

L'application ServiceNow Threat Intelligence dispose d'une table core_company qui stocke les informations sur les fournisseurs de l'entreprise. Ce plugin fournit un mécanisme permettant d'envoyer les données d'application du locataire Netskope vers la table Companies (core_company) pour l'analyse des risques. Ce plugin nécessite un compte ServiceNow ayant accès à la table Companies (core_company).
Conditions préalables
Pour compléter cette configuration, vous avez besoin de :
- Un locataire Netskope (ou plusieurs, par exemple des instances de production et de développement/test).
- A Netskope Cloud Exchange instance with the Netskope Tenant and Risk Exchange module already configured.
- Un abonnement à Secure Web Gateway pour le partage d'URL.
- Une instance de ServiceNow avec un accès administrateur.
- Connexion à l'hôte suivant : https://ven02207.service-now.com/.
Workflow
- Create a ServiceNow user.
- Configurez le plugin ServiceNow pour Application Risk Exchange.
- Partage de configuration pour le plugin ServiceNow.
- Validez le plugin ServiceNow.
Pour visionner une démonstration, cliquez sur "play".
Create a ServiceNow User
- Connectez-vous à votre instance ServiceNow.
- Aller à System Security > Users and Groups > Users.
- Click New.

- Remplissez les informations requises et assurez-vous de copier le User ID. Cliquez sur Submit.
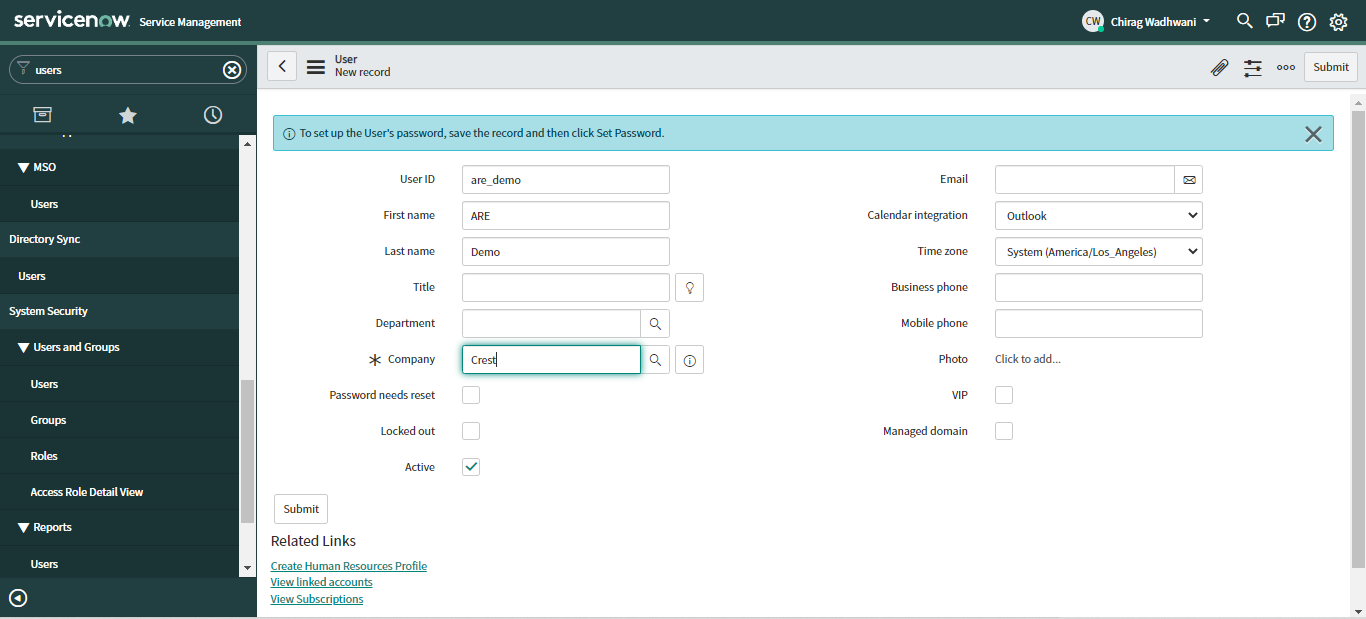
- Après avoir soumis l'utilisateur, ouvrez sa fiche pour définir son mot de passe et ses rôles. Cliquez Set Password.

- Click Generate to generate a new password, and make sure to copy the password.
- Click Save Password.

- Cliquez sur l’onglet Roles , puis Edit….

- Ajoutez le rôle user_admin . Cliquez Save.

L'utilisateur doit avoir le rôle d'administrateur.
Configure the ServiceNow Plugin for Application Risk Exchange
- Dans Cloud Exchange, allez à Settings > Plugins
- Recherchez et sélectionnez la boîte ServiceNow (ARE) pour ouvrir les pages de création de plugins.

- Sur la page Informations de base, entrez un nom de configuration.

- Cliquez sur Next.
- Saisissez l'URL de votre Instance ServiceNow.

- Enter your Username and Password obtained while creating a ServiceNow user.
- Cliquez sur Next.

- Select les informations de cartographie. Par exemple,
Name == Vendor. - Cliquez sur Save.

Configurer le partage pour le plugin ServiceNow
- Dans Application Risk Exchange, accédez à Sharing.

- Cliquez sur Add Sharing Configuration.
- Dans la première boîte déroulante de Configuration de la source, choisissez Netskope.
- Select an appropriate Business Rule from second drop down.
- In the third drop down box of Destination Configuration, select the ServiceNow plugin you created previously.

- Cliquez sur Save.

Configurer le partage automatique pour le plugin ServiceNow
- Le partage automatique sera déclenché toutes les 30 minutes après la configuration du plugin Netskope ARE.
- Le partage automatique partagera toutes les applications mises à jour après l'exécution de la tâche de partage automatique précédente.
- If the sharing is configured within 30 minutes of configuring Netskope ARE plugin, then all the applications that are stored will be shared in automatic sharing.
Note
If the sharing is not configured within 30 minutes, the user will have to share the existing data manually for the first time and then can rely on the automatic sharing.
Configurer le partage manuel pour le plugin ServiceNow
- Click on the Sync button to set the time period of sharing applications.
- Add a time period in days.

- Click on the Sync button to share the applications.
Valider le plugin ServiceNow pour l'échange de risques applicatifs
Pour valider le partage des données de l'application entre Netskope et ServiceNow, procédez comme suit :
- Connectez-vous à votre instance ServiceNow.
- Go to the Companies table by typing companies in the Filter Navigator, and then select Companies under User Administration.

- Allez dans l'entreprise qui a été mise à jour.
- Consultez la section Notes pour obtenir les détails du locataire Netskope.
