

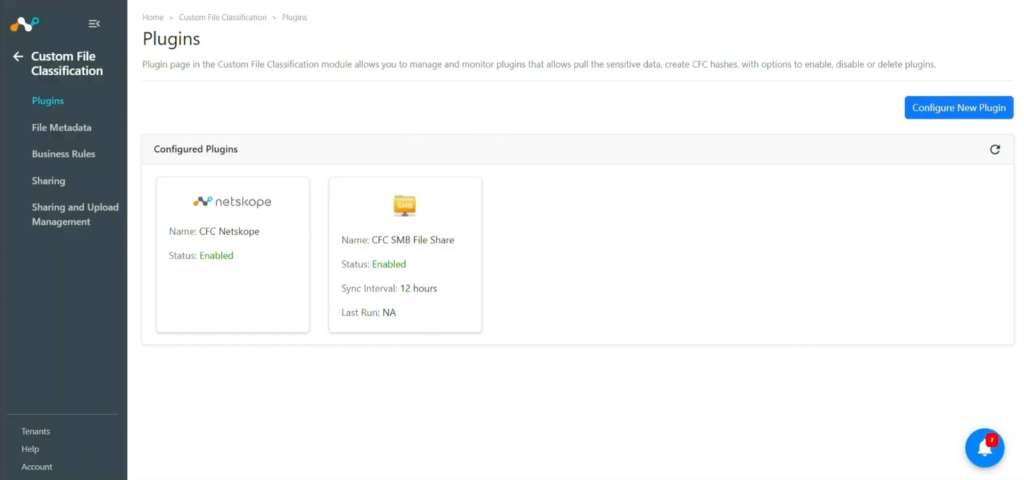
This document explains how to configure the SMB File Share v1.0.0 plugin with the Custom File Classification (CFC) module of the Netskope Cloud Exchange platform. This plugin is used to pull images or zip files from provided directories present on a remote SMB server. The plugin supports the SMB protocol version from SMB 2.0.2 to SMB 3.1.1.
Conditions préalables
Pour compléter la configuration, vous devez
- Un locataire Netskope (ou plusieurs, par exemple des instances de production et de développement/test) qui est déjà configuré dans Cloud Exchange.
- A Custom File Classifier on your Netskope tenant.
- A Netskope Cloud Exchange tenant with the Tenant plugin and Custom File Classification plugin already configured.
- Server with SMB setup and access with SSH service enabled to pull files.
SMB File Share Plugin Support
This plugin is used to pull images or zip files from provided directories present on a remote SMB server. The plugin supports the SMB protocol version from SMB 2.0.2 to SMB 3.1.1.
| Fonction | Support |
|---|---|
| Pull | Yes (.bmp, .dib, .jpeg, .jpg, .jpe, .jp2, .png, .webp, .avif, .pbm, .pgm, .ppm, .pxm, .pnm, .pfm, .sr, .ras, .tiff, .tif, .exr, .hdr, .pic, .zip, .tgz) |
| Push | Non |
Note
We have validated pulling following types of files: .bmp, .dib, .jpeg, .jpe, .jp2, .png, .webp, .sr, .ras, .tiff, .tif, .exr, .hdr, .pic, .zip
Permissions
This permission is needed for the plugin configuration: SSH User should have read access for the provided files.
Détails de l'API
Liste des bibliothèques utilisées
This plugin uses Python libraries to establish secure connections to Linux servers and transfer files via SMB protocol.
Library: smbclient – SMB file sharing library for Python
Usage: smbclient is a Python library that enables interaction with SMB network shares, allowing applications to access remote file systems as if they were local. The plugin uses smbclient to establish secure connections to shared folders on remote servers, authenticate using credentials, and perform file operations such as reading, writing, uploading, and downloading files. smbclient provides high-level abstractions for file handling along with support for authentication, session management, and seamless integration with SMB protocol features.
Créer une connexion client SSH
From ..lib import smbclient
Créer un client SFTP
smbclient.register_session(
server,
username=configuration.get("smb_username"),
password=configuration.get("smb_password"),
port=configuration.get("smb_port", 445))
Télécharger un fichier CSV à partir d'un serveur Linux
with smbclient.open_file(
remote_file_unc_path,
"rb"
) as remote_file:
with open(image_file_path, "wb") as file_object:
shutil.copyfileobj(remote_file, file_object)
Vérifier l'existence et les autorisations des fichiers
try:
    file_stat = sftp_client.stat(self.csv_file_path)
    file_size = file_stat.st_size
    file_permissions = file_stat.st_mode
except FileNotFoundError:
    # Handle file not found error    pass
Connexions étroites
smbclient.reset_connection_cache()
Matrice de performance
Here is the performance reading conducted for fetching and storing 10K Files metadata ( ~5.4 MB each file size and total file size is ~52.5 GB) on a Large Cloud Exchange instance with these specifications.
| Description | Spécifications |
|---|---|
| Détails de la pile | Taille : Grande RAM : 32 GB CPU : 16 cœurs |
| Files metadata fetched from SMB File Share | ~ 159,000 MB/hour ~ 29,500 Files/Hour (each file of ~5.4 MB) |
Note
For CE instance disk space, refer to this documentation.
Workflow
- Get a shared path from the SMB Server.
- Configure the SMB File Share CFC plugin.
- Configure a Business Rule for SMB File Share.
- Configure Sharing for SMB File Share.
- Validation for SMB File Share CFC Plugin.
Regardez une vidéo
Cliquez ici pour regarder une vidéo.
Get Shared Directory from the SMB Server
SMB Server hosted in Windows
-
Run PowerShell as Administrator.
-
Run this command in the PowerShell:
Get-SmbShare
Example Output:
Name	ScopeName	    Path
—--	 	---------		----
ADMIN$	*		        C:\Windows
C$		*         		C:\
MyShare	*         		C:\SMBShare
What It Means:
- Name: Share name
- Path: Actual folder location
- Shares ending with $ (like C$, ADMIN$) are hidden administrative shares
SMB Server hosted in Linux
-
Samba shares are defined inside
/etc/samba/smb.conf -
In Linux terminal, run:
testparm -s -
Look for sections like:
[shared]
path = /srv/samba/shared -
Every section below [global] is a shared folder.
[Documents]
    path = /home/devuser/docs
This means:
- Share name: Documents
- Actual folder:
/home/devuser/docs
SMB Server hosted in Isilon
-
Log in to the OneFS Web UI.
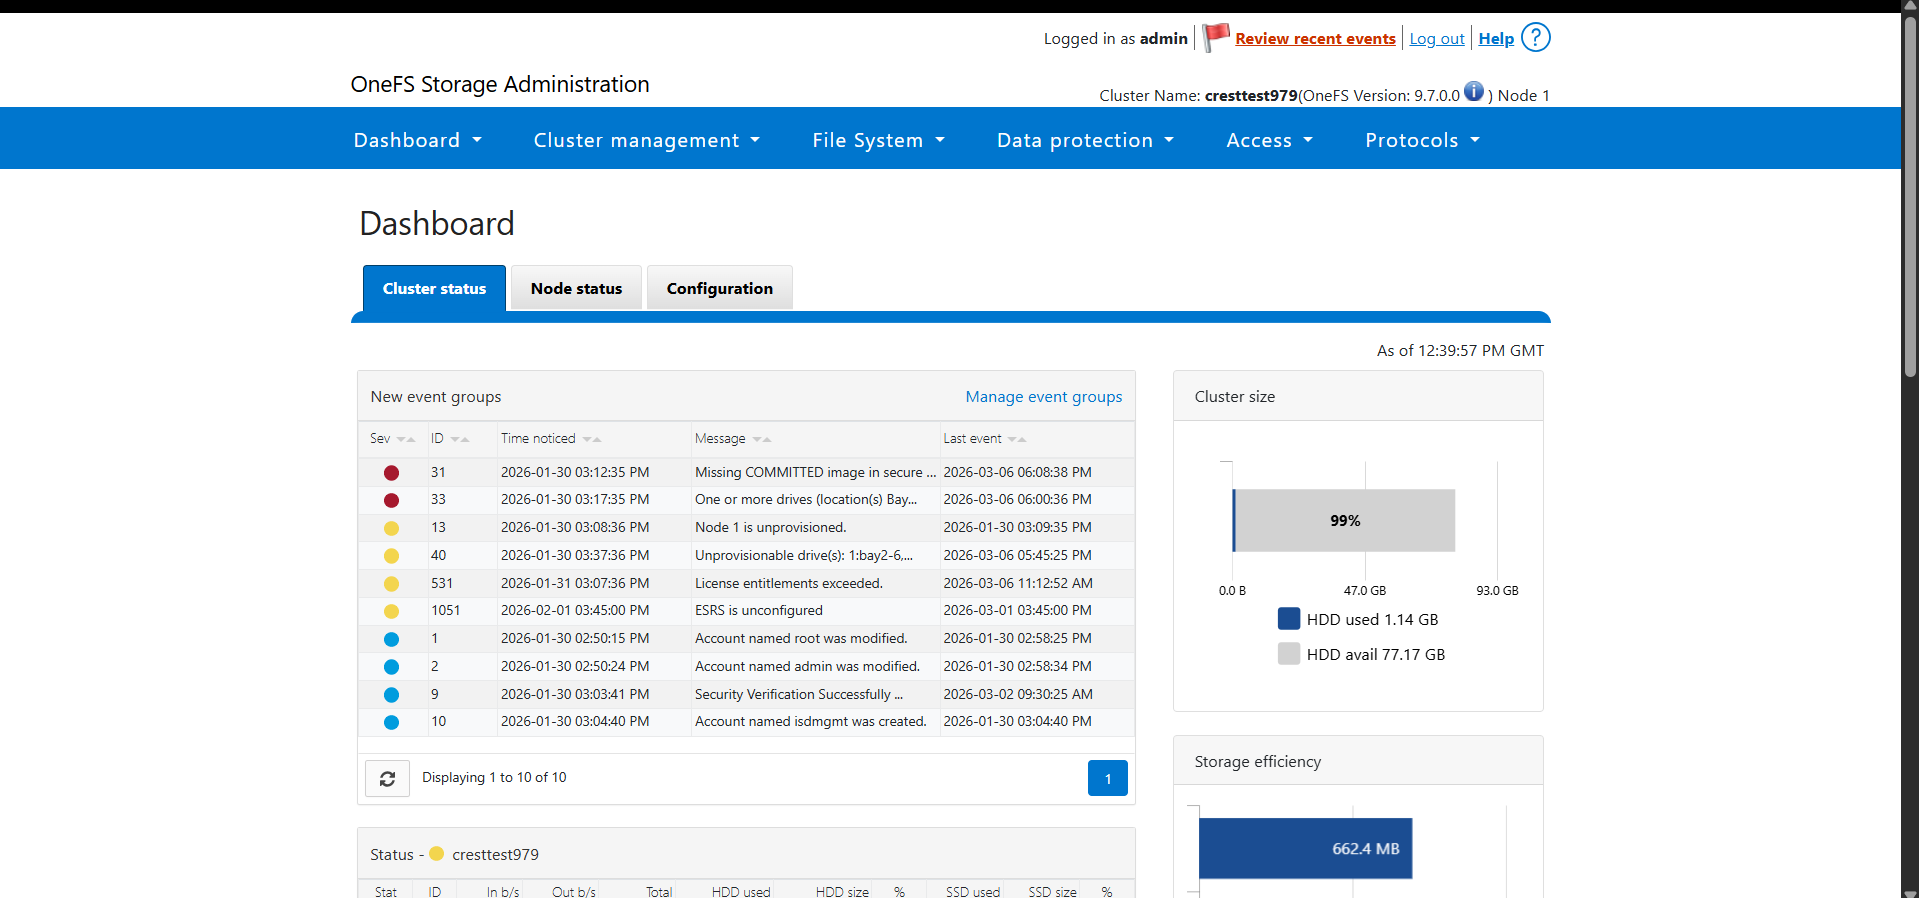
-
Allez à Protocols et sélectionnez SMB.
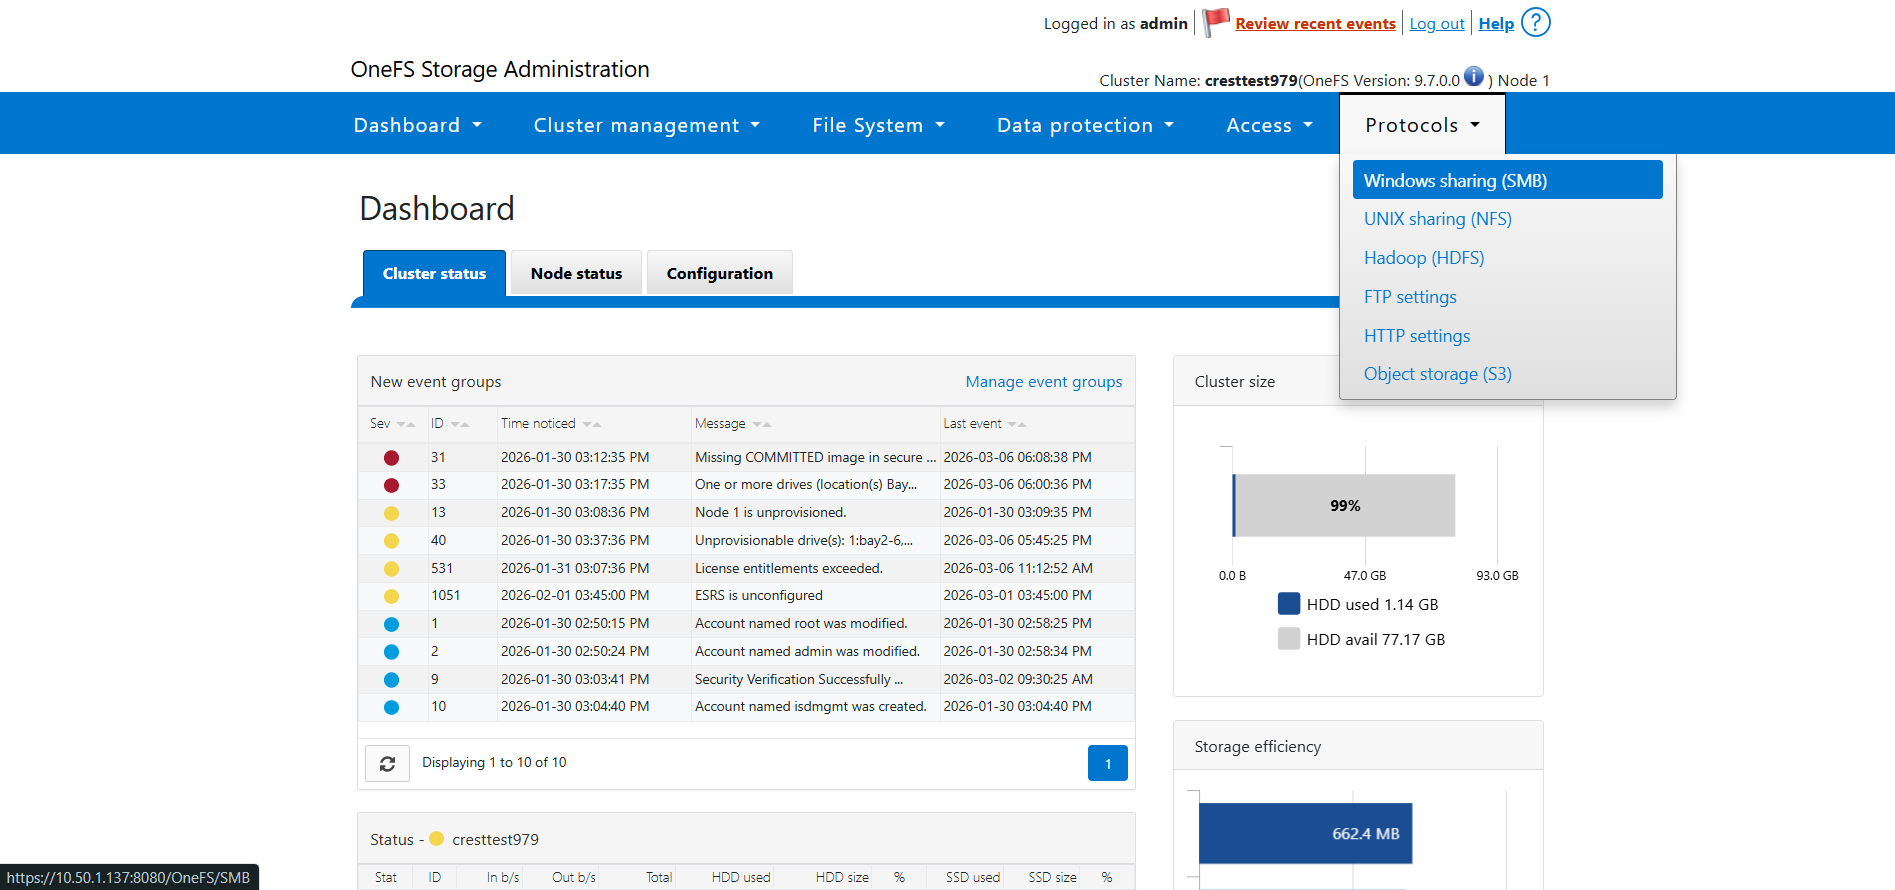
-
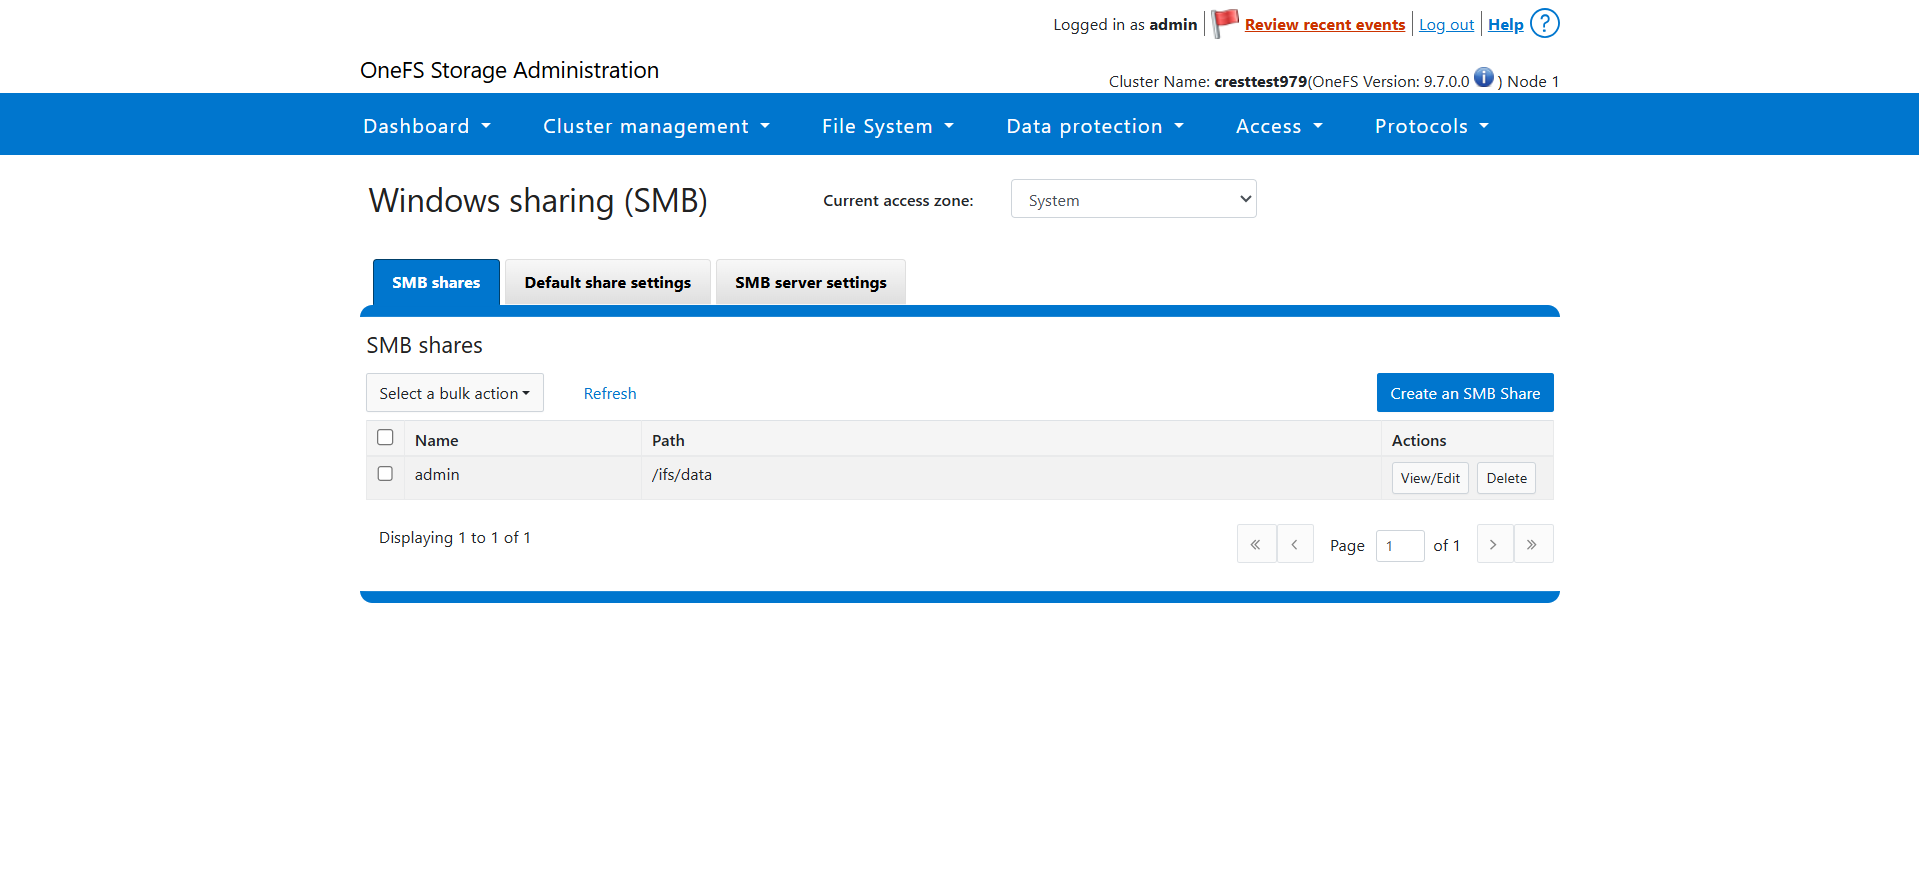
Open the Shares section.
-
You will see a list of configured SMB shares.
-
Look at the Path column. This shows the actual filesystem directory (usually under
/ifs) that is shared via SMB.Example table:
Share Name		Path
test-share		/ifs/data/test
Finance /ifs/data/finance -
The Path value (
/ifs/...) is the directory being shared.
Setup for Kerberos when using a Domain Name/FQDN instead of an IP Address
-
Install Kerberos Utilities Inside Core Container
- Access the core container:
docker exec -it -u0 <core-container> bash
- Install Kerberos packages.
- Ubuntu/Debian: apt update && apt install -y krb5-user smbclient
- RHEL/CentOS: yum install -y krb5-workstation samba-client
-
Configure Kerberos (krb5.conf)
- Create or update: /etc/krb5.conf
- Add realm configuration:
[realms]
   EXAMPLE.COM = {
       kdc = dc01.example.com
       admin_server = dc01.example.com
   }

[domain_realm]
   .example.com = EXAMPLE.COM
   example.com = EXAMPLE.COM
Note
- Realm must usually be uppercase.
- KDC should point to the domain controller.
- DNS resolution must work correctly inside the container.
- Replace these values:
Placeholder Replace With EXAMPLE.COM Your AD/Kerberos realm dc01.example.com Your Domain Controller / KDC hostname example.com Your domain -
Update the docker-compose.yml file.
- Edit the docker-compose.yml file and add extra_hosts in core service:
services:

 core:

   extra_hosts:

     - "<domain/FQDN>:<IP>"
-
Restart Cloud Exchange, and then configure the plugin with a domain name/FQDN of your SMB Server.
sudo ./stop && sudo ./start
Configure the SMB File Share CFC Plugin
-
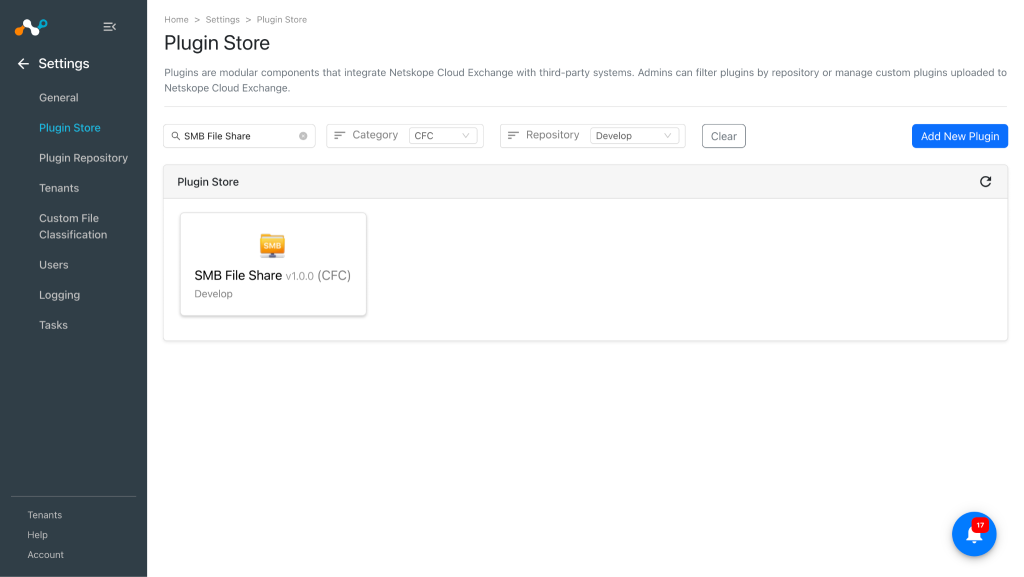
Dans Cloud Exchange, accédez à Settings > Plugin Store.
-
Recherchez et sélectionnez le plugin SMB File Share v1.0.0 (CFC).
-
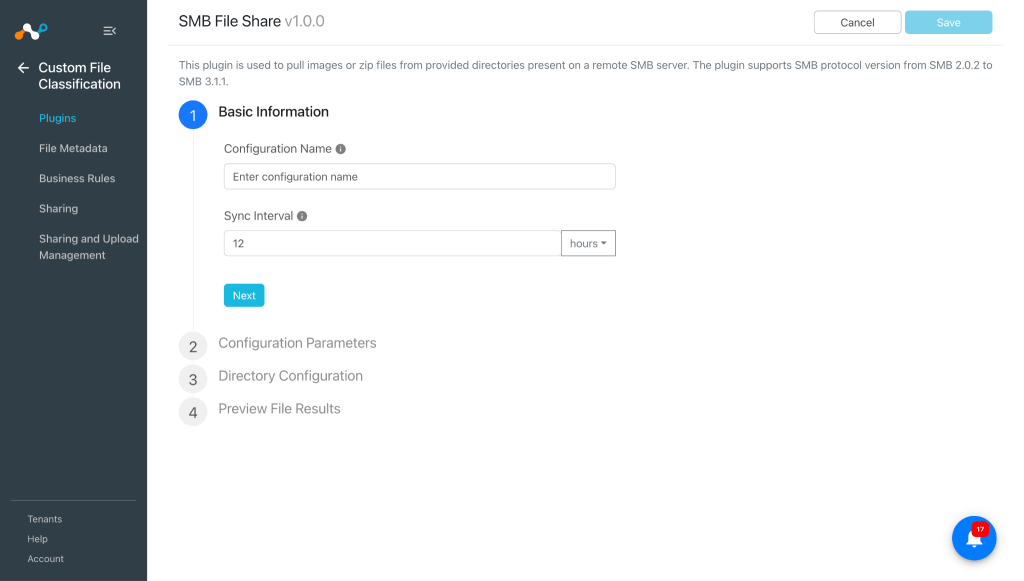
Saisissez les informations de base :
- Configuration Name: Enter a name appropriate for your integration.
- Sync Interval: Interval to pull the data from plugin source. We recommend keeping it longer than 12 hours. (Default: 12 hours)
-
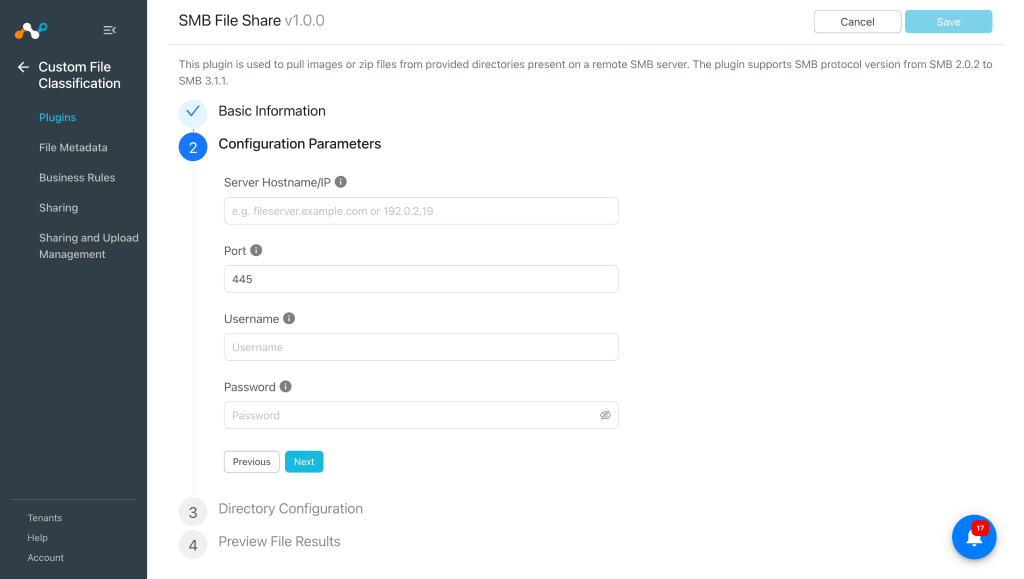
Click Next and enter the Configuration Parameters:
- Server IP/Hostname: Hostname or IP address of the SMB server from which the files are to be pulled.
- Username: Username of the remote machine which has read access to shared directories.
- Password: Password for the provided username.
- Port: TCP port for SMB connection (default 445).
-
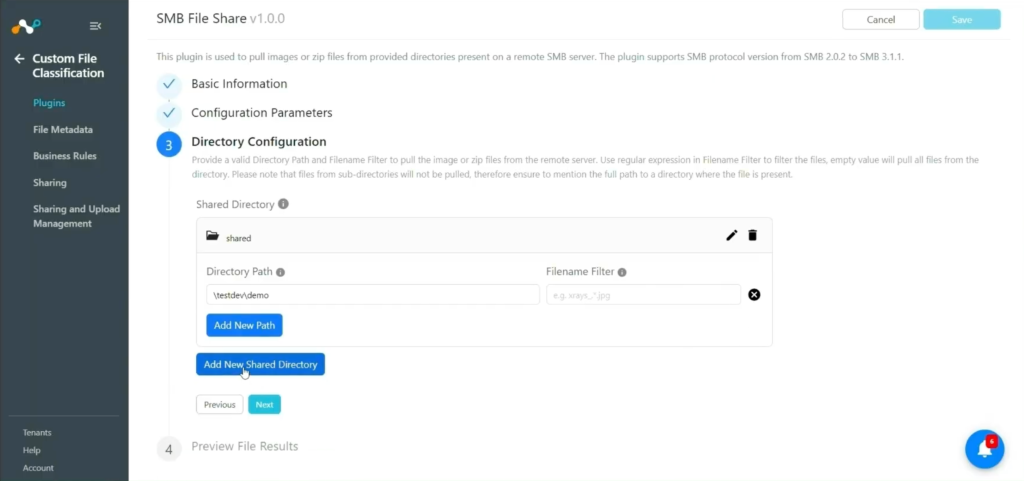
Click Next and enter the Directory Configuration parameters:
You can add multiple directories in the SMB File Share Plugin.
- Shared Directory: Name of the shared directory. Ensure that this directory name is present in the Network Path of the shared directory.
- Directory Path: Path of the directory from which the files are to be pulled. This path must be relative to the shared directory.
- Filename Filter: Regular expression that filters the files to be pulled based on their filenames. Ensure that the filter is a valid regular expression. If left empty, all files from the directory will be retrieved.
- Valeur vide, extrait tous les fichiers du répertoire.
- Le filtre n'extraira que les images stockées immédiatement dans le répertoire.
-
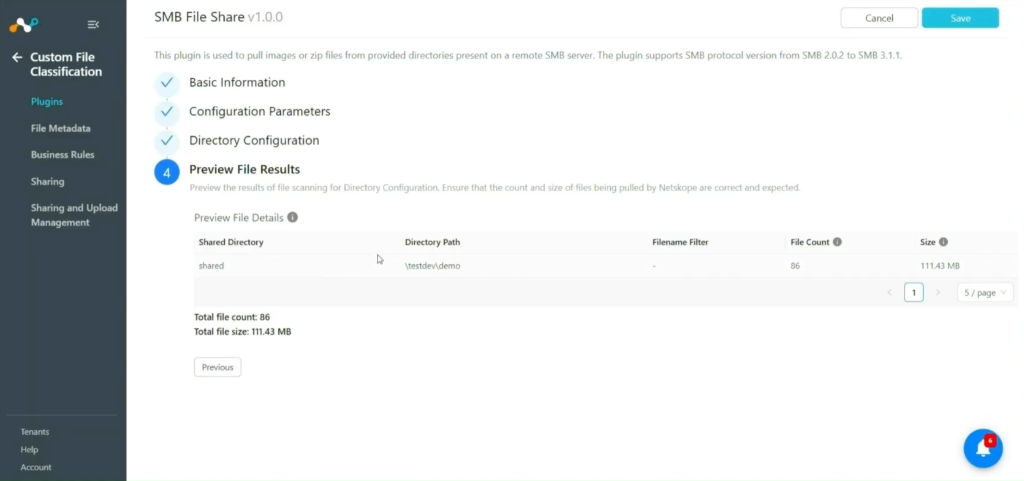
Cliquez sur Next et prévoyez les résultats de l'analyse des fichiers pour le répertoire configuré. Assurez-vous que le nombre et la taille des fichiers extraits par le plugin sont corrects et ne dépassent pas la limite du nombre total de fichiers (10 000) et la limite de la taille totale des fichiers (~78,125 Go).
-
Cliquez sur Save.


Configure a CFC Business Rule for SMB File Share
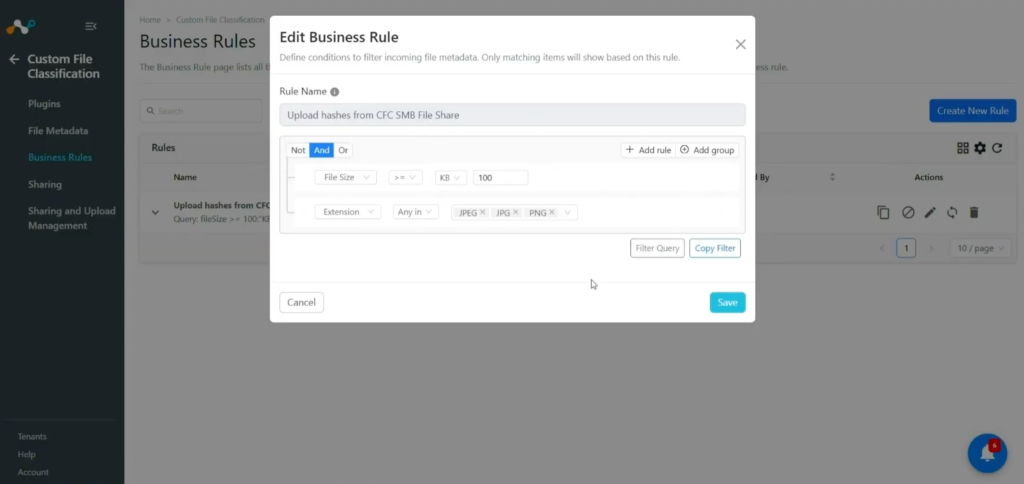
Le module Custom File Classification nécessite des règles commerciales pour partager des données de fichiers avec le locataire Netskope. Un utilisateur peut ajouter des règles pour filtrer les fichiers par nom, taille, extension, source, etc. Plusieurs règles peuvent être regroupées pour un filtrage avancé.
-
Allez sur Custom File Classification > Business Rules.
-
Cliquez sur Create New Rule et entrez ces paramètres :
- Rule Name: A unique name for the business rule.
- Rule: Set a filter based on conditions to make a group of files.
- Folder Name: Provide a folder or sub-folder name to group multiple business rules. It will help to see a structured list of business rules in the table.
-
Cliquez sur Save.

Configure Risk Exchange Sharing for SMB File Share
-
Allez sur Custom File Classification > Sharing.
-
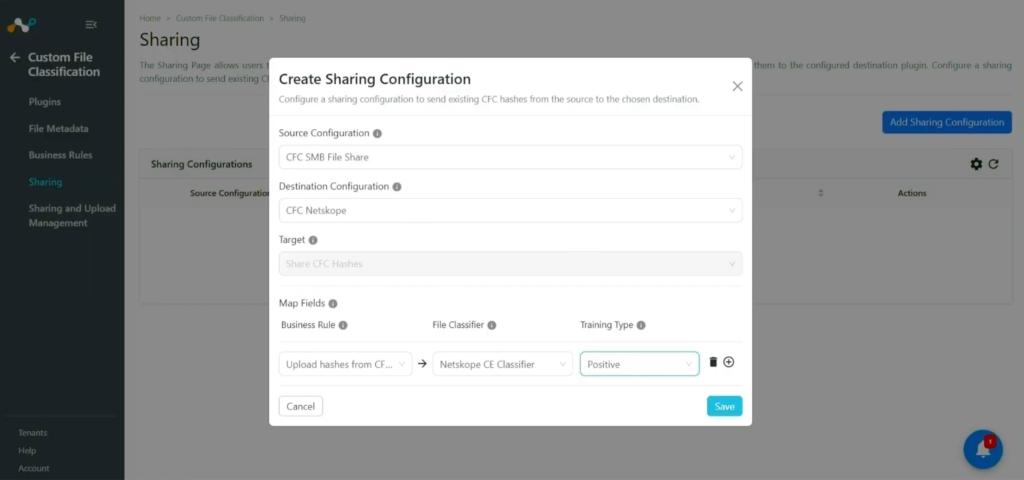
Click Add Sharing Configuration and select the SMB File Share CFC plugin as the Source Configuration.
-
Select le plugin Netskope CFC comme configuration de destination.
-
La cible est sélectionnée par défaut, en fonction de la configuration de la destination.
-
Select a Mapping for Business Rule, File Classifier, and Training Type. Un utilisateur peut appliquer plusieurs règles de gestion en un seul partage. Le classificateur de fichiers ne répertorie que les classificateurs de fichiers personnalisés créés sur le site Netskope.
-
Cliquez sur Save.

Synchroniser ou supprimer une configuration de partage
- Synchronisez la configuration de partage en cliquant sur l'icône de synchronisation. Le processus de partage démarre ainsi immédiatement, sans attendre le déclenchement de l'événement proprement dit.
- Supprimez la configuration de partage en cliquant sur l'icône de la poubelle.
Note
If multiple Destination Configurations use the same Source Configuration, clicking Sync on one will start syncing for all of them. This happens because they all share the same source.
Validate the SMB File Share CFC Plugin
Note
Cloud Exchange ne stocke que temporairement les données sensibles tirées jusqu'à ce que le processus de génération de hachage et de téléchargement soit terminé. Ensuite, les fichiers stockés sont automatiquement supprimés.
Valider le retrait
After the Sharing is configured, you should wait until the next plugin lifecycle run of the configured SMB File Share CFC plugin gets executed successfully.
Validez le statut du plugin SMB File Share sur la page Partage et Gestion du Téléchargement . Va sur Custom File Classification > Sharing and Upload Management.
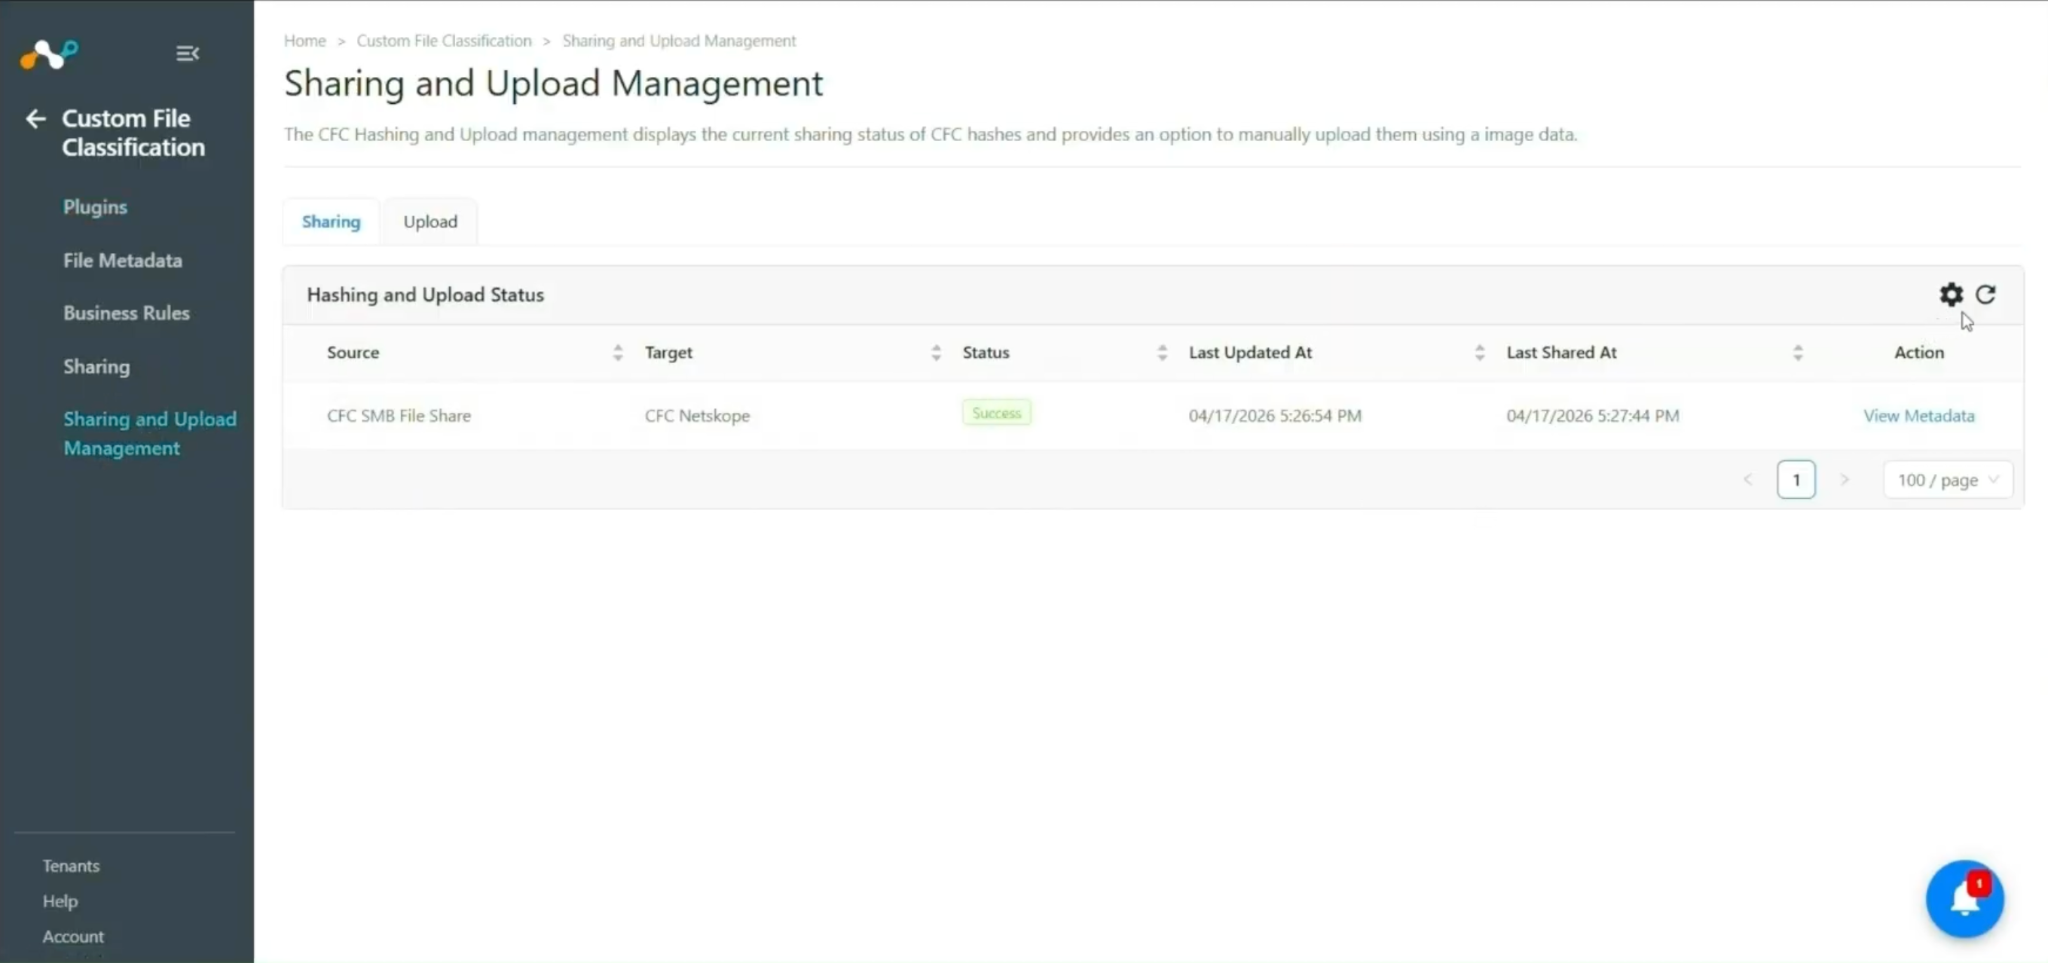
L'état de la configuration du partage peut être
- Scheduled: This represents that the sharing is configured, but it is still in the queue and waiting to run for the first time.
- Generating Hash: Cela signifie que le processus de génération d'un hachage est en cours.
- Uploading Hash: This represents that the hash is generated successfully, and the process of sharing it to the configured destination is in progress.
- Completed: This indicates that the generated hash is successfully shared with the destination configuration.
- Failed: Indicates that the process failed in either pulling data, hashing data, or uploading the hash.
Clicking View Metadata will redirect you to the Files Metadata page.
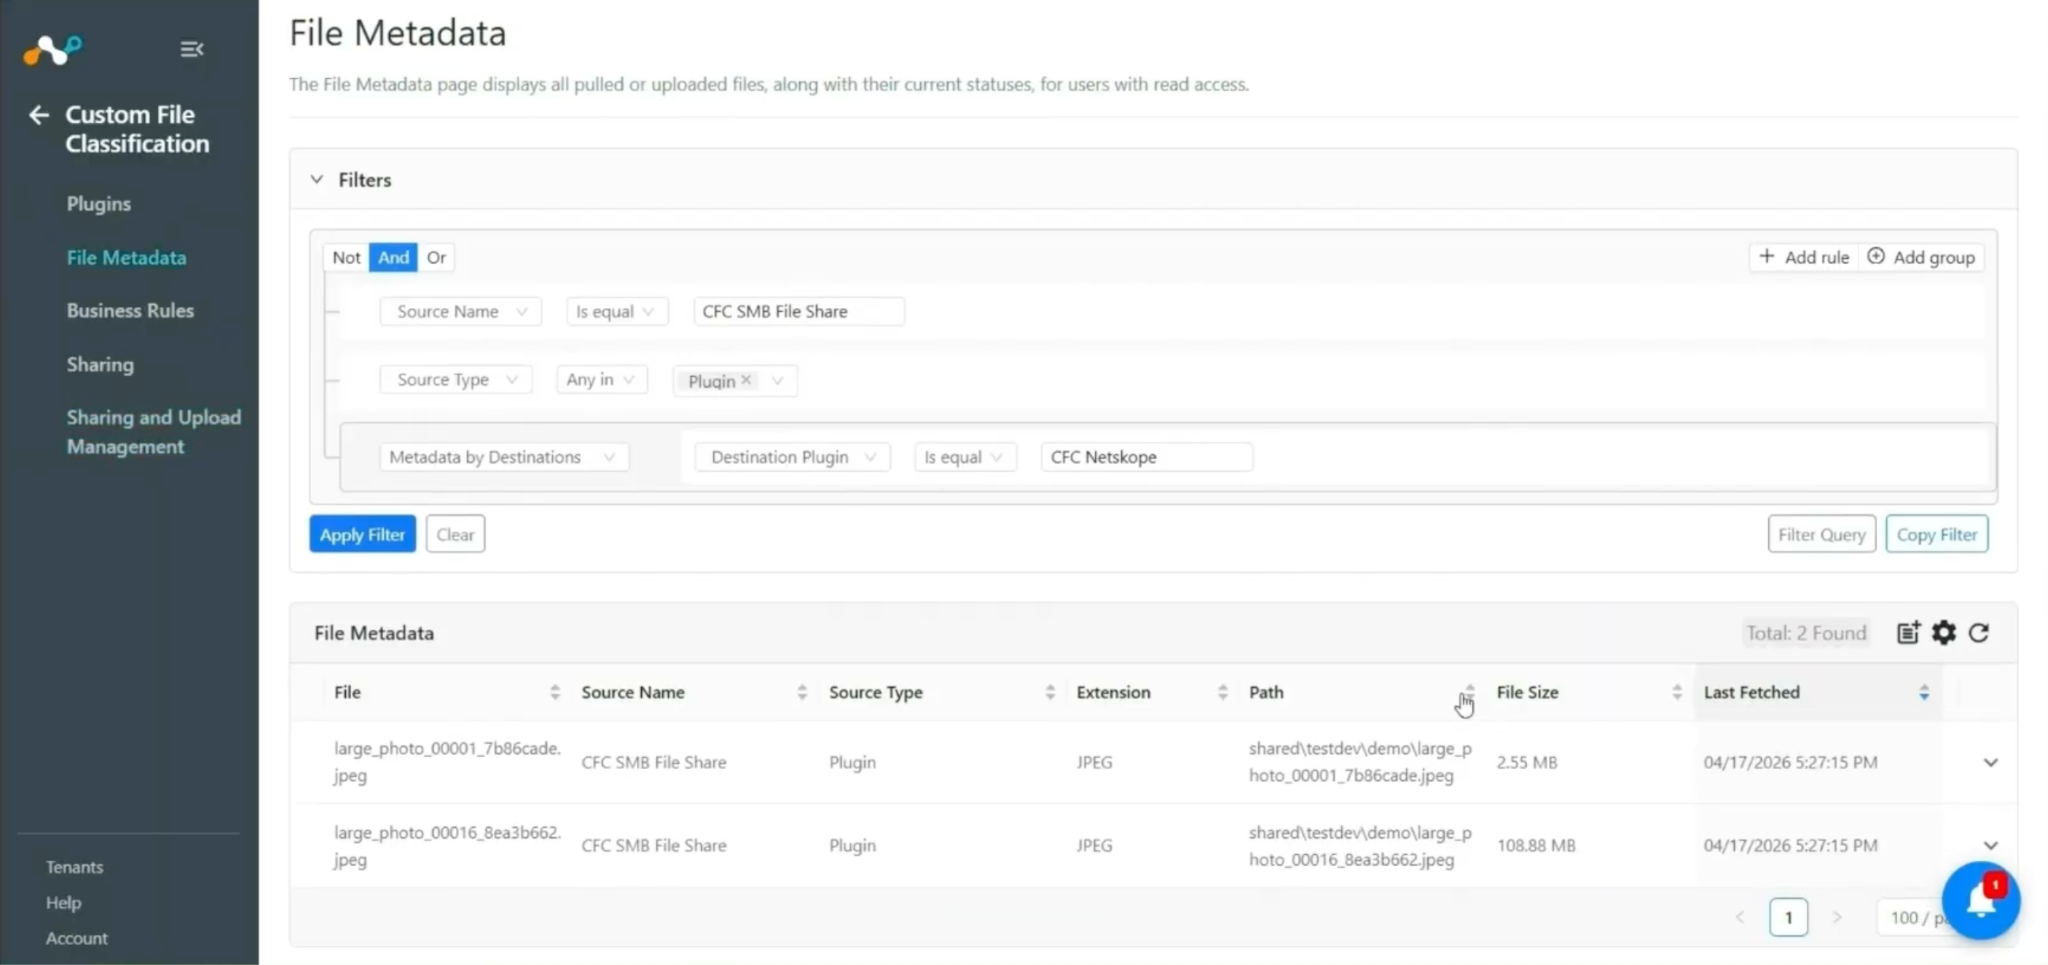
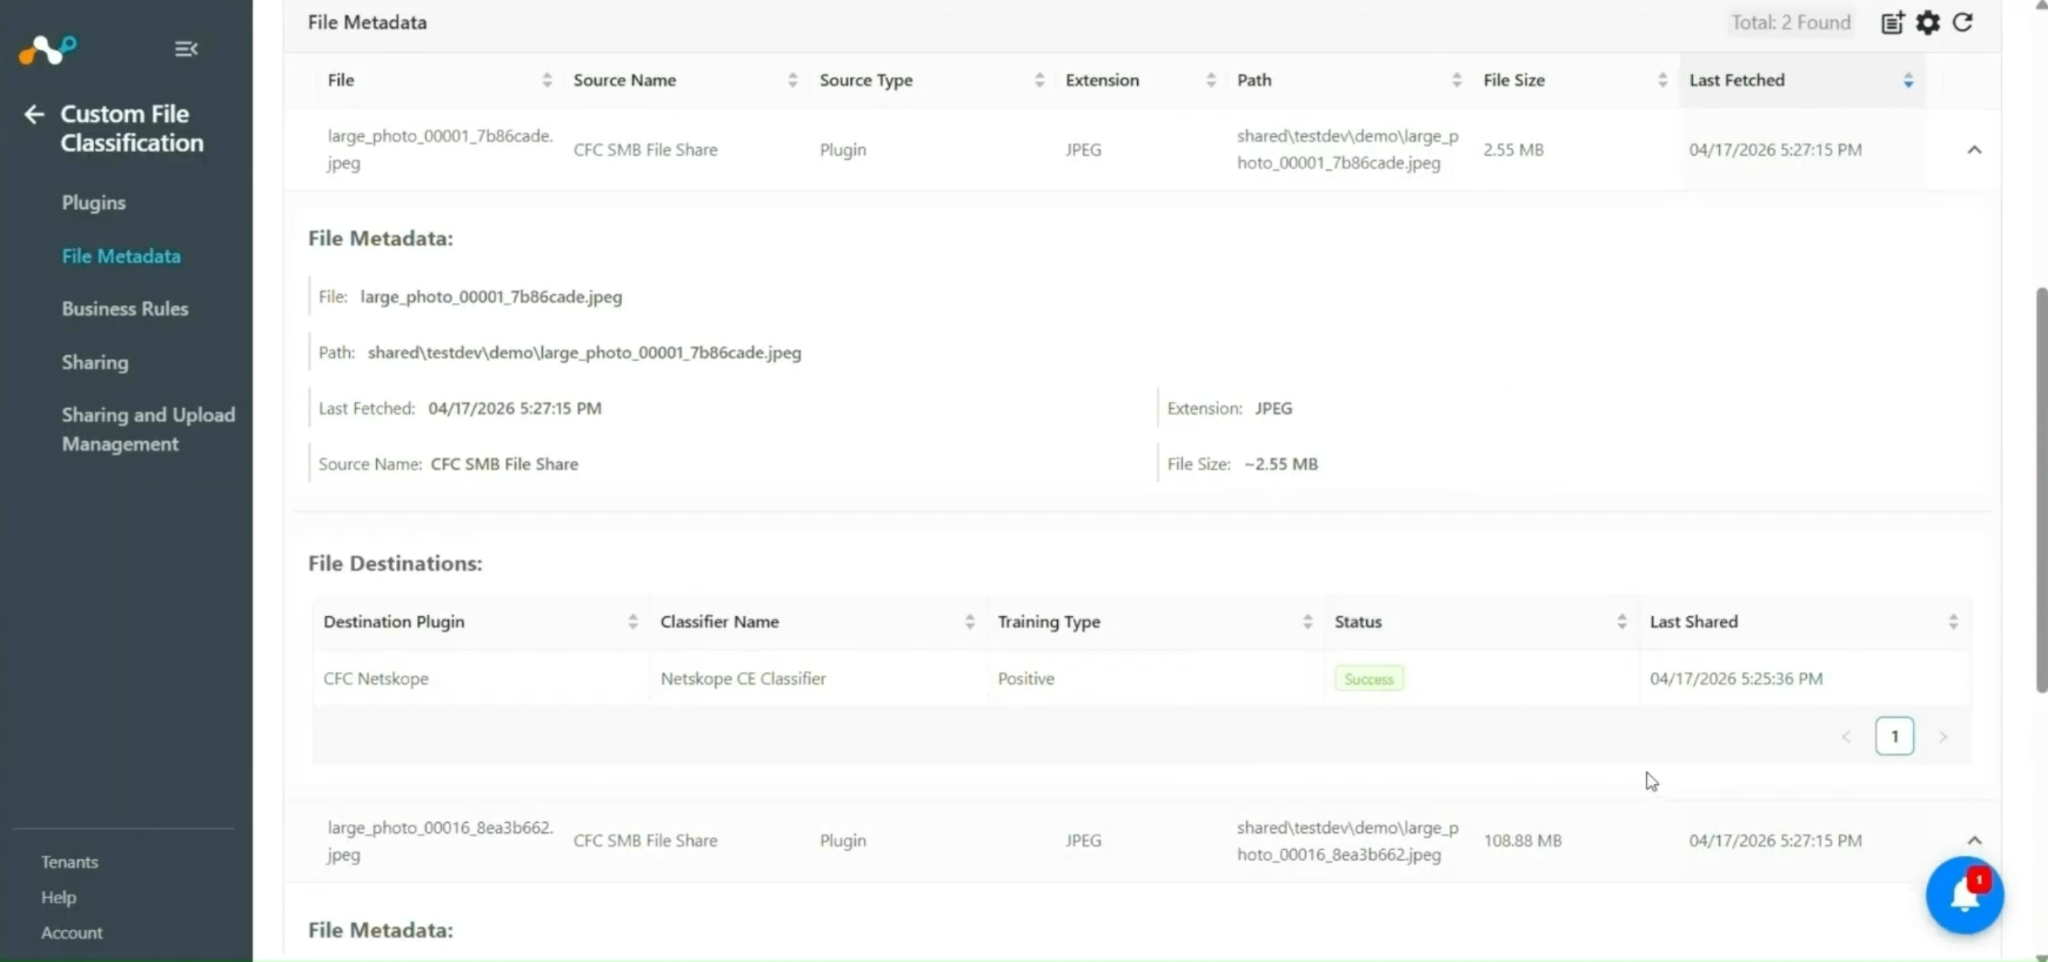
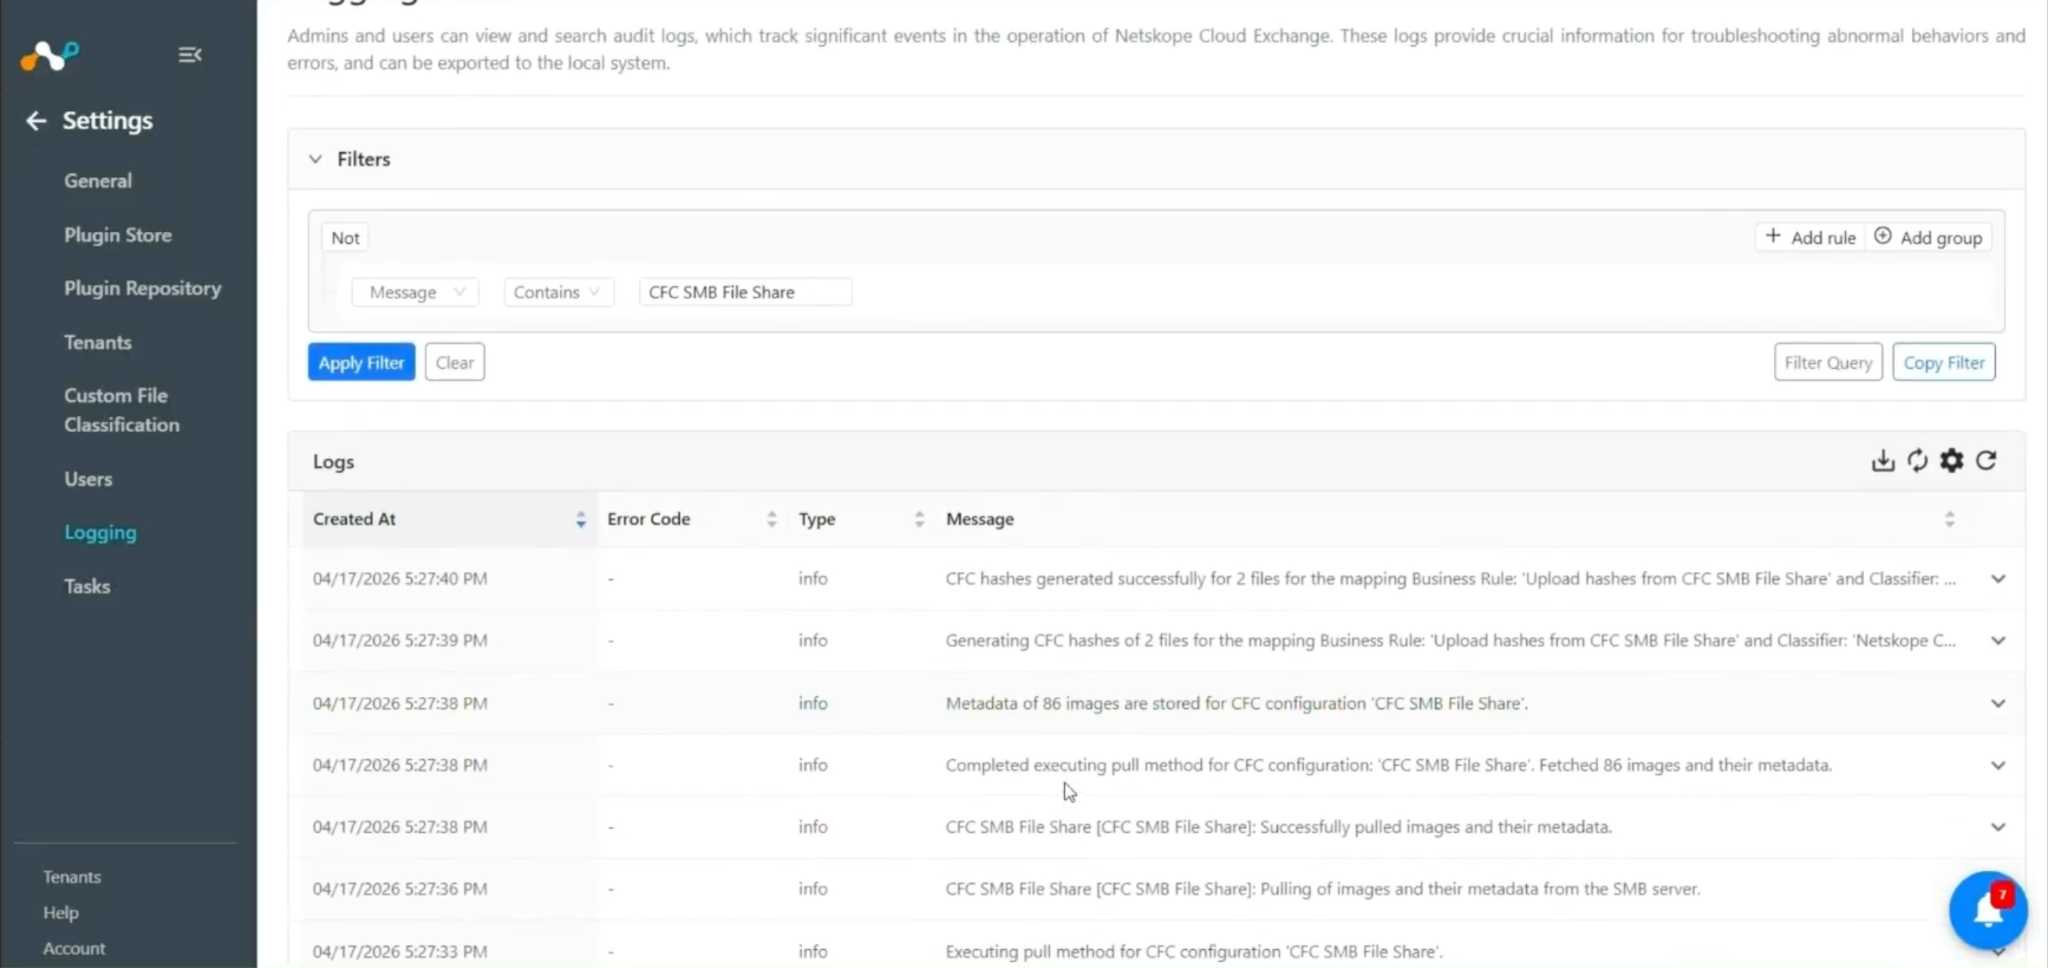
Pulling can be verified on Logging page in CE:
Validate Sharing on the Netskope Tenant
-
Connectez-vous à votre locataire Netskope.
-
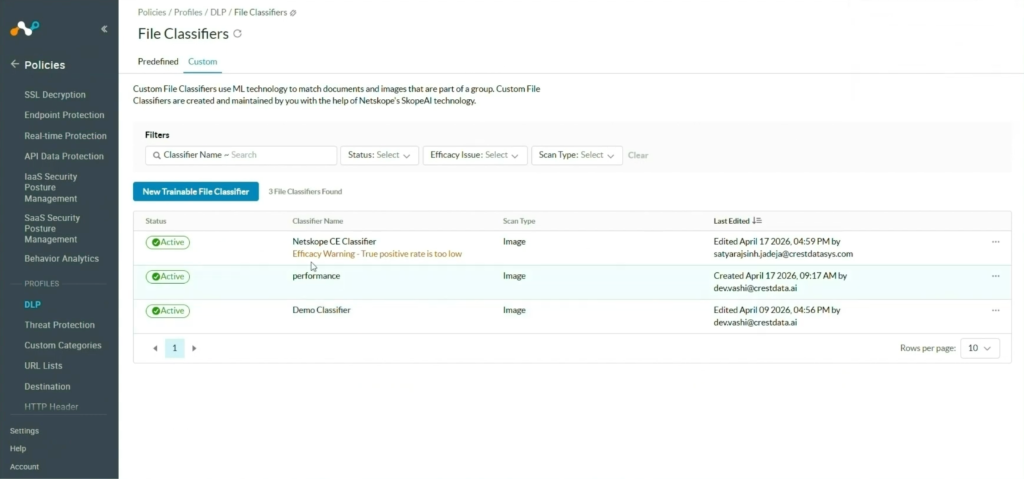
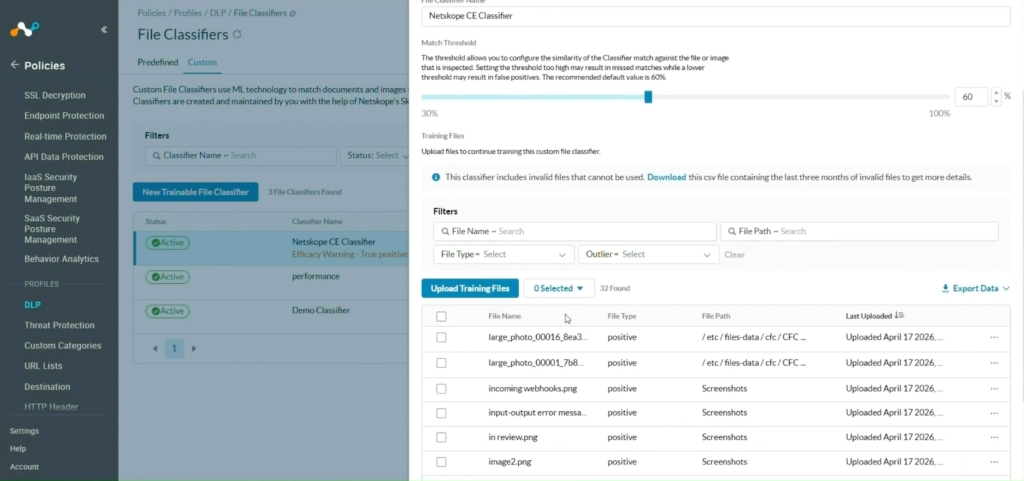
Aller à Policies > DLP > File Classifiers.

-
Select le classificateur que vous avez sélectionné lors de la configuration du partage, vous verrez les hachages de fichiers reçus ici :


Troubleshooting the SMB File Share Plugin
Unable to configure the SMB File Share CFC Plugin
Issue: If the user is unable to configure the SMB File Share CFC plugin, it may be due to one of these reasons:
- Des informations d'identification incorrectes ont été fournies.
- L'utilisateur n'a pas le droit de lire le fichier.
- Nom d'hôte/IP du serveur incorrect.
- The provided port value is disabled on the Server.
- Chemin d'accès au répertoire incorrect.
What to do: To solve these issues:
- Veillez à fournir les informations d'identification correctes.
- Assurez-vous que l'utilisateur dispose des autorisations requises pour lire le fichier.
- Assurez-vous que le nom d'hôte ou l'adresse IP du serveur est correct.
- Assurez-vous que le port est activé et qu'il est en mode d'écoute.
- Assurez-vous que les données du fichier image se trouvent dans le chemin d'accès fourni.