

To configure GitHub for the Next Generation API Data Protection, follow the instructions below. Before that, take a look at the following important notes about this integration:
-
Netskope can scan for DLP and threat protection on plain text source code only. Netskope does not scan binary files such as Microsoft Office docs, PDFs, images, executable files, and likes. Each section of a commit that includes any violations will result in a unique incident with a URL linking to that section of the commit. To view a DLP incident, navigate to Incidents > DLP, look for a GitHub incident, and click it.
-
If you have set up IP restrictions for your GitHub organization, make sure to allow requests from the installed Netskope CASB API app. This is necessary for Netskope to access your GitHub organization. To learn more: Allowing access by GitHub apps.
Alternatively, you may add the appropriate Netskope IP ranges to your organization as described in this article. For a list of Netskope IP address ranges, see NewEdge Consolidated List of IP Ranges for Allowlisting (requires a log in credential. If you do not have one, contact support@netskope.com.)
Prerequisite
Before configuring GitHub for the Next Generation API Data Protection, review the prerequisites.
-
You require a GitHub Enterprise Cloud edition.
Next Generation API Data Protection supports GitHub Enterprise Cloud with data residency edition. To learn more about this edition, see GitHub Enterprise Cloud with data residency. -
A GitHub account who is either a member or owner of your GitHub organization.
-
If you have guest or external users in your SaaS environment belonging to domains considered internal, you must set the appropriate internal domains for Netskope to classify exposure accurately. To set up internal domains, follow this article.
You can now configure two flavors of GitHub – Commercial (github.com) or GHE (ghe.com) with data residency.
Commercial (github.com) Onboarding
Install the Netskope CASB API App in GitHub
To install the Netskope CASB API app in the GitHub organization, follow the steps below:
-
Log in to www.github.com using your GitHub organization account.
-
Install the Netskope CASB API app from the following URLs:
-
Commercial: https://github.com/apps/netskope-casb-api
-
US FedRAMP: https://github.com/apps/netskope-casb-api-for-us-fedramp
-
Canada Federal PBMM: https://github.com/apps/netskope-casb-api-for-ca-pbmm
-
-
Click Install.
Screenshots below are from the Netskope CASB API app commercial version.
-
Select the organization name > All repositories and click Install.

 To know more about the permissions, see Permissions Required for GitHub.
Keep the installation options unchanged.


Once installed, you should see a successful message at the top of the page. Proceed to Configure GitHub Instance in Netskope UI.
GHE Onboarding
Next Generation API Data Protection supports GitHub Enterprise Cloud with data residency edition — GitHub’s dedicated cloud offering that runs on the *.ghe.com domain. This edition provides data residency guarantees and uses a fully isolated tenant environment per enterprise, with all user identities managed as Enterprise Managed Users (EMU) through an identity provider. To learn more about this edition, see GitHub Enterprise Cloud with data residency.
Unlike public GitHub (github.com), where Next Generation API Data Protection manages a shared GitHub App on your behalf, GitHub Enterprise Cloud with data residency requires you to create and install your own GitHub App on your GHE tenant before connecting to Next Generation API Data Protection. This is because each GHE tenant is isolated, and Next Generation API Data Protection cannot register a single shared app across all customer tenants.
Create a GitHub App
Create a GitHub app on your GHE tenant and configure the required permissions.
-
Log in to
https://<your-ghe-enterprise-name>.ghe.comas an organization owner. -
On the top-right, click the user profile icon, then click Settings.
-
On the left navigation, click <> Developer settings, then click New GitHub App.
-
GitHub App name: Enter a name of this GitHub app. For example:
netskope-api-data-protection. -
Homepage URL: Enter
https://www.netskope.com. -
Callback URL: Based on the account you are connecting, enter:
-
Commercial:
https://nso.goskope.com/common/oauthorize -
US FedRAMP:
https://nso.govskope.us/common/oauthorize -
Canada Federal PBMM:
https://nso.govskope.ca/common/oauthorize
Keep the Expire user authorization tokens checkbox checked.
-
-
Under Webhook, keep the Active checkbox checked, based on the account you are connecting, enter the Webhook URL:
-
Commercial:
https://casb-webhooks.netskope.io/v1/notifications/phoenix/github -
US FedRAMP:
https://casb-webhooks.govskope.io/v1/notifications/phoenix/github -
Canada Federal PBMM:
https://casb-webhooks.cagovskope.io/v1/notifications/phoenix/github
-
-
Secret: Generate a strong, random secret (for example, using
openssl rand -hex 32) and save it securely. You must provide the same value when integrating GitHub with Next Generation API Data Protection.The webhook secret configured here must exactly match the value entered in Next Generation API Data Protection. Next Generation API Data Protection uses this secret to validate the authenticity and integrity of incoming webhook payloads using HMAC-SHA256 signatures. -
Under SSL verification, ensure Enable SSL verification is selected.
-
Under Permissions, configure the following:
-
Repository permissions
Permission Access Level Administration Read and write Contents Read-only Metadata Read-only -
Organization permissions
Permission Access Level Administration Read-only Members Read-only
-
-
Under Subscribe to events, select Fork, Member, Membership, Organization, Push, Repository, Team.
-
Under Where can this GitHub App be installed?, select This enterprise. Click Create GitHub App.
You have successfully created a GitHub app. You will be greeted with a registration successful banner on the GitHub app’s setting page.
-
-
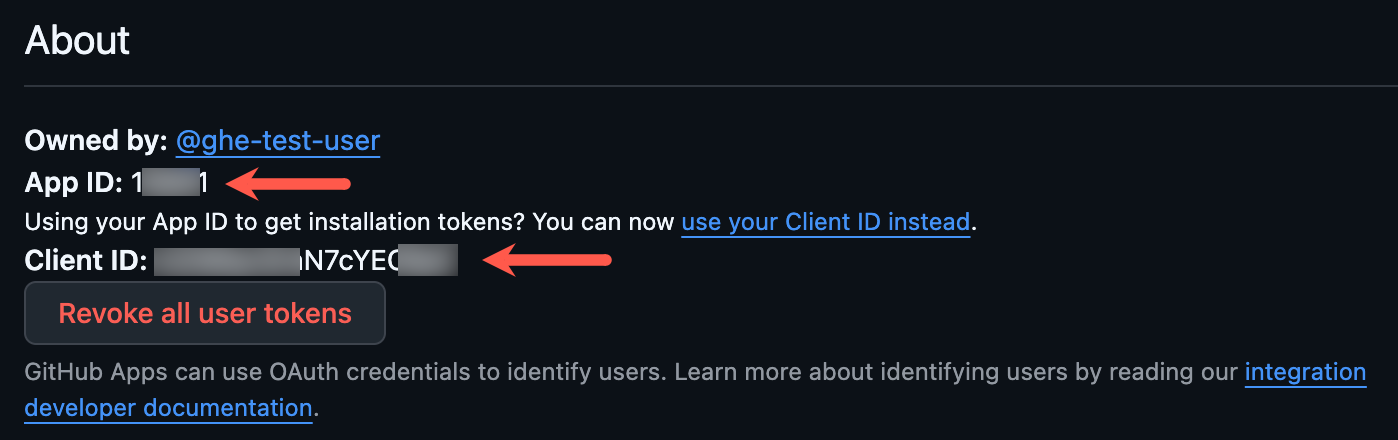
Note down the App ID and Client ID. These values are required when integrating GitHub with Next Generation API Data Protection.
-
Under Client secrets, click Generate a new client secret.
Make sure to copy the new client secret now. You cannot see it again. The client secret is required when integrating GitHub with Next Generation API Data Protection. -
Under Private keys, click Generate a private key.
The private key is downloaded as a.pemfile. Save this file securely, as its contents are required when integrating GitHub with Next Generation API Data Protection.
Install the GitHub App
Next, install the app on the target organization.
-
On the left navigation of the GitHub app setting page, click Install App.
-
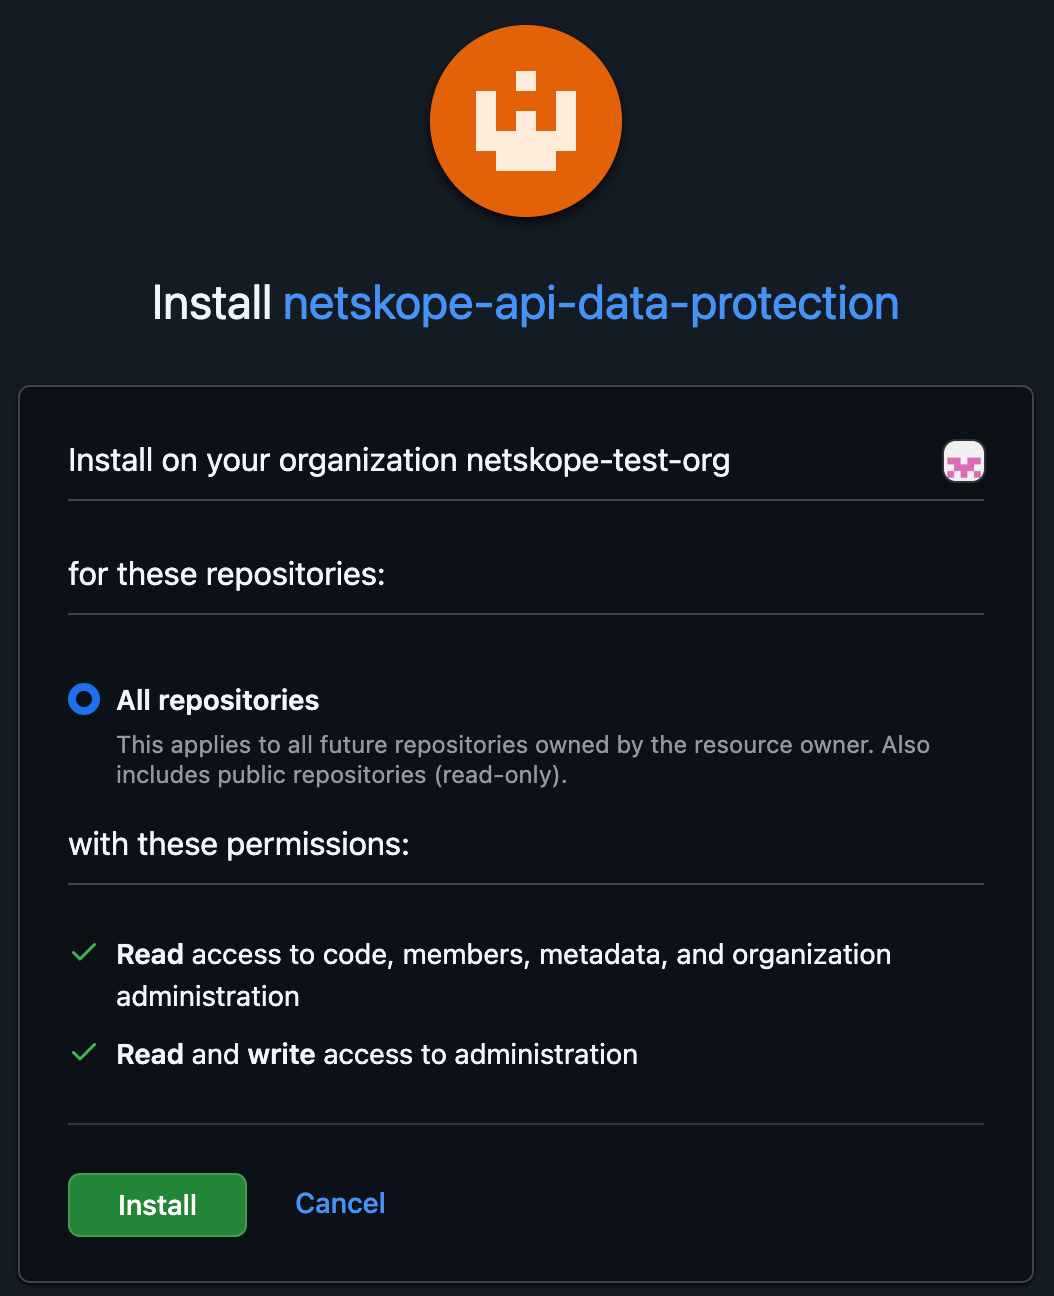
Identify the target organization and click Install.
-
Select All repositories and click Install.
Keep the following values handy:
-
GitHub host:
<your-ghe-enterprise-name>.ghe.com -
GitHub organization name: Name of the organization where the GitHub app is installed.
-
GitHub app client ID: As noted in step 4 above.
-
GitHub App client secret: As generated in step 5 above.
-
GitHub app ID: As noted in step 4 above.
-
GitHub app private key: As noted in step 6 above.
-
Webhook secret: As generated in step 3.5 above.
Proceed to Configure GitHub Instance in Netskope UI.
Configure GitHub Instance in Netskope UI
To authorize Netskope to access your GitHub instance, follow the steps below:
-
Log in to the Netskope tenant UI and go to Settings > Configure App Access > Next Gen > CASB API.
-
Under Apps, select GitHub and click Setup CASB API Instance.
The Setup Instance window opens.
-
Select the Environment.
Commercial (github.com)GHEEnter the following:
-
GitHub organization name: Name of the organization where the GitHub app is installed.
The organization name is case-sensitive.
Enter the following details:
-
GitHub host:
<your-ghe-enterprise-name>.ghe.com -
GitHub organization name: Name of the organization where the GitHub app is installed.
The organization name is case-sensitive. -
GitHub app client ID: As noted in step 4 of Create a GitHub App.
-
GitHub app client secret: As generated in step 5 of Create a GitHub App.
-
GitHub app ID: As noted in step 4 of Create a GitHub App.
-
GitHub app private key: As noted in step 6 of Create a GitHub App.
-
Webhook secret: As generated in step 3.5 of Create a GitHub App.
-
-
Under Administrator Email, enter the email address of the user who will receive an email notification when a policy violation or event triggers. This step is optional.
-
Under Instance Name, enter a name of the SaaS app instance. This step is optional and if left blank, Netskope will determine the name of the app instance post grant.
-
Click Grant Access. You will be prompted to log in with your GitHub member or owner of your GitHub organization username and password, and then click Sign In. Authorize the app.
When the configuration results page opens, click Close.
Refresh your browser, and you should see a green check icon next to the instance name.
Next, you can view the Next Generation API Data Protection Inventory page to get deep insights on various entities on your GitHub environment. Navigate to API-enable Protection > CASB API (NEXT GEN) > Inventory. The Inventory page lists the following entities from your GitHub environment:
-
Content Collection > Repository: This page displays a list of GitHub repositories.
-
Users: This page displays a list of GitHub users.
-
User Group: This page displays a list of GitHub teams/user groups.
For more information on the Inventory page, see Next Generation API Data Protection Inventory.
You can receive audit events and standard user behavior analytic alerts in Skope IT. To know more: Next Generation API Data Protection Skope IT Events.
Next, you should configure a Next Generation API Data Protection policy. To do so, see Next Generation API Data Protection Policy Wizard.
Important Notes for GitHub Policies
When configuring a Next Generation API Data Protection policy for GitHub, keep the following limitations and behaviors in mind:
-
Restrict Access to Internal Users action
This action only removes external collaborators from the repository.
-
Entity support
Next Generation GitHub policies currently apply only to commits pushed to a repository.
(Optional) Enable User IP Address in Audit Logs
To view the source IP address of GitHub users in Skope IT under Events & Alerts > Application Events, you must first enable source IP disclosure in your GitHub organization settings.
-
Log in to your GitHub account as a member or owner of the organization. Go to your organization’s landing page.
-
From the top navigation bar, select Settings.

-
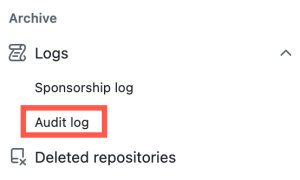
In the left sidebar, navigate to Archive > Logs > Audit log.
-
Click the Settings tab and select Enable source IP disclosure and click Save.
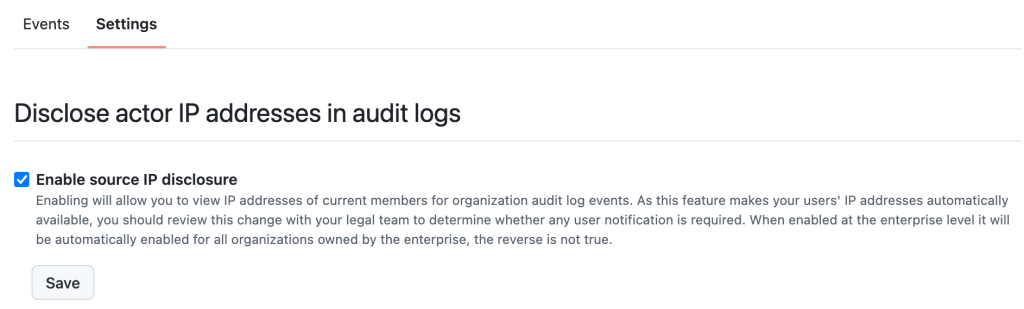


Once enabled, you can view the source IP address of each GitHub user in Skope IT > Events & Alerts > Application Events.

(Optional) Uninstall the Netskope CASB API App in GitHub
If you discontinue the integration between GitHub and Next Generation API Data Protection, first, you have to delete the GitHub instance from the Netskope tenant UI. Then, uninstall the Netskope CASB API app from GitHub.
You can uninstall the Netskope CASB API app. To uninstall the app, follow the steps below:
-
Log in to www.github.com using your GitHub administration username.
-
On the top-right, click Settings.

-
On the left navigation, click Organizations.
-
Identify the organization where you have installed the GitHub app and click Settings.
-
On the left navigation, click GitHub Apps.
-
Identify the GitHub app and click Configure.
-
Scroll down to the Uninstall <app name> section and click Uninstall.


Once you uninstall the app, Netskope stops receiving any notifications from GitHub.