

Windows Installation
Understanding Installation Methods
Before choosing a deployment method, review the differences between available options:
System-Wide MSI | User-Wide MSI | Email Invitation Installer
| |
|---|---|---|---|
Installation scope | System-wide (C:\Program Files\Netskope\) | Per-user (%LOCALAPPDATA%\Netskope\) | Per-user (%LOCALAPPDATA%\Netskope\) |
Admin privileges required | Yes | No | No |
Profile creation | Separate step (remediation script) | Separate step (script as logged-on user) | Built-in (single step via invitation link) |
Intended deployment method | MDM (Intune LOB app, SCCM), GPO, scripted | MDM (Intune LOB app, user-context), scripted | Self-service via email invitation link |
Auto-update | Yes (system-level updater) | Yes (user-level updater) | Yes (user-level updater) |
Visibility in system inventory | Yes (appears in Add/Remove Programs for all users) | Limited (appears only for the installing user) | Limited (appears only for the installing user) |
Filename | NetskopeSetupSystem-<MP>_<Version>.msi | NetskopeSetup-<MP>_<Version>.msi | NetskopeOnlineSetup-<MP>-<Version>.exe |
When to use the system-wide MSI: You want centralized IT control over deployment, versioning, and visibility. Ideal for managed fleets where IT needs to guarantee the browser is installed and enrolled. Requires admin privileges.
When to use the user-wide MSI: You want MDM-managed deployment without requiring admin privileges. The MSI installs to the user’s %LOCALAPPDATA% directory, similar to the email invitation installer, but can be deployed and managed centrally through Intune or scripts.
When to use the email invitation: You want a lightweight, self-service option for users on unmanaged devices or where admin privileges are not available and MDM is not in use.
Coexistence Behavior
Standardize on a single installation method per machine. If migrating between methods, uninstall the existing installation(s) first.
Deploying the System-Wide MSI
The system-wide MSI deployment consists of two steps:
Install the MSI package via a Line-of-business app running as System.
Create a browser profile by running a remediation script as the logged-on user.
Step 1: Installing the System-Wide MSI
Creating the Line-of-Business App in Intune
In the Intune admin center, go to Apps > All apps > Add.
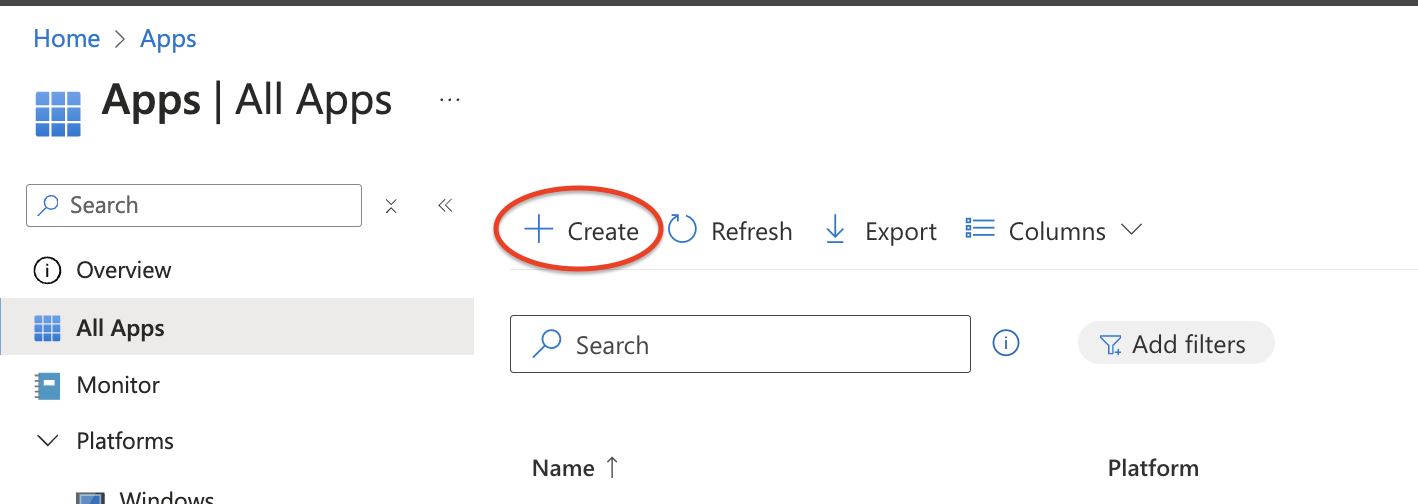
In the Select app type pane, under Other, select Line-of-business app and click Select.
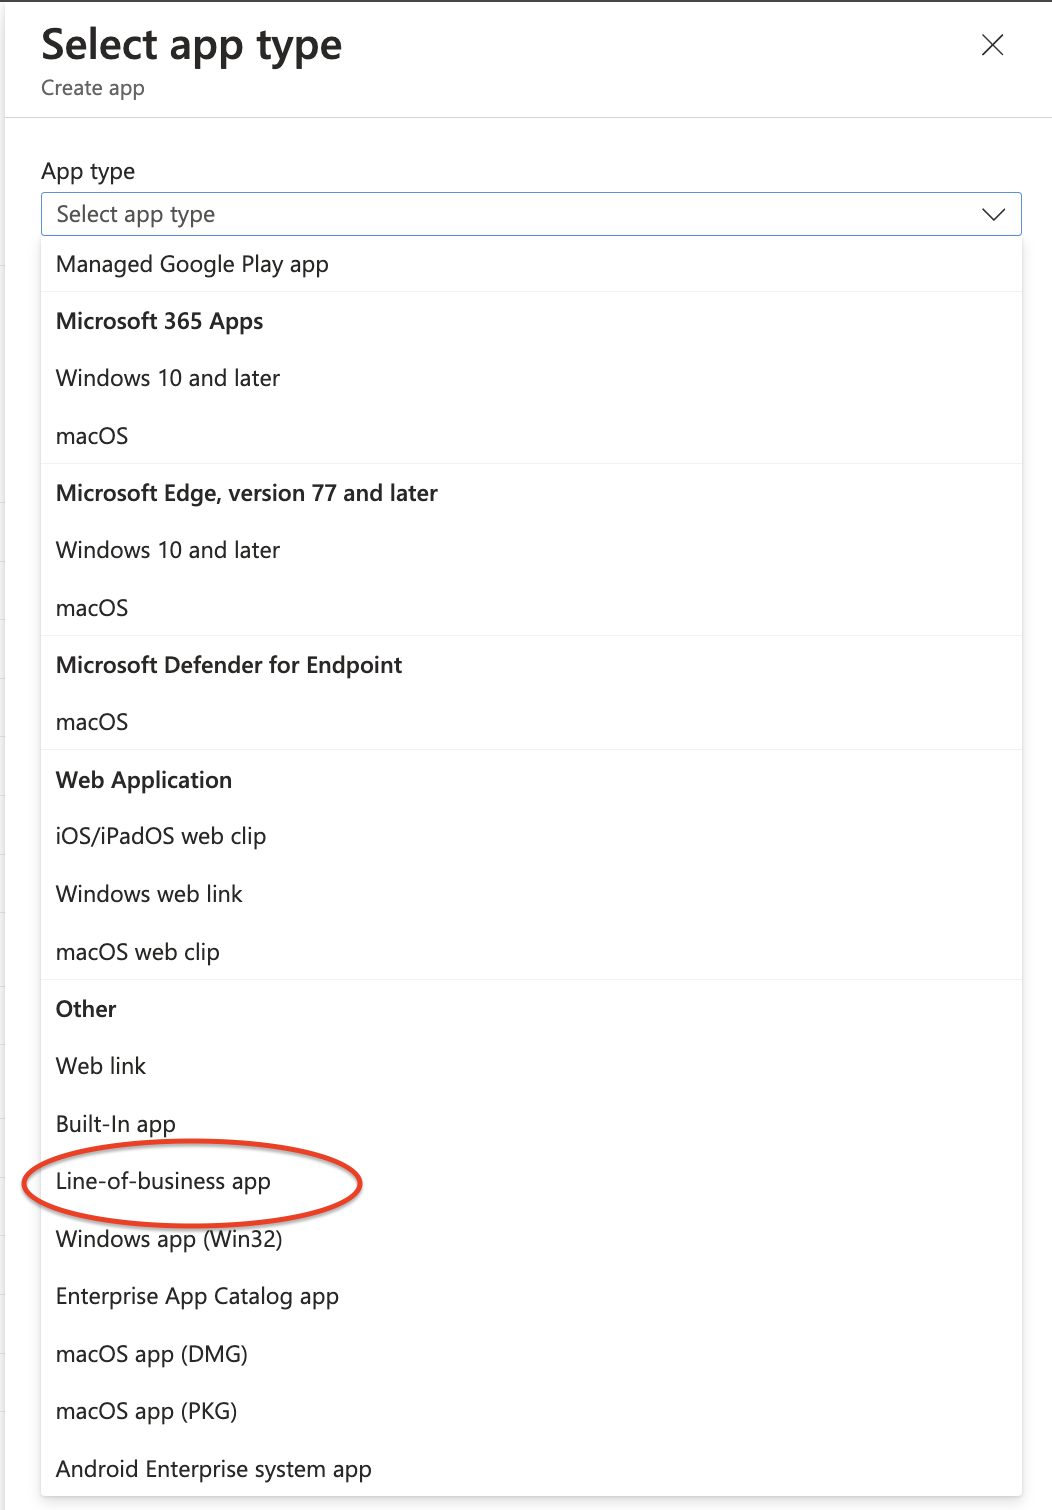
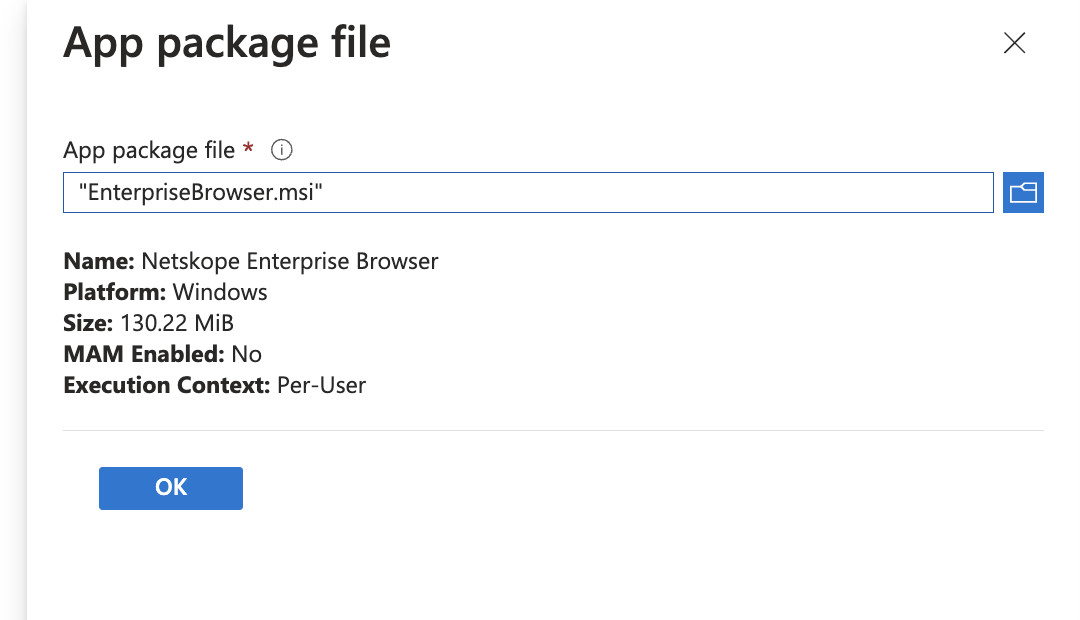
Click Select app package file and upload the system-wide MSI file (e.g., NetskopeSetupSystem-<MP>_<Version>.msi).
On the App information tab, configure the name, description, and publisher.
On the Command-line arguments field, enter:
/qn /norestart /l*v “%TEMP%\NetskopeInstall.log”
Set Ignore app version to Yes. Enterprise Browser updates itself via its built-in auto-updater, so Intune should not attempt to update the app when a newer MSI is uploaded. Set this to No only if you intend to manage version updates by uploading new MSI packages to Intune.
Review and Create the app.
Note: Intune handles MSI detection automatically for Line-of-business apps based on the MSI product code. No manual detection rule is required.
Expected Install Locations
On a successful system-wide MSI installation, the following paths are populated:
- Browser: C:\Program Files\Netskope\Browser\Application
- Updater: C:\Program Files (x86)\Netskope\NetskopeBrowserUpdater
- Registry keys: HKLM\SOFTWARE\WOW6432Node\Netskope\Update
Step 2: Creating the User Profile (System-Wide)
Profile creation requires the logged-on user’s security context because the profile is bound to the user’s identity and stored under their Windows user directory. For the system-wide MSI (which installs as SYSTEM through Intune), this means a separate remediation script.
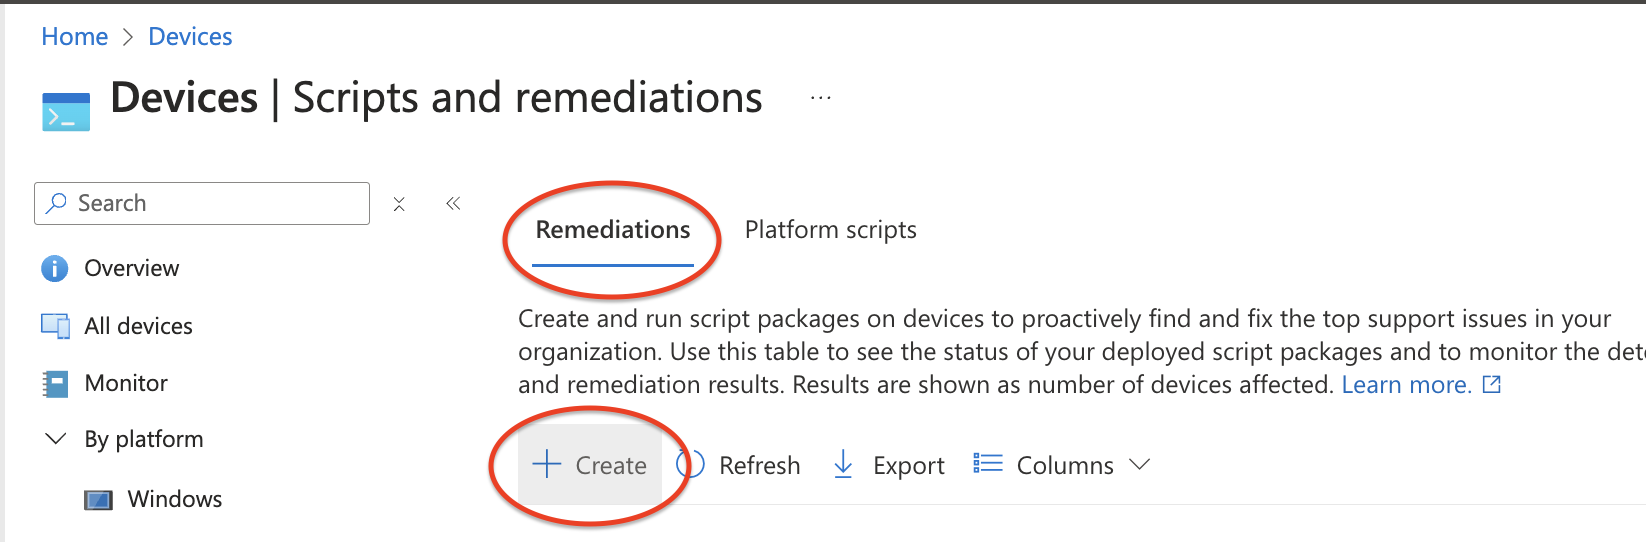
Create a Remediation in Devices > Scripts and remediations with the detection and remediation scripts described in the Profile Creation Scripts section below.
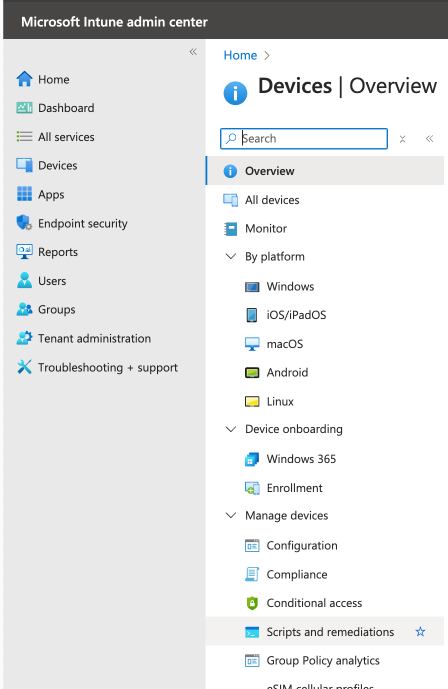
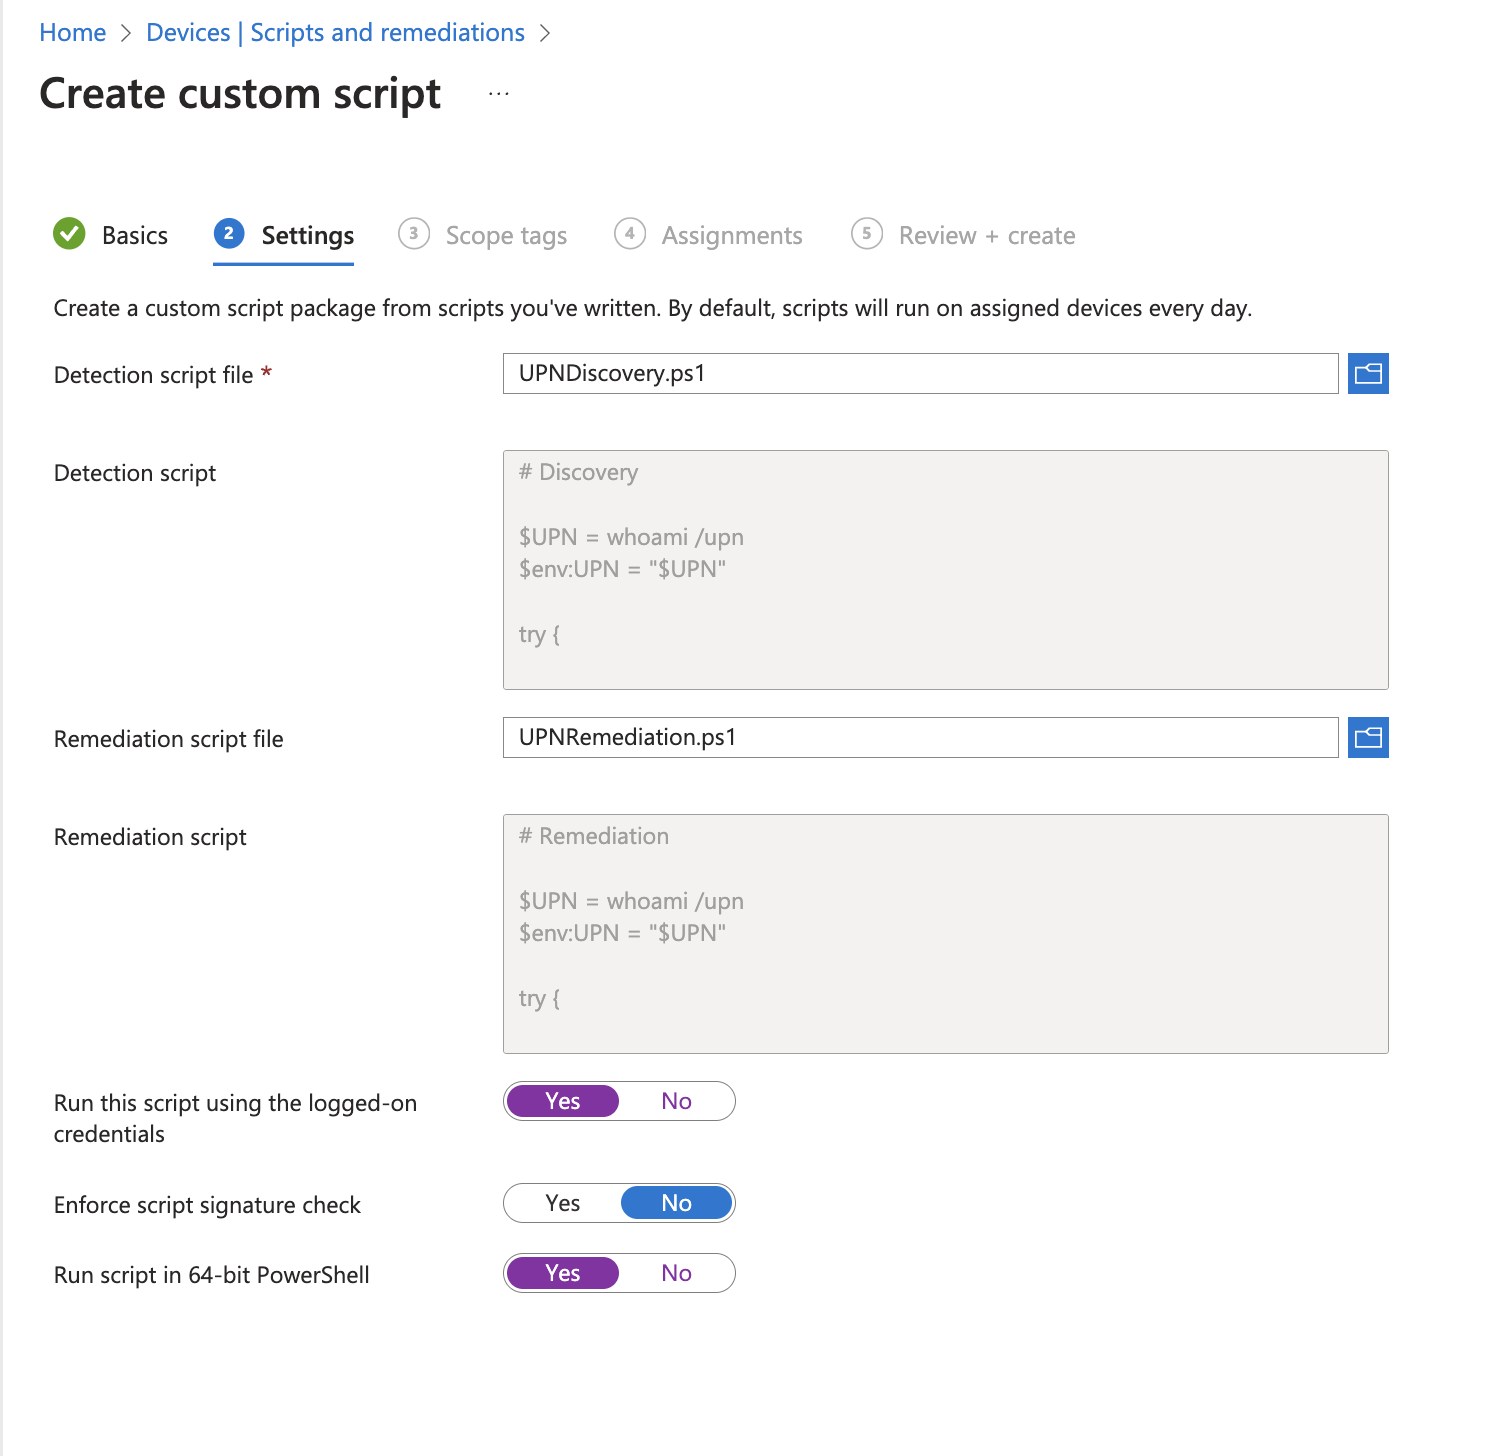
Configure the remediation with these settings:
Setting | Value
|
|---|---|
Run this script using the logged-on credentials | Yes |
Run script in 64-bit PowerShell | Yes |
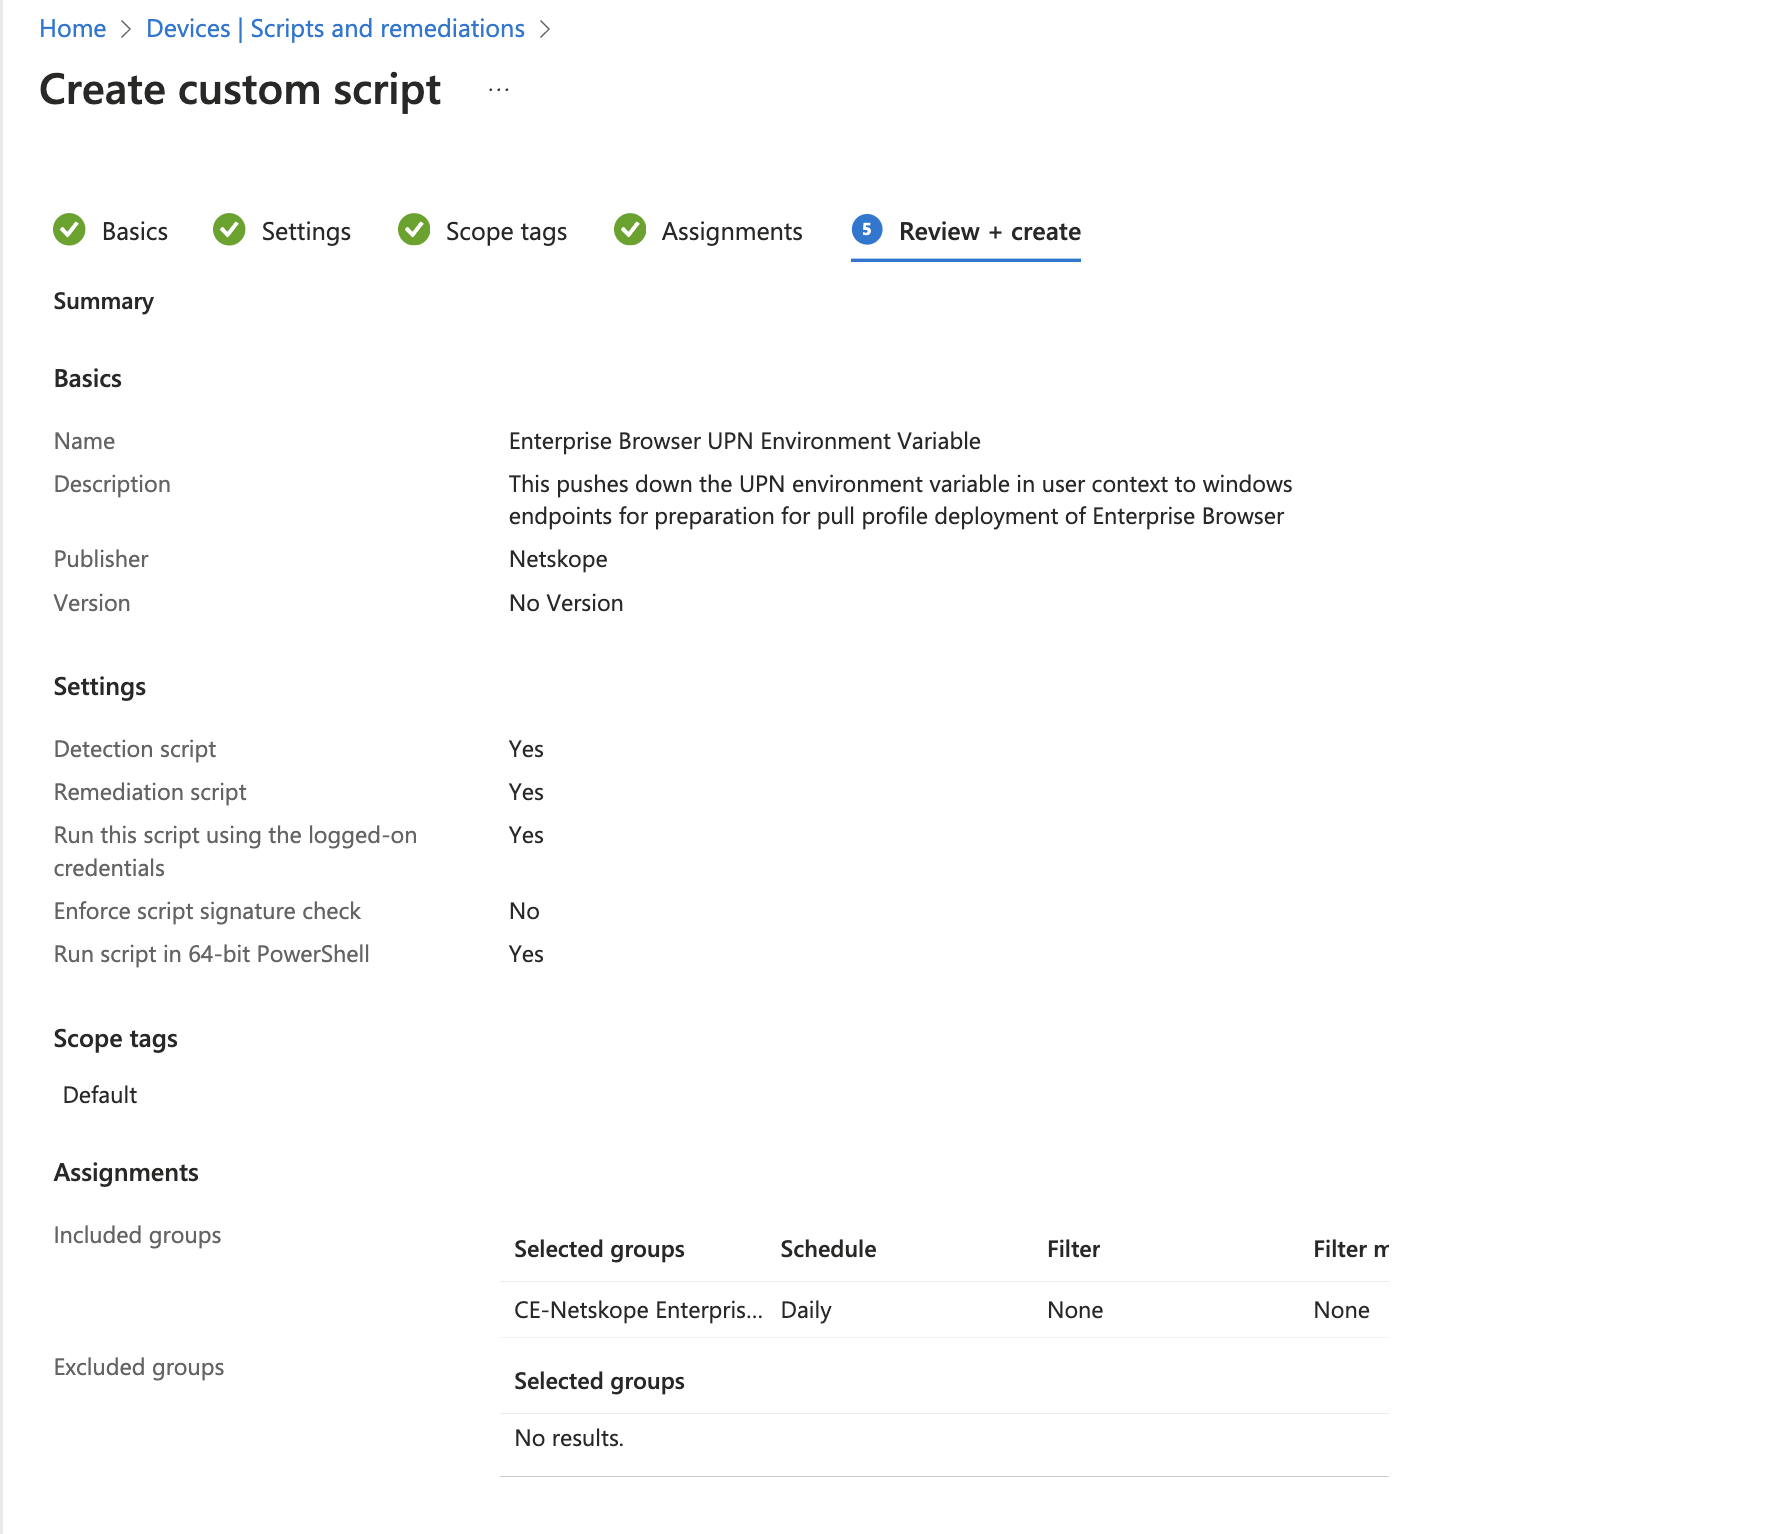
Set your assignment and schedule (e.g., run once per day until the profile is detected).
Deploying the User-Wide MSI
The user-wide MSI deployment also consists of two steps, but runs entirely in the user’s context:
Install the MSI package via a Line-of-business app assigned to a user group.
Create a browser profile by running a remediation script as the logged-on user.
Step 1: Installing the User-Wide MSI
Creating the Line-of-Business App in Intune
Follow the same steps as the system-wide deployment, with the following differences:
On the App information tab, set App install context to User.
Upload the user-wide MSI artifact (e.g., NetskopeSetup-<MP>_<Version>.msi).
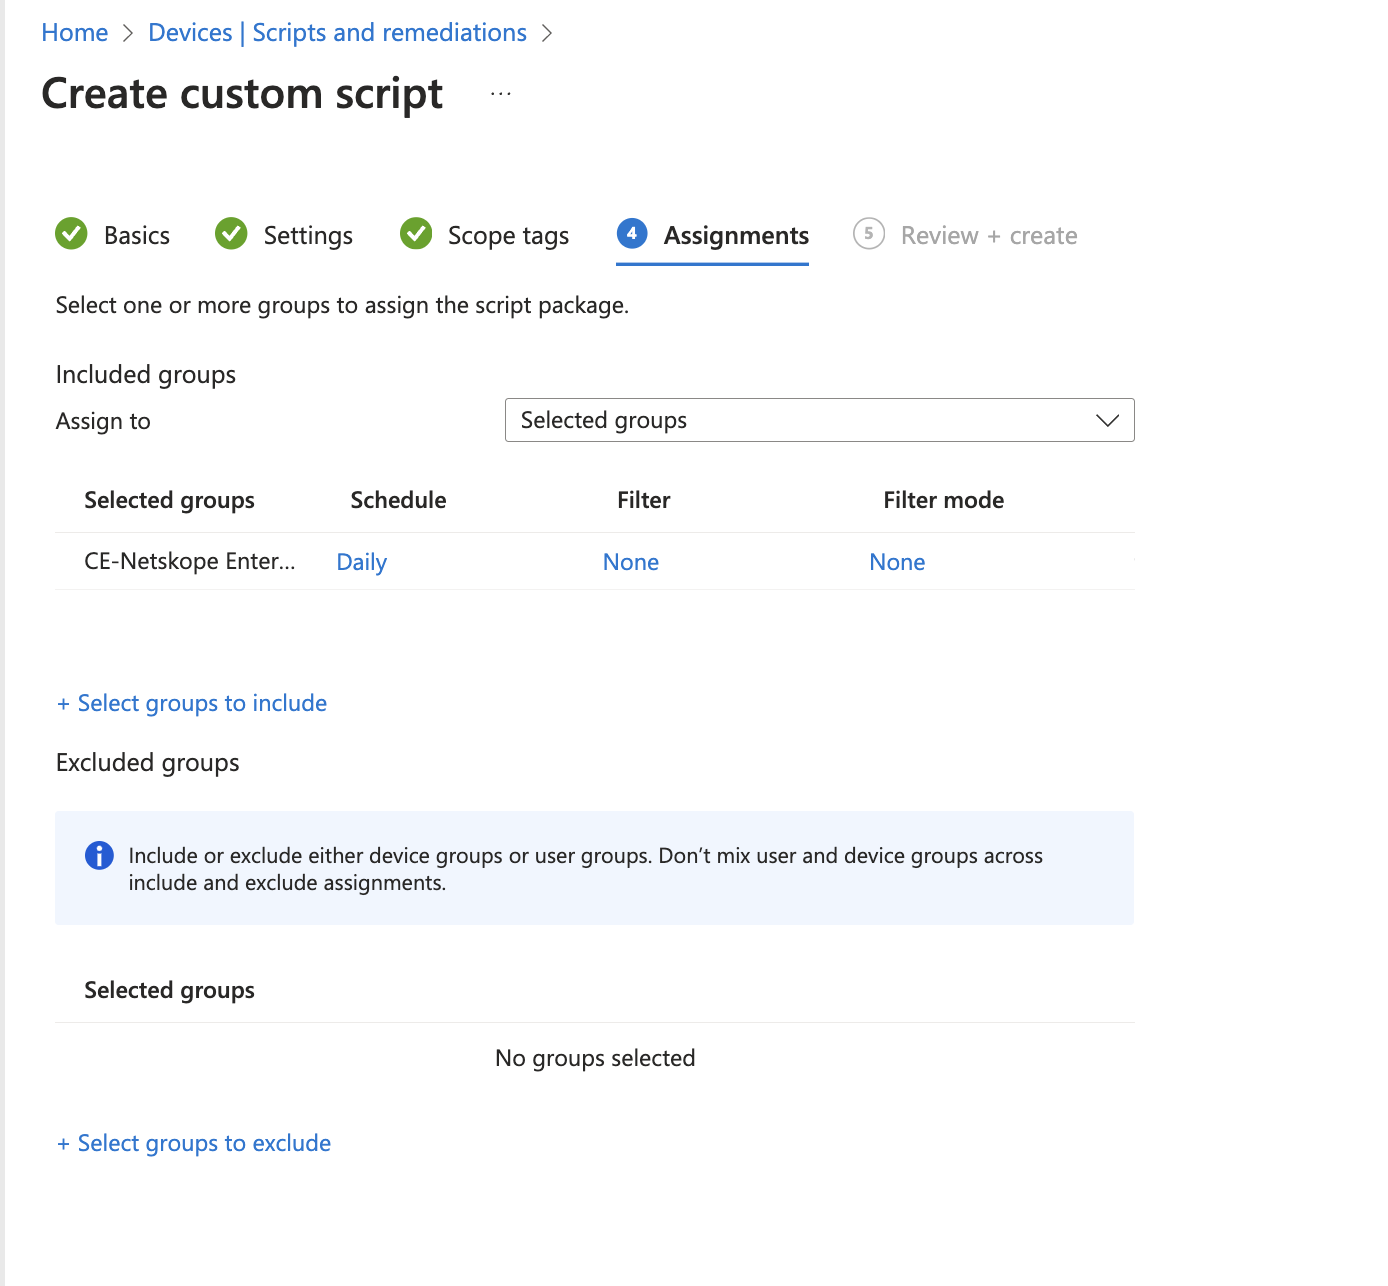
On the Assignments tab, assign the app to a user group (not a device group).
The command-line arguments are the same:
/qn /norestart /l*v “%TEMP%\NetskopeInstall.log”
Note: The user-wide MSI is a per-user package (ALLUSERS=””). When creating the Line-of-business app in Intune, set App install context to User and assign the app to a user group. Intune then installs the package in the user’s context when the user signs in, placing the browser in that user’s %LOCALAPPDATA% directory. Do not deploy this package in Device context — a per-user installer running as SYSTEM fails with msiexec error 1603 and rolls back. If device-context deployment is required, use the system-wide MSI instead.
Note: Intune handles MSI detection automatically for Line-of-business apps based on the MSI product code. No manual detection rule is required.
Expected Install Locations
On a successful user-wide MSI installation, the following paths are populated:
- Browser: %LOCALAPPDATA%\Netskope\Browser\Application
- Updater: %LOCALAPPDATA%\Netskope\NetskopeBrowserUpdater
- Registry keys: HKCU\Software\Netskope\Update
Step 2: Creating the User Profile (User-Wide)
The profile creation step is identical to the system-wide deployment. Use the same detection and remediation scripts described below. The scripts automatically detect both install paths.
Note: The created profile is named after the user’s email address (the value passed to –netskope-user-email). This is what the user sees in the browser’s profile UI.
Profile Creation Scripts
The following scripts handle profile creation for both system-wide and user-wide installations. They check the system-wide path first and fall back to the user-wide path.
Detection Script
$systemExe = “C:\Program Files\Netskope\Browser\Application\nsbrowser.exe”
$userExe = “$env:LOCALAPPDATA\Netskope\Browser\Application\nsbrowser.exe”
$browserExe = if (Test-Path $systemExe) { $systemExe }
elseif (Test-Path $userExe) { $userExe }
else { $null }
if (-not $browserExe) {
Write-Host “Netskope Enterprise Browser is not installed.”
exit 0
}
$regPath = “HKCU:\Software\Netskope\Browser”
if (Test-Path $regPath) {
$props = Get-ItemProperty -Path $regPath -ErrorAction SilentlyContinue
if ($null -ne $props.LastProfileCreationStatus) {
$status = [int]$props.LastProfileCreationStatus
if ($status -eq 0 -or $status -eq 6) {
Write-Host “Profile already exists (status: $status).”
exit 0
}
}
}
Write-Host “Browser installed but no profile found. Remediation required.”
exit 1
Remediation Script
Replace YOUR_MP_HOST and YOUR_TENANT_NAME with your organization’s values. The mpHost value uses the format nsbrowser-config.<MP>.goskope.com (for example, nsbrowser-config.sjc1.goskope.com). See the Annex: Endpoints per MP for the full list of configuration service hostnames per Management Plane.
Note: This script uses the Windows User Principal Name (UPN) retrieved via whoami /upn as the value for –netskope-user-email. This works for Entra ID (Azure AD) joined devices where the UPN matches the user’s corporate email. If your environment uses a different identity source or the UPN does not match the email provisioned in Enterprise Browser, modify the script to obtain the email address from the appropriate source (for example, an environment variable injected by your MDM, an Active Directory attribute, or a CSV lookup).
$systemExe = “C:\Program Files\Netskope\Browser\Application\nsbrowser.exe”
$userExe = “$env:LOCALAPPDATA\Netskope\Browser\Application\nsbrowser.exe”
$logFile = “$env:TEMP\NetskopeProfileCreation.log”
$mpHost = “YOUR_MP_HOST”
$tenantName = “YOUR_TENANT_NAME”
$browserExe = if (Test-Path $systemExe) { $systemExe }
elseif (Test-Path $userExe) { $userExe }
else { $null }
$upn = (whoami /upn 2>$null)
if (-not $upn) {
$upn = [System.Security.Principal.WindowsIdentity]::GetCurrent().Name
}
$upn = $upn.Trim()
$timestamp = Get-Date -Format “yyyy-MM-dd HH:mm:ss”
function Write-Log {
param ([string]$Message)
$entry = “$timestamp – $Message”
Write-Host $entry
Add-Content -Path $logFile -Value $entry
}
if (-not $browserExe) {
Write-Log “ERROR: nsbrowser.exe not found. Is the MSI installed?”
exit 1
}
Write-Log “Using browser at: $browserExe”
$arguments = @(
“–netskope-mp-host=$mpHost”,
“–netskope-user-email=$upn”,
“–netskope-tenant-name=$tenantName”,
“–no-startup-window”
)
Write-Log “Starting profile creation for: $upn”
try {
$process = Start-Process -FilePath $browserExe `
-ArgumentList $arguments `
-Wait -PassThru -NoNewWindow
$exitCode = $process.ExitCode
} catch {
Write-Log “ERROR: Failed to launch nsbrowser.exe: $_”
exit 1
}
switch ($exitCode) {
0 { Write-Log “Profile created successfully for $upn.”; exit 0 }
6 { Write-Log “Profile for $upn already exists.”; exit 0 }
7 { Write-Log “ERROR: Profile creation failed (exit code 7).”; exit 1 }
default { Write-Log “ERROR: Unexpected exit code: $exitCode”; exit 1 }
}
MSI Command-Line Reference
The following msiexec options are relevant when deploying the Netskope Enterprise Browser MSI:
Standard msiexec Options
Option | Description
|
|---|---|
/i “path.msi” | Install the specified MSI package |
/x “path.msi” | Uninstall the specified MSI package |
/qn | Silent install (no UI) |
/qr | Reduced UI (progress bar only) |
/qf | Full UI |
/norestart | Suppress reboot even if required |
/l*v “path.log” | Write a verbose log file (recommended for troubleshooting) |
Troubleshooting Exit Codes
The MDM installation process involves a chain of components: MSI installer, offline installer (meta-installer), installer executable, and browser executable. Each component produces status codes that propagate up the chain.
MSI Installer Exit Codes
These are the exit codes returned by msiexec after the MSI installation completes. Check the exit code of the msiexec process in your MDM reporting to determine the installation outcome.
Exit Code | Name | Description | Notes
|
|---|---|---|---|
0 | ERROR_SUCCESS | The action completed successfully. | The browser was successfully installed and registered in the list of installed apps. If an older version existed prior to execution, the browser and the installed apps entry were updated. |
1602 | ERROR_INSTALL_USEREXIT | The user canceled the installation. | The MSI installation was interrupted by the user. |
1603 | ERROR_INSTALL_FAILURE | A fatal error occurred during installation. | In rare cases, this means the browser failed to install (for example, due to insufficient disk space). Check the verbose log for details. |
1619 | ERROR_INSTALL_PACKAGE_OPEN_FAILED | This installation package could not be opened. | Returned by msiexec.exe when it cannot find the specified MSI file. Probable causes are antivirus or EDR systems interfering with the installation. Verify that the package exists and is accessible. |
1638 | ERROR_PRODUCT_VERSION | Another version of this product is already installed. | This appears if an old version of Enterprise Browser was already installed and the new installer is unable to upgrade. Fully remove the old version of the browser and try again, or use ALLOWDOWNGRADE=1. |
An error exit code from the MSI can be caused by the following conditions:
the underlying browser installation failed (for example, due to disk being full)
the user cancelled the MSI package execution
the MSI package was not found or is inaccessible
there is an incompatibility between the currently installed MSI package and the one being executed
Installer Registry Statuses
After the browser installation completes, the installer executable writes additional status data to the Windows registry. These values provide more detail than the MSI exit code alone.
For the system-wide MSI, statuses are written to:
HKLM:\SOFTWARE\WOW6432Node\Netskope\Update
HKLM:\SOFTWARE\WOW6432Node\Netskope\Update\ClientState\{b65831c5-a4c1-4a0a-9d70-03488008ffea}
For the user-wide MSI, statuses are written to:
HKCU:\Software\Netskope\Update
The following registry values are available:
Key | Description
|
|---|---|
LastInstallerResult | Stores 0 for a successful installation or 1 for a failure. |
LastInstallerError | Stores the installer error code in the case of an installation failure. |
LastInstallerResultUIString | Stores a human-readable string describing the installation failure. Available when installing via meta-installer (online or offline), but not available when installing via MSI. |
To retrieve these values after a system-wide MSI installation:
$RegPath = “HKLM:\SOFTWARE\WOW6432Node\Netskope\Update”
Get-ItemProperty -Path $RegPath -Name LastInstallerResult, LastInstallerError -ErrorAction SilentlyContinue
To retrieve these values after a user-wide MSI installation:
$RegPath = “HKCU:\Software\Netskope\Update”
Get-ItemProperty -Path $RegPath -Name LastInstallerResult, LastInstallerError -ErrorAction SilentlyContinue
Profile Creation Exit Codes
When nsbrowser.exe runs in profile creation mode, it writes the result to HKCU:\Software\Netskope\Browser in two values: LastProfileCreationStatus (numeric) and LastProfileCreationStatusString (human-readable).
On failure, a third value, LastProfileCreationFailureDetail, contains a machine-readable reason: INVALID_PARAMS (missing required parameter, listed in the value), NOT_INTERACTIVE_SESSION, LICENSE_KEY_NOT_FOUND, LICENSE_KEY_TIMEOUT, LICENSE_KEY_PERMISSION_DENIED, LICENSE_KEY_SERVER_UNAVAILABLE, LICENSE_BLOCKED (license deleted or deactivated), SYSTEM_PROFILE_UNAVAILABLE, PROFILE_MANAGER_UNAVAILABLE, or DIRECTORY_CREATION_FAILED.
Value | Name | Description
|
|---|---|---|
0 | PROFILE_CREATED | The requested profile was created successfully. |
6 | PROFILE_WITH_NAME_EXISTS | A profile with the same name already exists. This is a success condition — the requested profile is available. |
7 | PROFILE_CREATION_FAILED | The requested profile could not be created, or an attempt was made to create a profile from a non-interactive or elevated session. |
To retrieve the profile creation status:
Get-ItemProperty -Path “HKCU:\Software\Netskope\Browser” -Name LastProfileCreationStatus, LastProfileCreationStatusString, LastProfileCreationFailureDetail -ErrorAction SilentlyContinue
Diagnosing Profile Creation Failures
If profile creation fails (status 7), verify the following:
- Correct mpHost format — the value must use the format nsbrowser-config.<MP>.goskope.com. See the Annex: Endpoints per MP for the full list of configuration service hostnames per Management Plane.
- User is provisioned — the user’s email address must be invited in Enterprise Browser. Go to Settings > Security Cloud Platform > Enterprise Browser > User Provisioning > Invite Users to confirm. Use “Do not send onboarding email” for silent MDM flows.
- Interactive user session — the profile creation command must run in the logged-on user’s interactive session. It fails if run from a non-interactive session, such as the SYSTEM account, a service, or a scheduled task running whether the user is logged on or not. When this happens, LastProfileCreationFailureDetail is set to NOT_INTERACTIVE_SESSION. Running the command as the logged-on user via an Intune remediation script (with “Run this script using the logged-on credentials” set to Yes) satisfies this requirement.
- Network connectivity — the machine must be able to reach https://nsbrowser-config.<MP>.goskope.com. Firewall, proxy, or DNS blocks cause error code 7.
- Profile creation log — check %TEMP%\NetskopeProfileCreation.log for details on the failure.
User Experience
When the deployment completes, users see the Netskope Enterprise Browser icon on their desktop with their corporate profile automatically enrolled. Depending on the MSI variant, the browser runs from:
- System-wide MSI: C:\Program Files\Netskope\Browser\Application\nsbrowser.exe
- User-wide MSI: %LOCALAPPDATA%\Netskope\Browser\Application\nsbrowser.exe
The browser auto-updates via a background updater. For the system-wide MSI, the updater runs at system level. For the user-wide MSI, the updater runs at user level.
Considerations
Considerations include:
the user-wide MSI and the email invitation installer write to the same file paths (%LOCALAPPDATA%\Netskope\). Only one should be present on a machine at a time. Uninstall the existing installation before switching methods.
if both a system-wide MSI and user-wide MSI are installed on the same machine, the system-level installation takes precedence for shortcuts and file associations. This combination is not recommended — standardize on one deployment model per machine.
the NETSKOPEPROFILE msiexec property is deprecated for new deployments. Profile creation should always be performed as a separate step after MSI installation.
profile creation must run in the logged-on user’s interactive session, regardless of which MSI variant is used. Running nsbrowser.exe from a non-interactive session (SYSTEM, service account, or non-interactive scheduled task) fails with status 7.
profile creation only succeeds when the user has no running instance of Enterprise Browser. If the browser is open when the command runs, the launch is handed to the running instance and exits with code 0 without creating a profile or writing a registry status. Schedule the remediation to run repeatedly (for example, once per day) — the detection script re-triggers remediation on the next run because no status was recorded.
all MSI download URLs are tenant-specific. User-wide installers use /mdm/win/<arch>/get and system-wide installers use /mdm/win/<arch>/get/system.
on a successful MSI installation, the browser appears in Add/Remove Programs showing the Netskope version. If the MSI install fails, the browser and updater may still be installed on disk but will not appear in the installed apps list.
verbose logging (/l*v) is recommended as part of the standard install command to aid troubleshooting failed deployments.
To learn more: Netskope Enterprise Browser Installation and Troubleshooting
MacOS Installation
Netskope Enterprise Browser for macOS can be deployed through two methods: a self-service email invitation (DMG installer) or centralized MDM deployment (PKG installer). The PKG installer provides a system-level installation managed by IT, while the DMG is a per-user installation triggered by the end user. This page covers both methods, including step-by-step instructions for Microsoft Intune and JAMF Pro.
Prerequisites
macOS 12 Monterey or later
Intel (x64) or Apple Silicon (ARM64) processor
Enterprise Browser license assigned to target users
End users must be provisioned in Netskope Enterprise Browser
Path: Settings > Security Cloud Platform > Enterprise Browser > User Provisioning > Invite Users
Network connectivity to the Netskope Enterprise Browser endpoints for your Management Plane (see Enterprise Browser Prerequisites and Requirements for the full list)
For MDM deployments: access to your MDM admin console (Intune, JAMF Pro, Kandji, Mosyle, or Workspace ONE)
Understanding Installation Methods
Before choosing a deployment method, review the differences between available options:
PKG Installer (MDM) | DMG Installer (Email Invitation)
| |
|---|---|---|
Installation scope | System-wide (/Applications/) | Per-user (/Applications/) |
Admin privileges required | Yes (installed via MDM as root) | No (user drag-and-drop) |
Profile creation | Separate step (post-install script) | Built-in (single step via license key) |
Intended deployment method | MDM (Intune, JAMF, Kandji, Workspace ONE) | Self-service via email invitation link |
Auto-update | Yes (system-level updater) | Yes (user-level updater) |
Updater location | /Library/Netskope/NetskopeBrowserUpdater/ | ~/Library/Application Support/Netskope/NetskopeBrowserUpdater/ |
Installer artifact | PKG | DMG |
When to use the PKG (MDM): You want centralized IT control over deployment and automated profile enrollment. Ideal for managed fleets.
When to use the DMG (email invitation): You want a lightweight self-service option for individual users on unmanaged devices.
Downloading the PKG Installer
The PKG installer is available from your tenant-specific download URL:
- macOS x64 (Intel): https://browser-downloads-<tenant-name>.goskope.com/mdm/mac/x64/get/pkg
- macOS ARM64 (Apple Silicon): https://browser-downloads-<tenant-name>.goskope.com/mdm/mac/arm64/get/pkg
Replace <tenant-name> with your organization’s tenant name.
Note: The DMG (user-wide) installer is available at the same base URL without the /pkg suffix:
- macOS x64 DMG: https://browser-downloads-<tenant-name>.goskope.com/mdm/mac/x64/get
- macOS ARM64 DMG: https://browser-downloads-<tenant-name>.goskope.com/mdm/mac/arm64/get
Coexistence Behavior
If a user already has Enterprise Browser installed via DMG and the PKG is subsequently installed via MDM, the PKG overrides the application in /Applications/ and installs a new system-level updater. The user-level updater from the DMG installation remains in place but does not interfere. It can be manually removed if the user encounters any issues.
Deploying with MDMs
Deploying with Microsoft Intune
Step 1: Creating the macOS App
In the Intune admin center, go to Apps > macOS > Add.
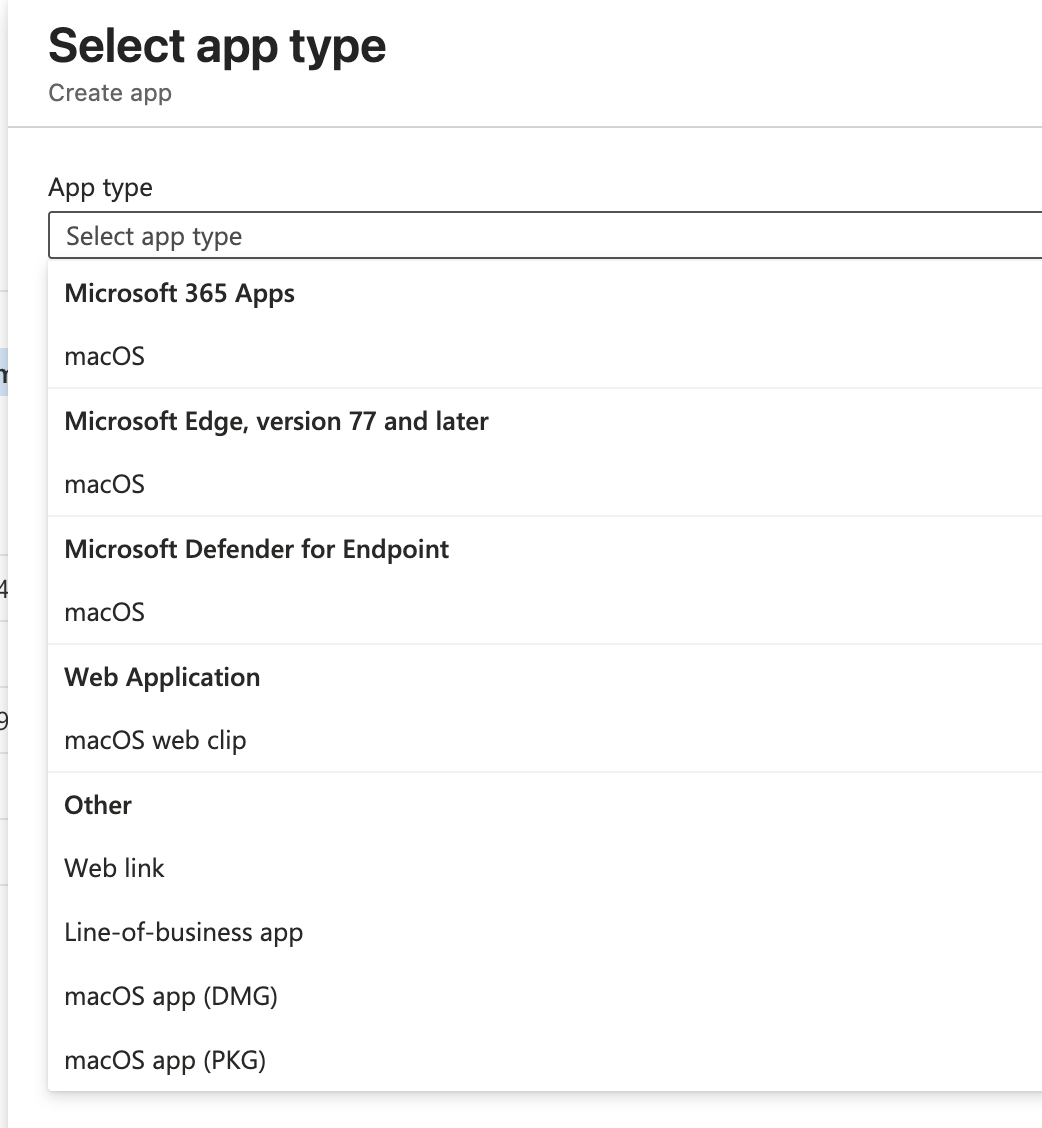
In the dropdown, select macOS App (PKG).
Click Select and upload the PKG file.
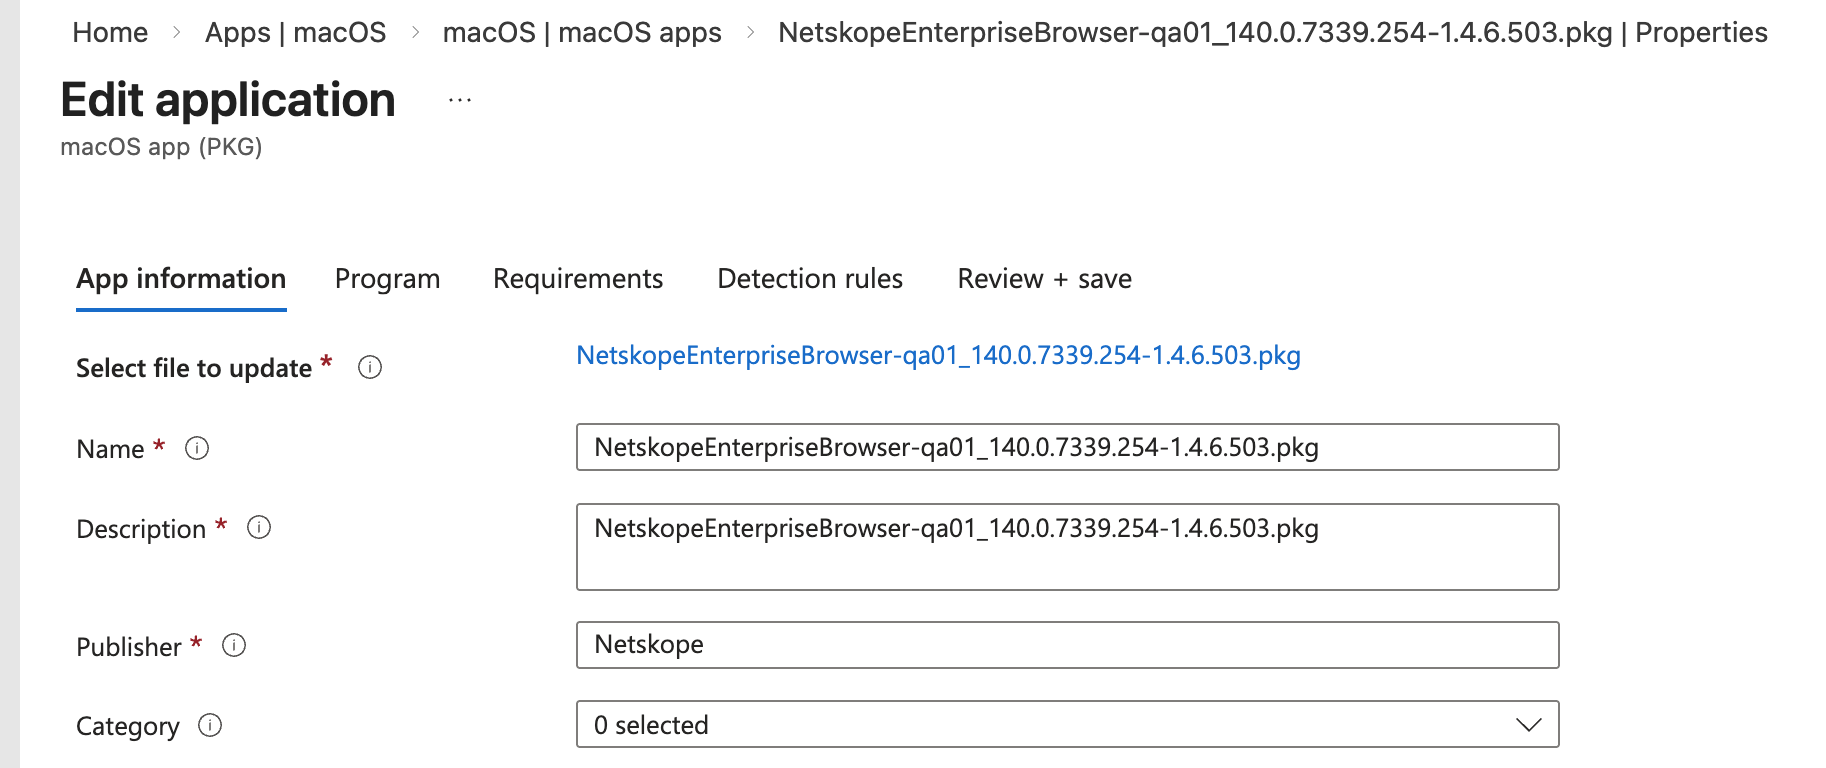
Specify Publisher as Netskope. Additional settings are optional and should follow your organization’s standards.
Click Next.
Step 2: Adding the Post-Install Script
In the Post-install script section, enter the following script to create the user profile after installation. The PKG installs as root, but profile creation must run as the logged-in user because the profile is stored in the user’s home directory.
#!/bin/bash
# Get the current logged-in user (not root)
CURRENT_USER=$(stat -f%Su /dev/console)
CURRENT_UID=$(id -u “$CURRENT_USER”)
# If no user is logged in (e.g., during DEP enrollment), exit gracefully.
# Profile creation will need to be handled via a separate mechanism at first login.
if [[ “$CURRENT_USER” == “root” ]] || [[ “$CURRENT_USER” == “loginwindow” ]] || [[ -z “$CURRENT_USER” ]]; then
echo “No user logged in. Skipping profile creation.”
exit 0
fi
BROWSER_PATH=”/Applications/Netskope Enterprise Browser.app/Contents/MacOS/Netskope Enterprise Browser”
if [[ ! -x “$BROWSER_PATH” ]]; then
echo “Browser not found at expected path.”
exit 1
fi
echo “Creating profile as user $CURRENT_USER…”
launchctl asuser “$CURRENT_UID” sudo -u “$CURRENT_USER” “$BROWSER_PATH” \
–netskope-mp-host=<MP-HOSTNAME>\
–netskope-user-email={{mail}} \
–netskope-tenant-name=<tenant-name>.goskope.com \
–no-startup-window &
sleep 30
# Quit the browser
echo “Quitting Netskope Enterprise Browser…”
pkill -f “Netskope Enterprise Browser” || true
Replace <MP-HOSTNAME> with your Management Plane region code.See the Annex: Endpoints per MP for the full list of configuration service hostnames per Management Plane.
Replace <tenant-name> with your Netskope tenant name.
The {{mail}} variable is an Intune token that resolves to the enrolled user’s email address.
Note: If no user is logged in at install time (for example, during Automated Device Enrollment), the script exits without creating a profile. In this case, configure a separate Intune Shell Script with the same profile creation logic, assigned to run at user login.
Click Next.
Step 3: Setting Minimum OS Requirements
In the dropdown, select the minimum macOS version for your environment (for example, macOS 12 Monterey).
Click Next.
Step 4: Assigning and Creating
Detection rules are pre-populated automatically for PKG apps — no manual detection rule is needed.
Assign the app to the appropriate user or device groups. Click Save.
Deploying with JAMF Pro
JAMF Pro deployment requires three components: a package, a configuration profile (PLIST), and a deployment policy with a post-install script.
Step 1: Adding the PKG Package
Go to Settings > Computer Management > Packages > New.
Upload the PKG file.
Click Save.
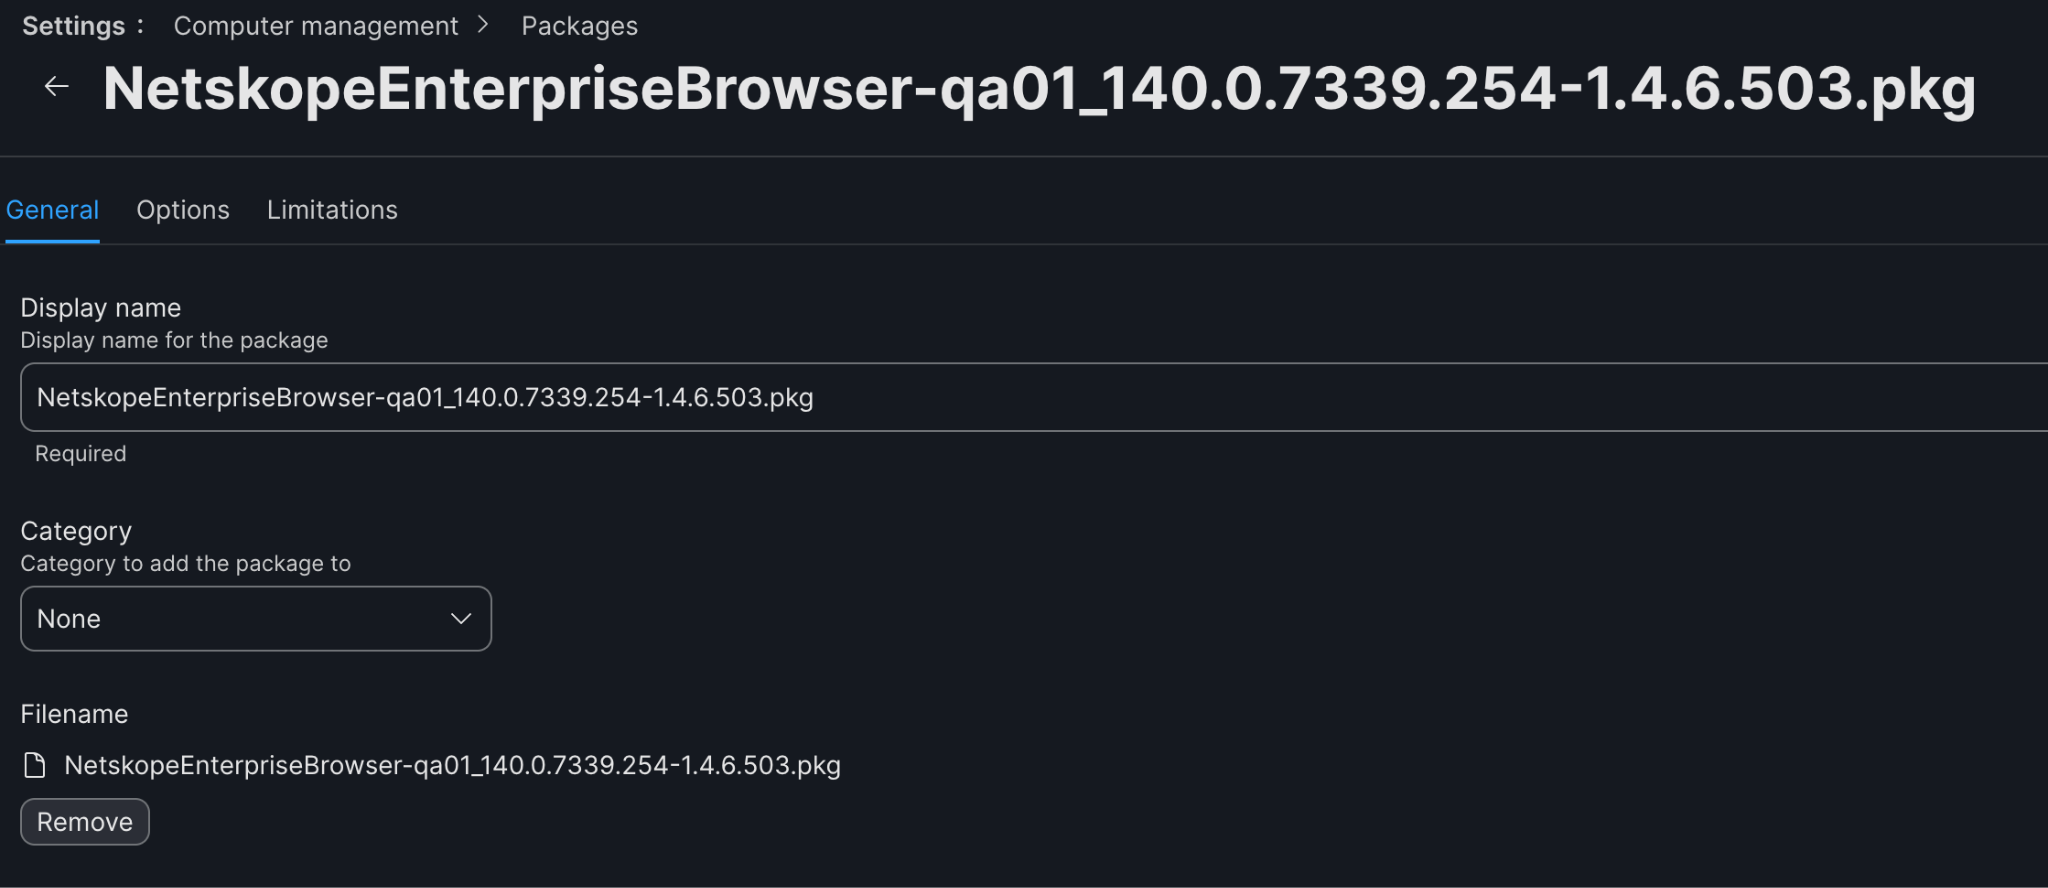
Step 2: Creating the PLIST Configuration Profile
This profile delivers the user’s email address to the device for use during profile creation.
Go to Computers > Configuration Profiles > New.
Define the name (for example, Netskope EB Configuration Profile).
Set Level to Computer Level.
Set Distribution Method to Install Automatically.- Under Application & Custom Settings, click Upload and add the following:
- Preference Domain: netskope
- Property List:
- Preference Domain: netskope
<?xml version=”1.0″ encoding=”UTF-8″?>
<!DOCTYPE plist PUBLIC “-//Apple//DTD PLIST 1.0//EN”
“http://www.apple.com/DTDs/PropertyList-1.0.dtd”>
<plist version=”1.0″>
<dict>
<key>email</key>
<string>$EMAIL</string>
</dict>
</plist>
Click Save.
On the Scope tab, configure the appropriate scope.
Click Save.
Step 3: Creating the Deployment Script
Go to Settings > Computer Management > Scripts > New.
Define the name (for example, Netskope Enterprise Browser Script).
Switch to the Script tab and paste the following: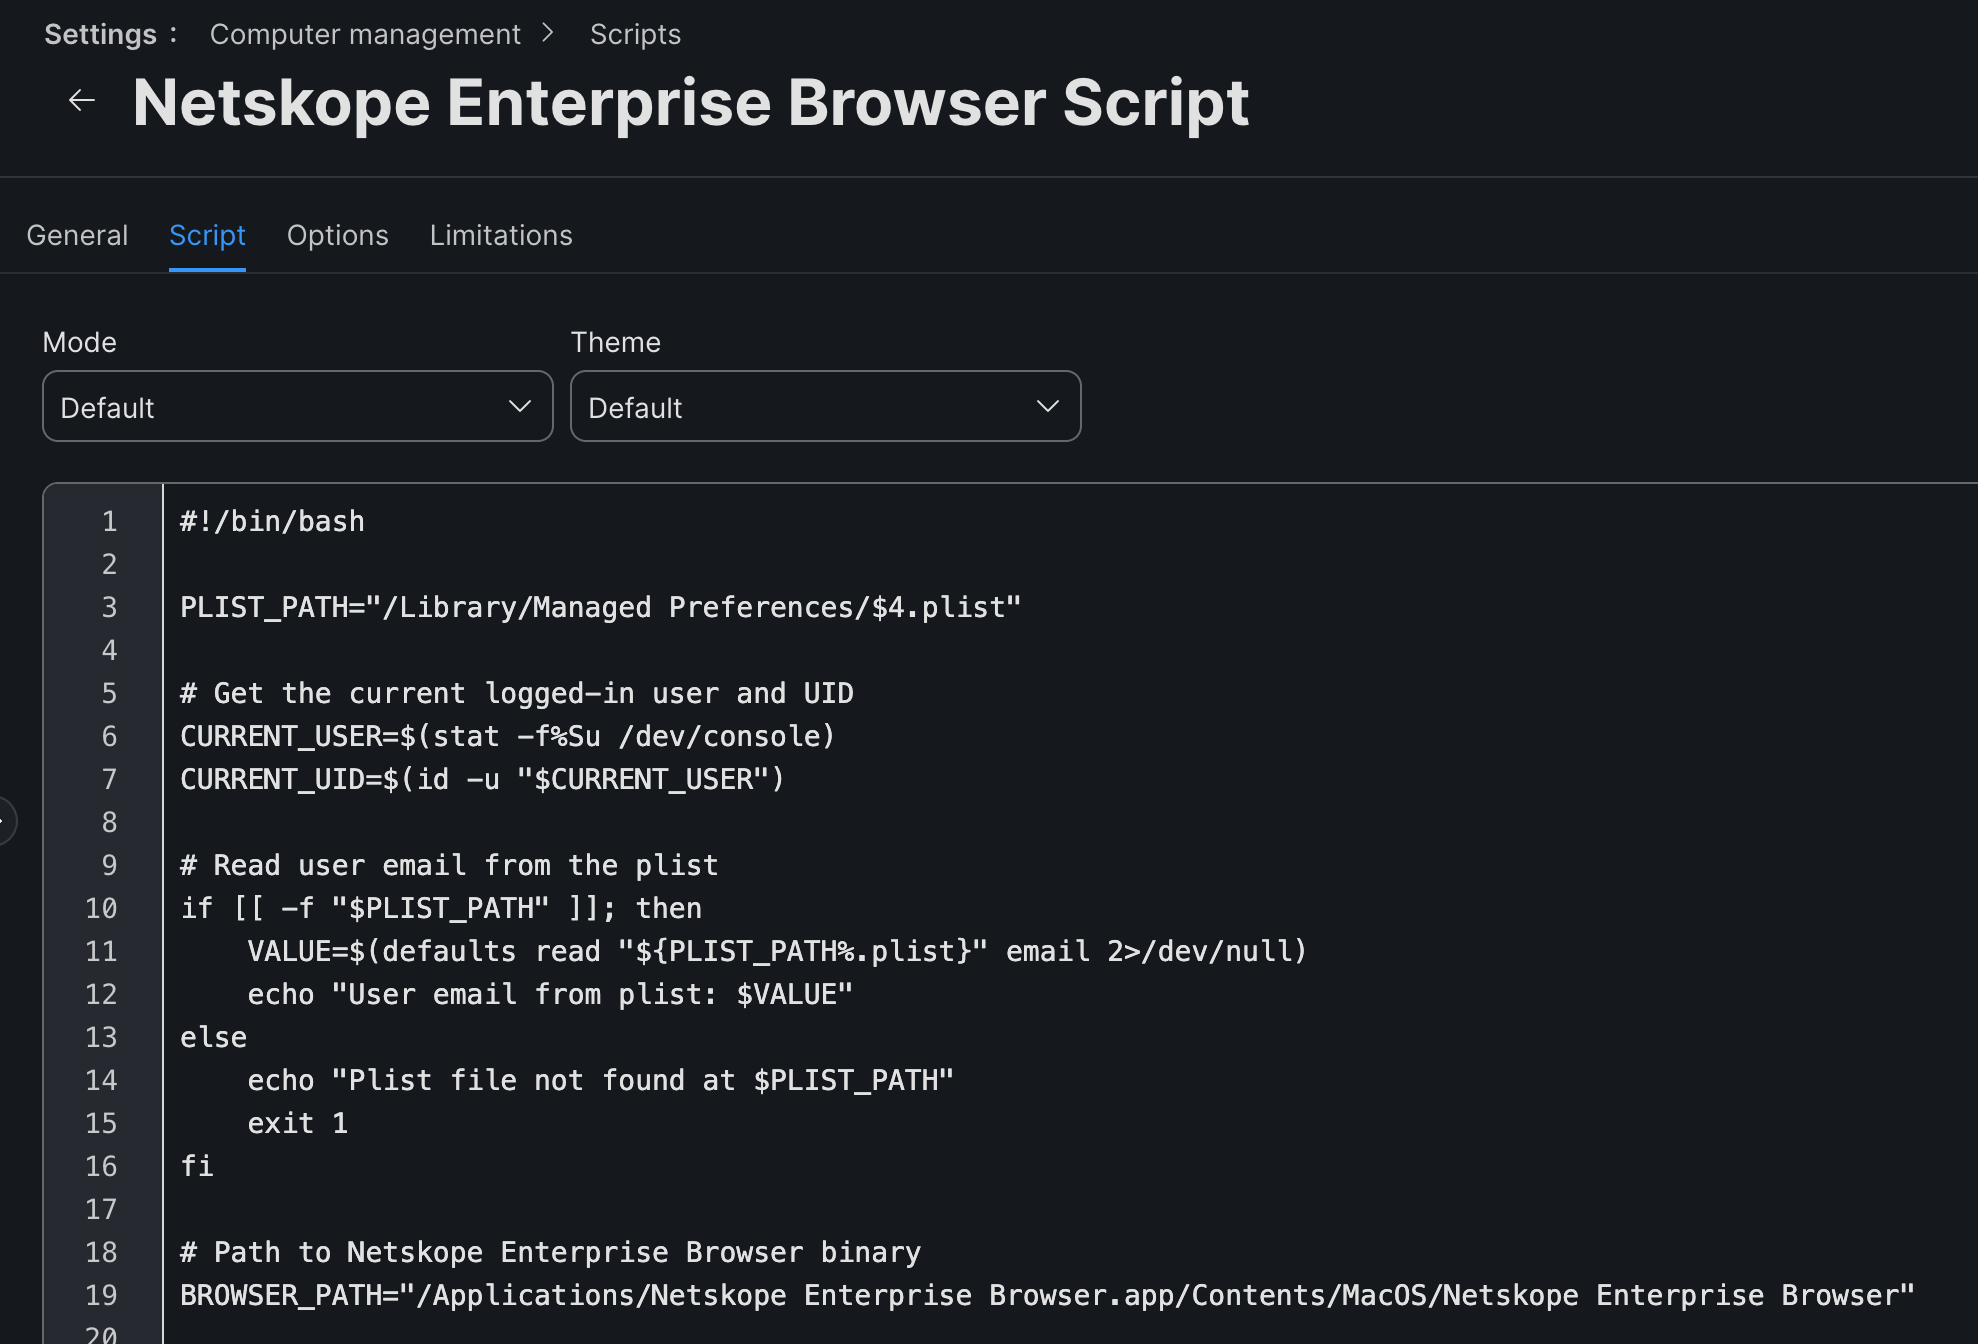
#!/bin/bash
PLIST_PATH=”/Library/Managed Preferences/$4.plist”
# Get the current logged-in user and UID
CURRENT_USER=$(stat -f%Su /dev/console)
CURRENT_UID=$(id -u “$CURRENT_USER”)
# Read user email from the plist
if [[ -f “$PLIST_PATH” ]]; then
VALUE=$(defaults read “${PLIST_PATH%.plist}” email 2>/dev/null)
echo “User email from plist: $VALUE”
else
echo “Plist file not found at $PLIST_PATH”
exit 1
fi
# Path to Netskope Enterprise Browser binary
BROWSER_PATH=”/Applications/Netskope Enterprise Browser.app/Contents/MacOS/Netskope Enterprise Browser”
# Launch the browser with all arguments
if [[ -x “$BROWSER_PATH” ]]; then
echo “Launching Netskope Browser as user $CURRENT_USER…”
launchctl asuser “$CURRENT_UID” sudo -u “$CURRENT_USER” “$BROWSER_PATH” \
–netskope-mp-host=<MP-HOST> \
–netskope-user-email=”$VALUE” \
–netskope-tenant-name=<tenant-name>.goskope.com \
–no-startup-window &
else
echo “Browser not found at expected path: $BROWSER_PATH”
exit 1
fi
sleep 30
# Quit the browser
echo “Quitting Netskope Enterprise Browser…”
osascript -e ‘quit app “Netskope Enterprise Browser”‘
Click Save.
Step 4: Creating the Deployment Policy
Go to Computers > Policies > New.
Define the name (for example, Netskope EB Policy).
Set Trigger according to your organization’s preferences (for example, Startup, Login, Enrollment Complete, or Recurring Check-in).
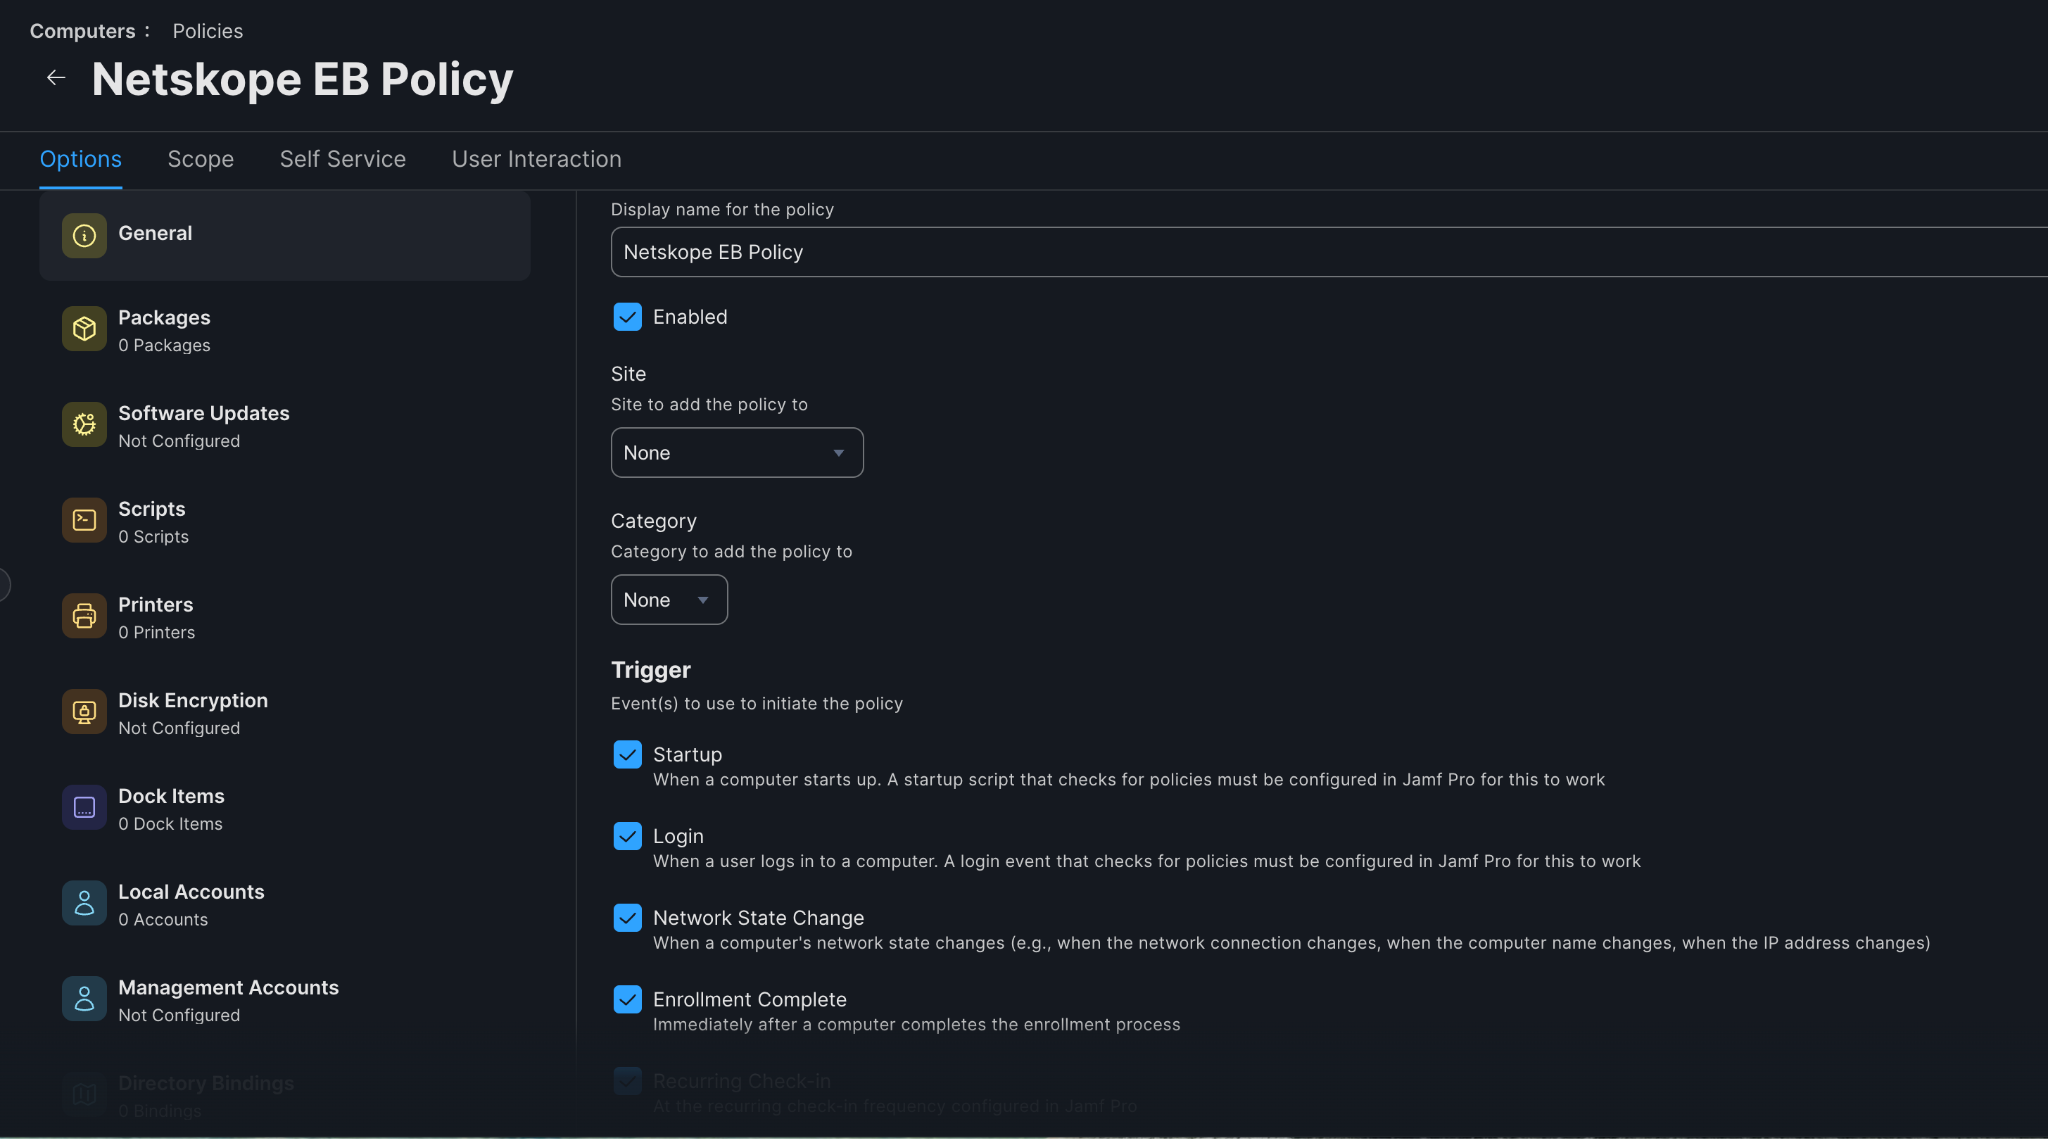
Set Execution Frequency to Ongoing or as appropriate.
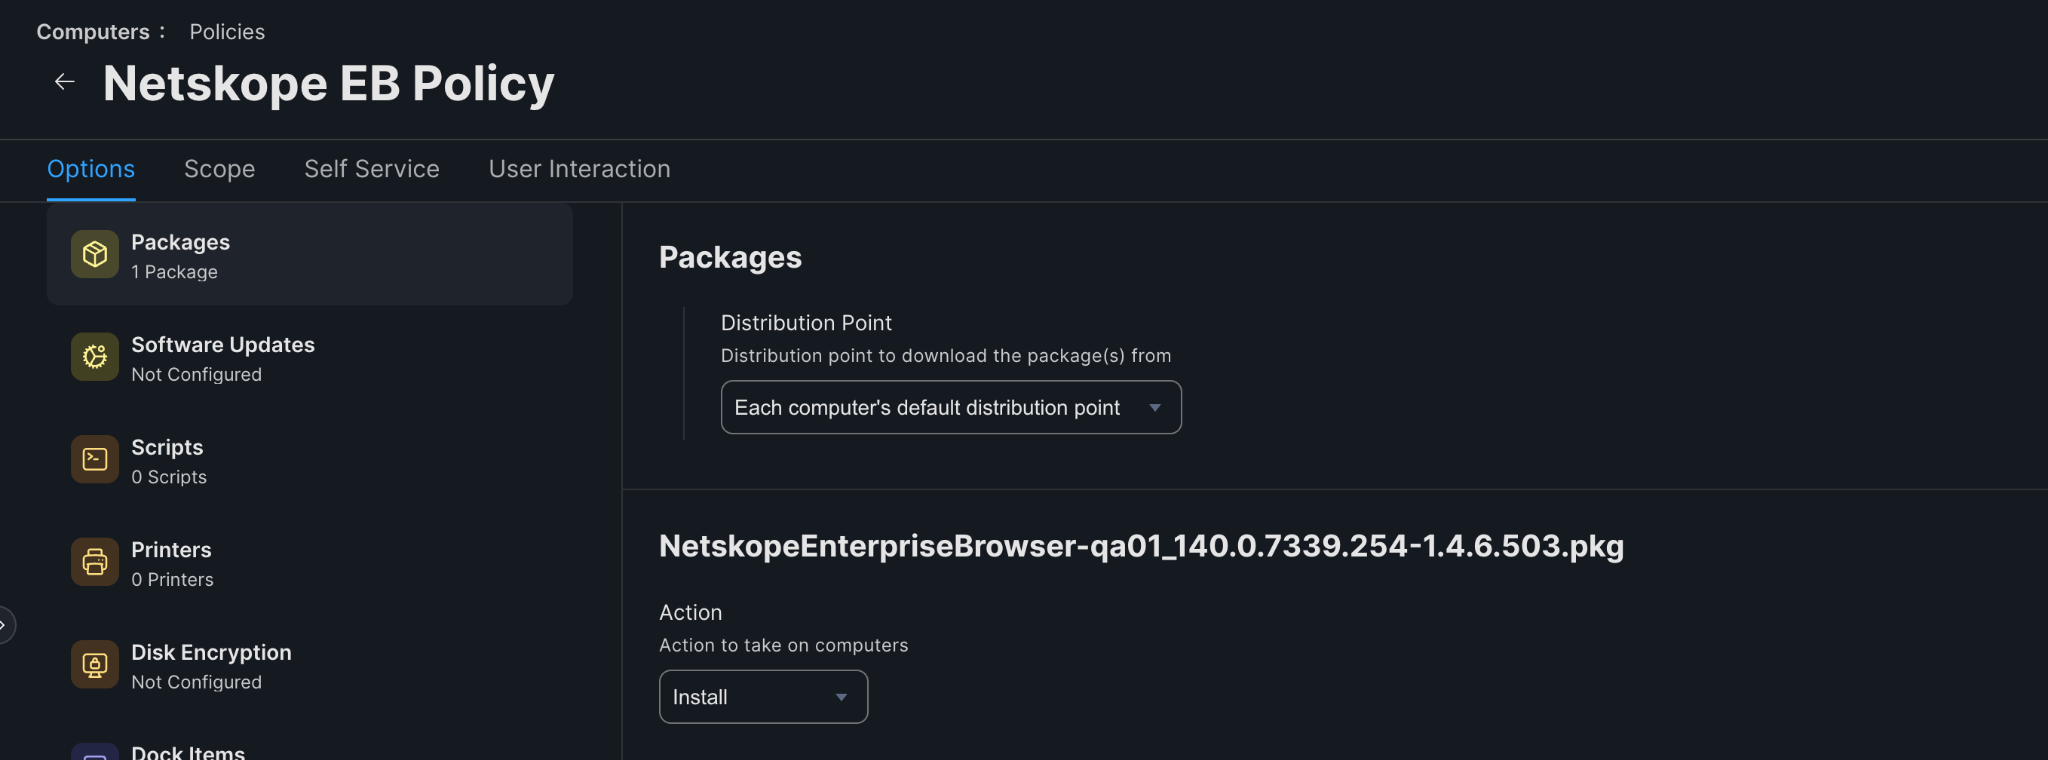
Under Packages, click Configure > Add the pre-created package. Set action to Install.
- Under Scripts, click Configure > Add the pre-created script with:
- Priority: After
- Parameter 4: netskope (PLIST configuration name)
- Parameter 5: your tenant MP code (for example, sjc1, dfw3)
- Parameter 6: your tenant name (for example, if your tenant is acme.goskope.com, enter acme)
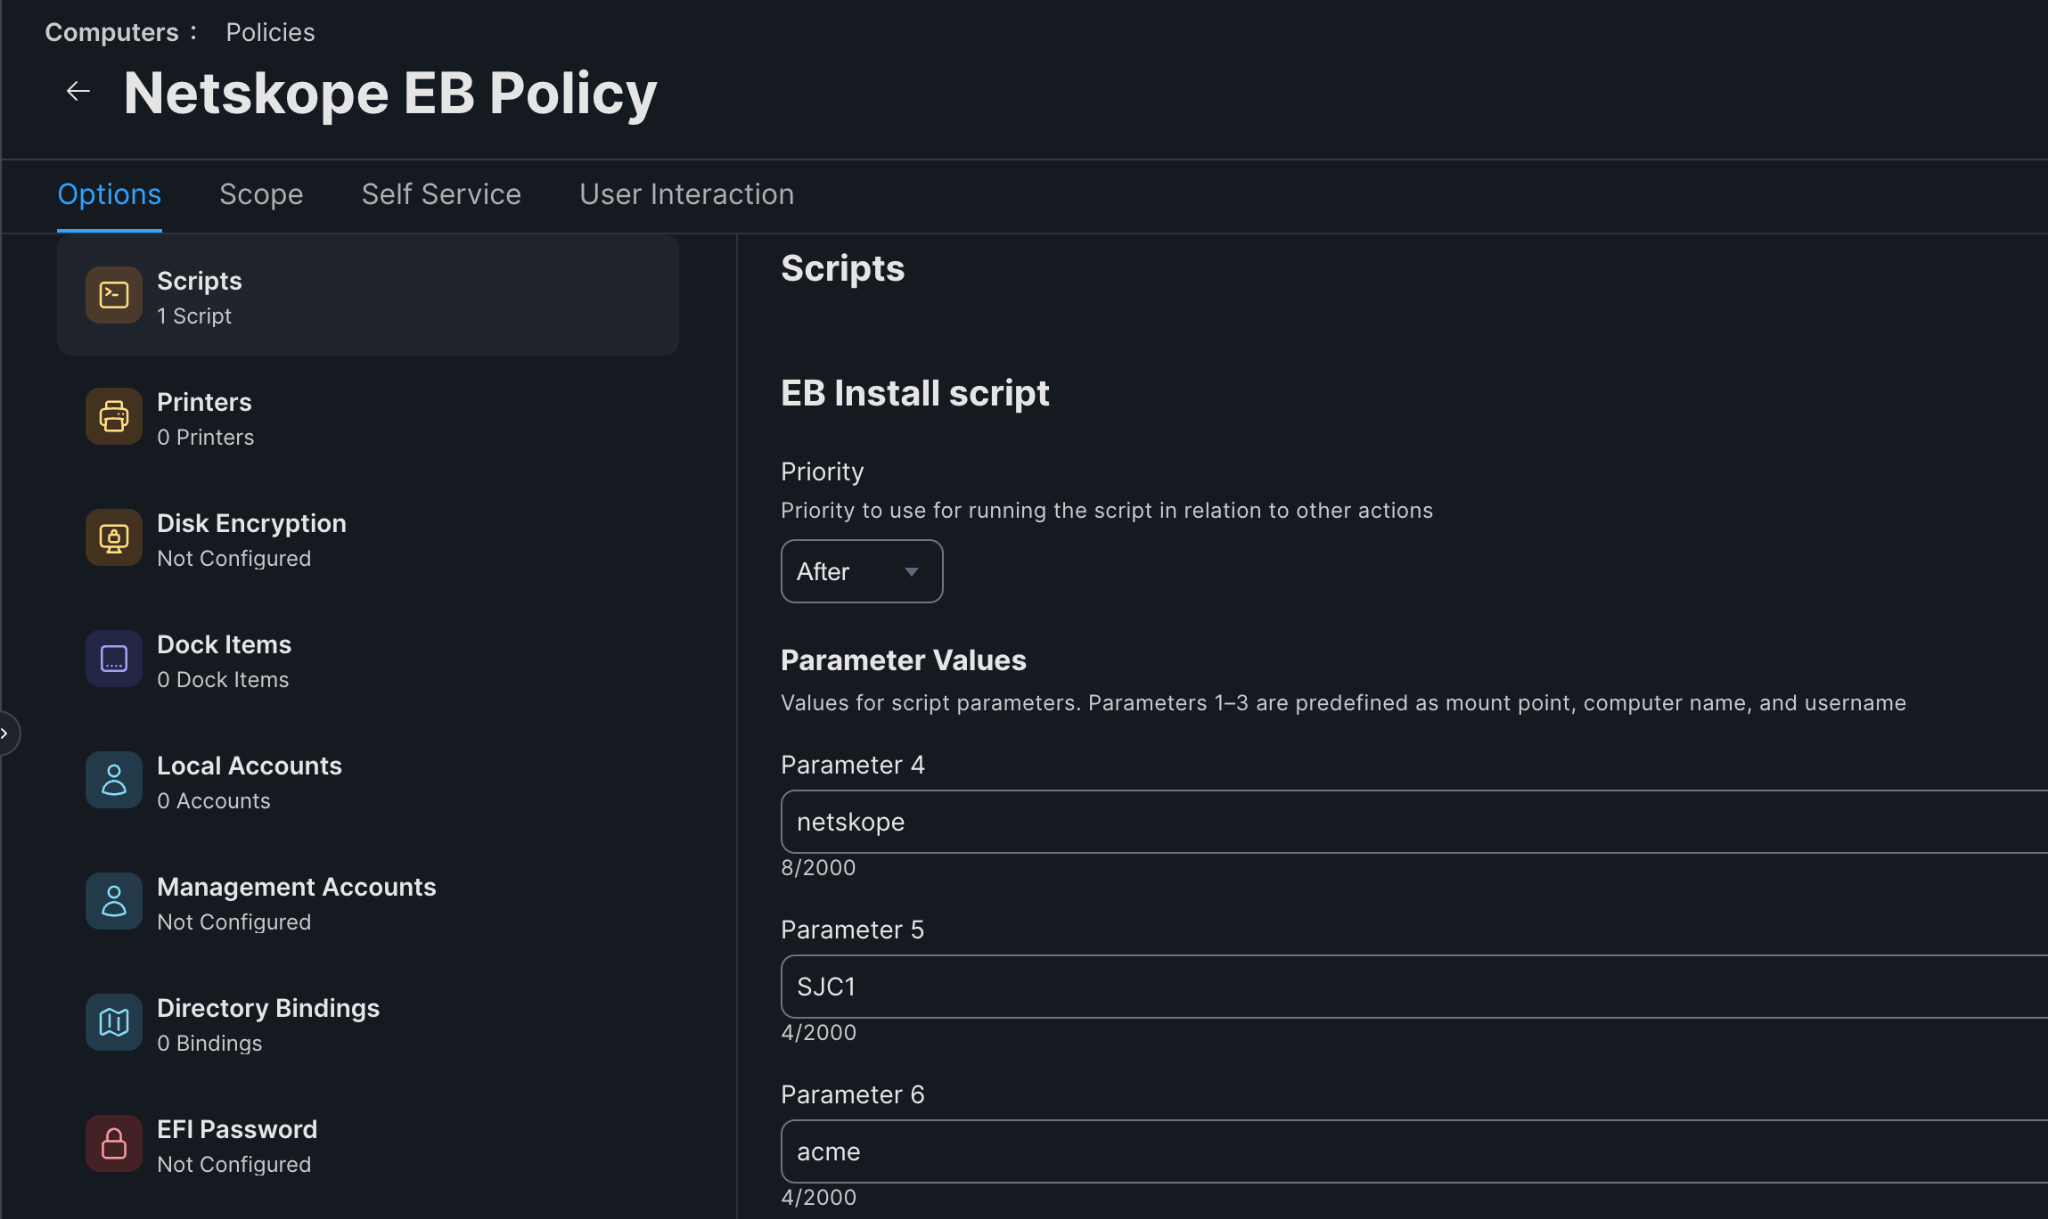
- Priority: After
On the Scope tab, configure the appropriate scope.
Click Save.
Enterprise Browser is deployed and the user profile is created automatically.
Deploying with Other MDM Solutions (Kandji, Mosyle, Workspace ONE)
For other MDM solutions, follow the same general pattern:
Upload the PKG as a custom app or package.
Configure a post-install script that runs the profile creation command as the logged-on user.
The profile creation command is always:
“/Applications/Netskope Enterprise Browser.app/Contents/MacOS/Netskope Enterprise Browser” \
–netskope-mp-host=<MP-HOSTNAME> \
–netskope-user-email=<user-email> \
–netskope-tenant-name=<tenant-name>.goskope.com \
–no-startup-window
Wait 30 seconds for profile creation to complete, then quit the browser process.
The script must run as the logged-on user (not root) for the profile to be created correctly.
Deploying iOS and iPadOS with MDM
Netskope Enterprise Browser for iOS and iPadOS is available on the Apple App Store. You can deploy it to managed devices using your organization’s Mobile Device Management (MDM) solution, or employees can install it manually by following an email invitation. Once enrolled, the browser connects to your Netskope tenant and enforces your browser configuration.
Prerequisites
Enterprise Browser 1.5.0 or later (iOS and iPadOS)
iOS 17.0 / iPadOS 17.0 or later on target devices
A Netskope One tenant with Enterprise Browser entitlement
Access to your MDM console (for managed deployments)
NPA access configured in the Netskope console (if deploying private app access)
Deploying via MDM
MDM deployment lets you push the Enterprise Browser app and its configuration to devices without requiring user action beyond accepting the managed app.
Step 1: Add the App to Your MDM
In your MDM console, go to the app catalog or app management section.
Add Netskope Enterprise Browser from the Apple App Store (App Store ID: 6744964352).
Assign the app to the appropriate user groups or device groups.
Step 2: Configure Managed App Configuration
Enterprise Browser reads the following keys from the MDM-pushed Managed App Configuration:
Key | Required | Description |
|---|---|---|
netskope-tenant-name | Yes | Your Netskope tenant name (for example, acme) |
netskope-user-email | Yes | The enrolled user’s email address |
netskope-mp-host | Yes | Your management plane hostname (for example, tenantname.goskope.com) |
When all three keys are present, Enterprise Browser auto-provisions the user profile — no manual license key entry is required.
Step 3: Configure Network Access (NSClient Coexistence)
If you deploy Enterprise Browser alongside the Netskope Client (NSClient) on iOS:
In the Netskope console, go to Security Cloud Platform → App Definition.
On the Certificate Pinned Apps tab, click New Certificate Pinned Application.
Select iOS as the platform, then add the relevant domains (for example, <MP>.goskope.com). See the Annex: Endpoints per MP for the full list of configuration service hostnames per Management Plane.
Go to Steering Config Exceptions for the app entry and configure the appropriate user group exceptions.
Step 4: Distribute
Push the app and configuration to devices using your standard MDM deployment workflow. Devices with valid managed configuration auto-provision when the user opens the browser for the first time.
Considerations
Considerations include:
iOS and iPadOS require version 17.0 or later. Older OS versions are not supported.
Sideloading is not supported; Enterprise Browser must be distributed through the App Store or your MDM app catalog.
NPA (private app access) requires the NSClient coexistence configuration described above.
WebRTC-based screen sharing interception is not supported on iOS.
Copy link with highlight is allowed on iOS even when a copy policy is set to block (known limitation).
Deploying Android and ChromeOS with MDM
Netskope Enterprise Browser for Android and ChromeOS is available on Google Play. You can deploy it to managed devices using Android Enterprise MDM solutions such as Microsoft Intune, VMware Workspace ONE, or Google Workspace. Once enrolled, the browser connects to your Netskope tenant and enforces your configured Browser Protection Policies.
Prerequisites
Enterprise Browser 1.5.0 or later (Android and ChromeOS)
Android 12 (Snow Cone) or later on target Android devices
ChromeOS 89 or later on target Chromebooks (running Android apps via ARC++)
A Netskope One tenant with Enterprise Browser entitlement
An Android Enterprise MDM console configured for your organization
Deploying via Android Enterprise MDM
MDM deployment uses Android Enterprise Managed App Configuration to push the browser app and profile settings to devices automatically.
Step 1: Add the App to Your MDM
In your MDM console, go to the managed app catalog.
Add Netskope Enterprise Browser from Google Play.
Assign the app to the appropriate user groups or device groups.
Step 2: Configure Managed App Configuration
Enterprise Browser reads the following keys from the MDM-pushed Managed App Configuration (Android Enterprise):
Key | Required | Description |
|---|---|---|
netskope-tenant-name | Yes | Your Netskope tenant name (for example, acme) |
netskope-user-email | Yes | The enrolled user’s email address |
netskope-mp-host | Yes | Your management plane hostname (for example, tenantname.goskope.com) |
When all three keys are present, Enterprise Browser auto-provisions the user profile — no manual license key entry is required. If any key is missing or empty, the browser falls back to the manual profile creation flow.
Step 3: Distribute
Push the app and configuration to devices using your standard MDM deployment workflow. Devices with valid managed configuration auto-provision when the user opens the browser for the first time.
Step 4: Verify Enrollment
After deployment, verify that the browser is correctly connected to your tenant:
On a test device, open Netskope Enterprise Browser.
Navigate to netskope://policy to confirm policies are being received from your tenant.
In the Netskope console, confirm the device appears under the user’s devices.
ChromeOS-Specific Notes
On ChromeOS, Enterprise Browser runs as an Android app through ARC++ (Android Runtime for Chrome). The deployment procedure is the same as for Android. Note that:
ChromeOS 89 or later is required.
The browser window resizes with the ChromeOS window manager. Watermark rendering adapts to window size changes.
Managed App Configuration on ChromeOS is pushed through your EMM solution in the same way as for Android mobile.
User Experience
Once deployed, users launch Netskope Enterprise Browser from their app drawer or ChromeOS shelf. The browser looks and behaves like a standard Android browser, with Netskope-enforced policies applied transparently. Users may see:
A watermark overlay on protected pages (if Watermarking is enabled)
A blank screen when attempting to take a screenshot of a protected page (if Screenshot and Screen Sharing Protection is enabled)
A policy indicator showing active Browser Protection Policies
Restricted copy/paste behavior on protected sites (if Sandboxed Clipboard is enabled)
Considerations
Considerations include:
Android 12 or later is required. Devices on Android 11 or earlier are not supported.
ChromeOS requires the Android app (ARC++) to be enabled on the device.
Intelligent Tab Sharing is not supported on Android and ChromeOS.
Google Play does not support downgrading to an older APK; hotfixes are delivered as new versions.
To learn more: Platform Support Matrix | Enterprise Browser Installation and Troubleshooting
Deploying via Manual Enrollment (Email Invitation)
For organizations without MDM, or for individual user enrollment:
In the Netskope console, go to Security Cloud Platform → User Management.
Find the user and click Send Invitation, or create a new user and send an invitation.
The user receives an email with a link to install the app and a configuration profile.- The user follows these steps on their iPhone or iPad:
Open the invitation link in a browser to download the configuration profile.
Go to Settings → Profile Downloaded and tap Install to trust the profile.
Open the App Store link in the email and install Netskope Enterprise Browser.
Open the browser and create a profile using the license key from the invitation email.
Verifying Enrollment
After deployment, verify that the browser is correctly connected to your tenant:
Ask the user (or verify via MDM) that the browser launches without errors.
In the browser, navigate to netskope://policy to confirm policies are being received from your tenant.
In the Netskope console, confirm the device appears under the user’s devices.
User Experience once Enterprise Browser is installed
Once deployed, users launch Netskope Enterprise Browser from their home screen. The browser looks and behaves like a standard iOS browser, with Netskope-enforced policies applied transparently. Users may see:
A watermark overlay on protected pages (if Watermarking is enabled)
A blank screen or a notification when attempting to take a screenshot of a protected page (if Screenshot Protection is enabled)
A policy indicator in the navigation bar showing active Browser Protection Policies
Restricted copy/paste behavior on protected sites (if Sandboxed Clipboard is enabled)
To learn more: Platform Support Matrix | Enterprise Browser Installation and Troubleshooting
Annex: Endpoints per MP
Ensure that your firewall allows connections to the following endpoints. You only need to allow access to the endpoints corresponding to your tenant’s Management Plane (MP).
MP | Configuration Service | Updater Service
|
|---|---|---|
SV5 | https://nsbrowser-config-sv5.goskope.com | https://nsbrowser-updates-sv5.goskope.com |
SJC2 | https://nsbrowser-config.sjc2.goskope.com | https://nsbrowser-updates.sjc2.goskope.com |
SJC1 | https://nsbrowser-config.sjc1.goskope.com | https://nsbrowser-updates.sjc1.goskope.com |
AM2 | https://nsbrowser-config-am2.goskope.com | https://nsbrowser-updates-am2.goskope.com |
LON3 | https://nsbrowser-config.lon3.goskope.com | https://nsbrowser-updates.lon3.goskope.com |
DFW3 | https://nsbrowser-config.dfw3.goskope.com | https://nsbrowser-updates.dfw3.goskope.com |
FRA2 | https://nsbrowser-config.fra2.goskope.com | https://nsbrowser-updates.fra2.goskope.com |
FR4 | https://nsbrowser-config-fr4.goskope.com | https://nsbrowser-updates-fr4.goskope.com |
RUH1 | https://nsbrowser-config.ruh1.goskope.com | https://nsbrowser-updates.ruh1.goskope.com |
ZUR2 | https://nsbrowser-config.zur2.goskope.com | https://nsbrowser-updates.zur2.goskope.com |
SIN2 | https://nsbrowser-config.sin2.goskope.com | https://nsbrowser-updates.sin2.goskope.com |
MEL2 | https://nsbrowser-config.mel2.goskope.com | https://nsbrowser-updates.mel2.goskope.com |
BOM3 | https://nsbrowser-config.bom3.goskope.com | https://nsbrowser-updates.bom3.goskope.com/ |
In addition to the above, all target machines require connectivity to:
eproxy-<tenant-name>.goskope.com:8090 (secure proxy for internet traffic steering)
<tenant-name>.ebnpa.goskope.com:8090 (secure proxy for private app traffic, if NPA is enabled)