

Overview
This article explains how to manage Netskope DSPM sidecars. Sidecars are deployed in groups called sidecar pools, which link to your Netskope tenant using a unique security token. This page covers how to create and manage these pools and tokens within the Netskope UI.
Additionally, you can deploy a Single Appliance that bundles both the sidecar and DLP services into one virtual machine. To learn more: Deploy the DSPM Single Appliance.
For an overview of how sidecars and DLP appliances fit into the DSPM architecture, see DSPM Architecture. For firewall and egress requirements, see Firewall Settings for DSPM-Hosted Instances.
Sidecar Administration UI
Go to DSPM > Administration > Sidecar to access the Sidecar Administration page.
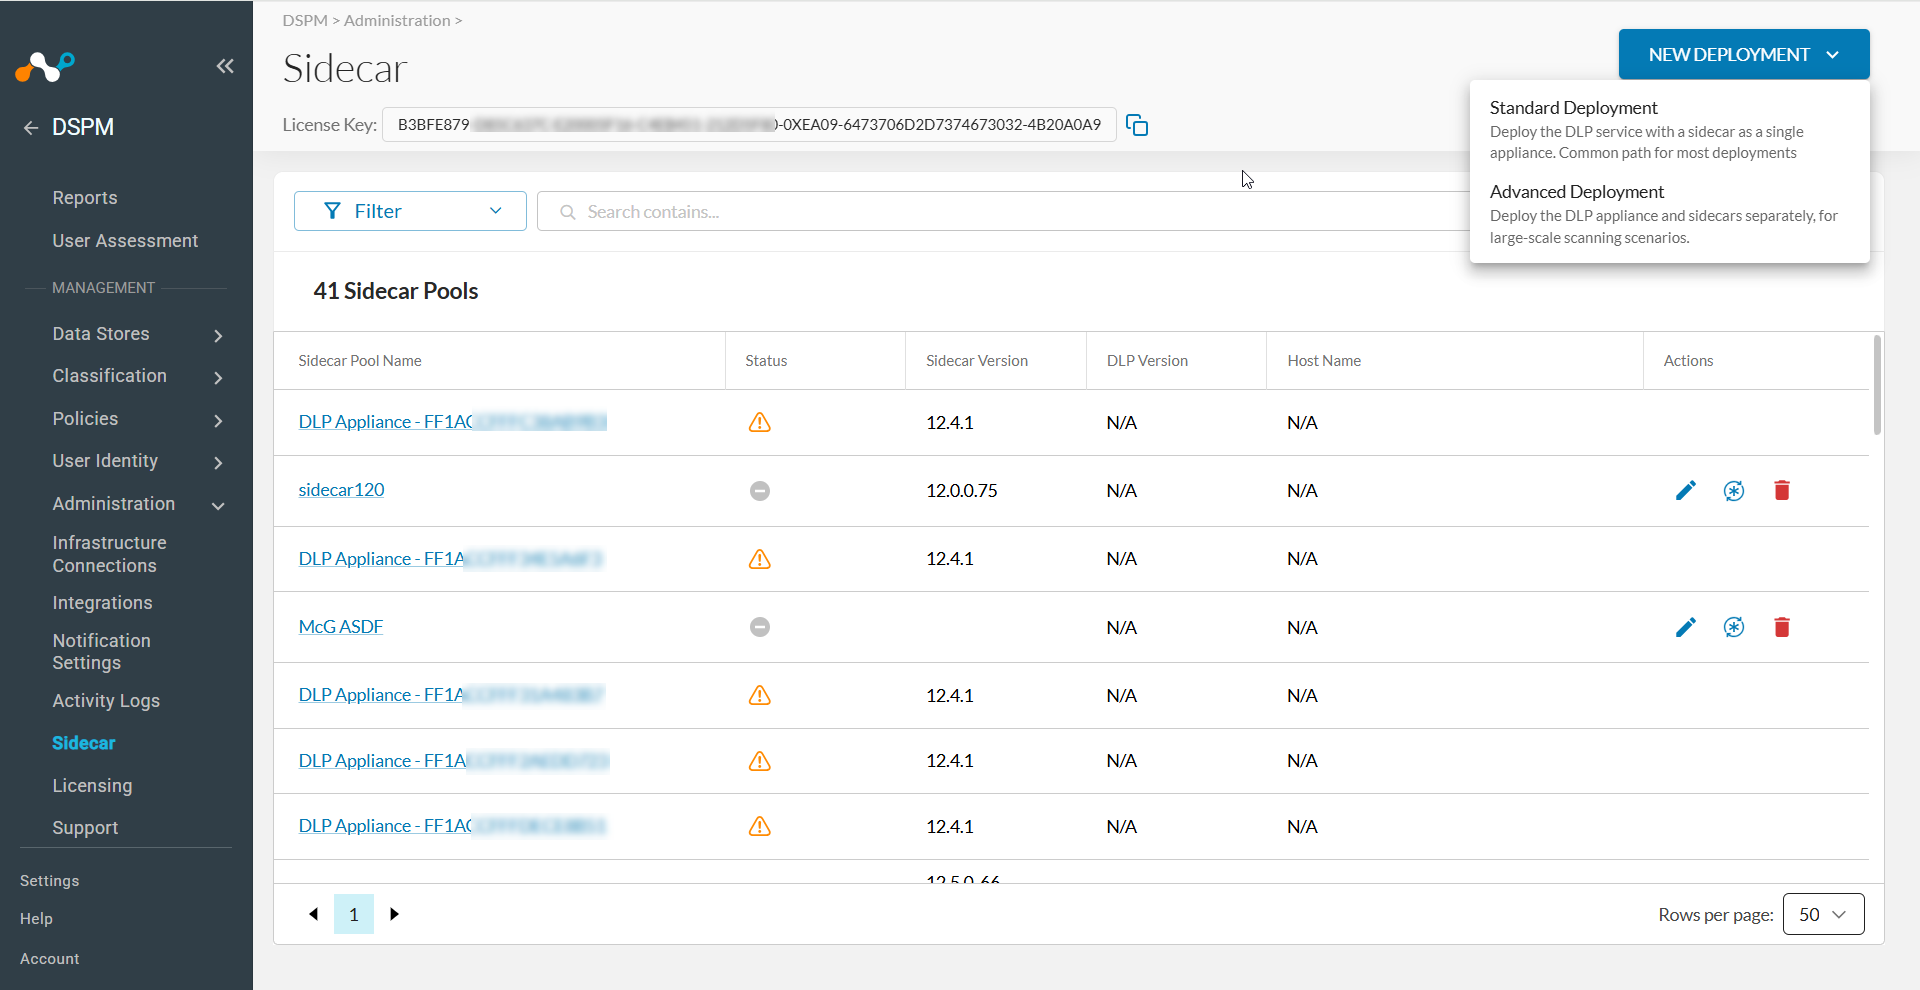
This page displays the following components:
- License Key: Appears at the top of the page with a copy button. You use this key during appliance deployment.
- New Deployment: A dropdown button with two deployment options:
- Standard Deployment: deploys the DLP service with a sidecar as a single appliance. This is the common path for most deployments.
- Advanced Deployment: deploys the DLP appliance and sidecars separately, for large-scale scanning scenarios.
The Sidecar Pools table lists all registered pools and includes the following columns:
| Column | Description |
|---|---|
| Sidecar Pool Name | The name assigned to the pool. |
| Status | The health status of the pool (green = Healthy, yellow = Needs Attention, grey = Incomplete). Note: Sidecar pools with an Incomplete (grey) status don’t appear in the Sidecar Pool drop-down when you connect a data store. If a pool you configured isn’t available for selection, return to this page and resolve any incomplete setup steps. |
| DLP Version | The DLP appliance version linked to the pool. |
| Sidecar Version | The sidecar software version running in the pool. Note: If the pool contains sidecars with a mix of versions, this displays Multiple Versions. |
| Host Name | The user-defined host name for the DLP appliance. |
| Actions | Options to edit, generate new token, or delete the pool. If actions are missing, the pool belongs to a Single Appliance and is system-controlled. |
Register a Sidecar Pool (Advanced Deployment Only)
To establish the connection between your sidecars and your Netskope DSPM tenant, you first generate a unique authentication token by registering a sidecar pool. If you already have an existing sidecar pool token, you can skip this procedure.
- Go to DSPM > Administration > Sidecar.
- Click New Deployment > Advanced Deployment.
- Enter a descriptive Name for the pool.
- (Optional) Select your DLP Appliance from the drop-down, or manually enter an IP address if your appliance doesn’t appear in the list. If you haven’t deployed a DLP appliance yet, you can leave this field blank, or click + Add DLP Appliance to download or assign a DLP appliance image.
- Click Next.
- Select your target platform > Choose the deployment method for your platform > Click Done.
- When the Sidecar Authentication Token window appears, click Generate Token.
- Click Copy to save the token.
- Note: You need this token for the installation process.
- Click Done to close the window.
Install and Associate Sidecars (Advanced Deployment Only)
After you register a sidecar pool and copy the authentication token, deploy the sidecar instances in your environment. The deployment process varies depending on your environment (cloud or on-premises) and the specific installation method.
Follow the detailed instructions in the appropriate guide below:
- Deploy a DSPM Sidecar on AWS EC2 via Terraform
- Deploy a DSPM Sidecar on AWS EC2 via CloudFormation
- Deploy DSPM Sidecars via Helm Chart
- Deploy a DSPM Sidecar on GCP via Cloud Run
- Deploy a DSPM Sidecar on Azure via Container Instances
Retrieve Required Keys for the DLP Appliance (Advanced Deployment Only)
The DLP appliance requires two separate keys. You retrieve both within the Netskope console:
- REST API v1 Key: The appliance leverages this key to fetch the latest DLP configurations. This key may already exist in your environment; if so, you can reuse it. Otherwise, generate a new one:
- Go to Settings > Tools > Rest API v1.
- Click Generate New Token.
- Set the expiration to never expire.
- License Key: The appliance setup leverages this key to validate the DLP entitlement. The Netskope console generates this key automatically, and it appears at the top of the DSPM > Administration > Sidecar page.
Link a DLP Appliance to a Sidecar Pool (Advanced Deployment Only)
Each sidecar pool must link to a DLP appliance for data classification. A single DLP appliance can serve multiple sidecars, as long as their sidecar pools register to the same appliance address.
To link the appliance:
- Go to DSPM > Administration > Sidecar.
- In the Actions column, click the Edit icon for the pool associated with your sidecar.
- In the DLP Appliance field, select your appliance from the drop-down, or manually enter its IP address.
- Note: If you haven’t deployed an appliance, click + Add DLP Appliance.
- Click Test Connection to validate the configuration.
- When the connection test succeeds, click SAVE.
Edit a Sidecar Pool (Advanced Deployment Only)
You can edit the name or change the linked DLP appliance for a registered sidecar pool:
- Go to DSPM > Administration > Sidecar.
- Locate the sidecar pool you want to edit.
- In the Actions column, click the Edit icon.
- In the Edit Sidecar Pool window, update the Sidecar Pool Name or select a different DLP Appliance.
- (Optional) If you changed the DLP appliance, click Test Connection to validate connectivity.
- Click SAVE.
Generate a Replacement Sidecar Token (Advanced Deployment Only)
If you need a new authentication token for an existing sidecar pool, you can generate a replacement token.
- Go to DSPM > Administration > Sidecar.
- Locate the sidecar pool you want to update.
- In the Actions column, click the Generate New Token icon.
- In the Generate New Token dialog box, review the warning and click CONFIRM.
- When the Sidecar Authentication Token window appears, click Copy to save the new token.
- Click CLOSE to exit.
After you copy the new token, update your deployed sidecars to maintain connectivity with your Netskope DSPM tenant. The update process depends on your deployment method. For detailed instructions on updating the token in your environment, see the rotating tokens section in the appropriate deployment guide:
- Deploy DSPM Sidecars on AWS EC2 via Terraform – Netskope Technical Documentation
- Deploy DSPM Sidecars on AWS EC2 via CloudFormation – Netskope Technical Documentation
- Deploy DSPM Sidecars via Helm – Netskope Technical Documentation
- Deploy DSPM Sidecars on GCP via Cloud Run – Netskope Technical Documentation
- Deploy DSPM Sidecars on Azure via Container Instances – Netskope Technical Documentation
View Sidecar Pool Details
Click a sidecar pool name to view its details. By default, the details panel displays only active sidecars. Click the Show Inactive Sidecars icon to toggle the display of inactive sidecars.
- Pool Information, which includes the pool name, status (Active or Inactive), and an Edit Pool link
- DLP Appliance Information, which displays the host name and serial number, DLP version, IP address, uptime, memory usage, and average CPU load
- Sidecar(s), which provides a table listing all sidecars in the pool with their name, status, version, last seen date, creator, and creation date
Upgrade and Schedule (Single Appliance Only)
For pools created by a Single Appliance, the details panel also displays upgrade management options.
- Automatic Upgrade Schedule shows the current schedule, the next automatic upgrade date, and provides an Upgrade Now link for on-demand upgrades.
- Single Appliance Upgrade History is a table showing past upgrades, including the status (Completed, Cancelled), timestamp, trigger (Auto update, Manual), and description (e.g., Full Upgrade, v135.0.24).
To modify the schedule:
- In the pool details panel, click the Upgrade tab then click Edit Schedule.
- Choose when to apply the upgrade after release (Within the first week after release, Within the second week after release, or Within the third week after release).
- Select the day of the week and start time (in the appliance’s local timezone).
- Click Save Schedule.