

Netskope designed the new Netskope Client UI for both end users and IT administrators. This topic outlines the essentials of operating and administering the Netskope Client application across supported endpoint operating systems.
Supported Operating Systems
-
Windows
-
macOS
All new Client UI options are available across all supported operating systems.
Overview
Netskope considers the Overview section as the single page that displays all licensed Netskope Client services along with their current status.
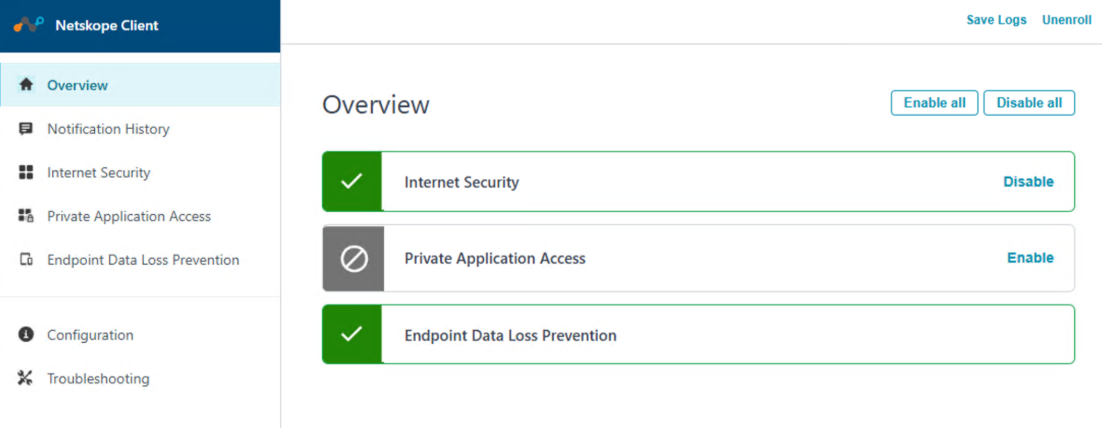
Here are the specifications related to the Overview section:
| Attribute | Description |
|---|---|
 | This icon indicates that the Client services are enabled. |
 | This icon indicates that the Client services are disabled. |
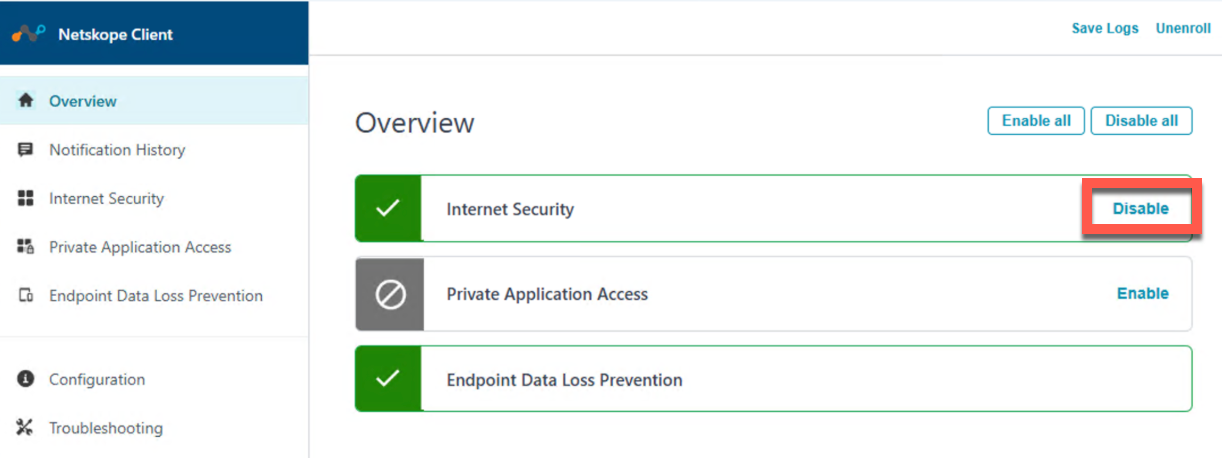
| Enable/Disable | This indicates that each service displays the Enable or Disable option. Click the option to change the status from Enable to Disable or vice versa. |
| Enable All/ Disable All | Allows you to enable or disable the configured services at once. |
| Save Logs | Use this option to save client logs that can be shared with support team for troubleshooting. |
| Unenroll | If you provision the Netskope Client using IDP, use this option to allow users to unenroll from Netskope. |
The Overview page immediately highlights any items that require user attention. For example:
-
An error message when the system cannot establish a connection.
-
A countdown when you must re-authenticate soon, complete with a Re-authenticate button.
-
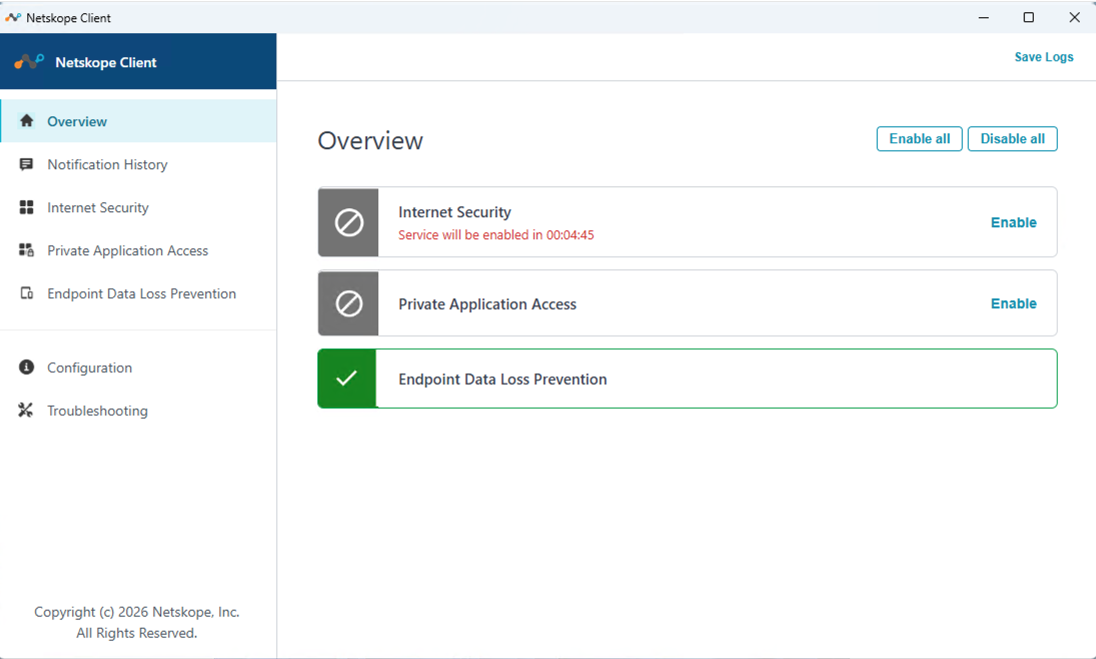
A countdown when the system temporarily disables a service before automatically re-enabling it.
Enable/Disable All Client Services
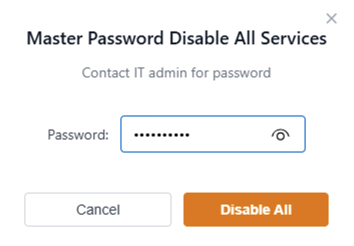
On Windows and macOS devices, if the administrator configures the Master Password for a tenant, the end-user must enter the password provided by the IT administrator to disable Netskope Client services, including Internet Security and Netskope Private Access (NPA).
To disable Netskope Client services using Master Password:
-
Click Disable All.
-
This prompts another dialog box with the option to enter the master password shared by the IT administrator.
-
Enter the password.
-
Click Disable.
This disables the Client services immediately.
Netskope also provides two nsdiag options to disable Netskope Client in Windows and macOS devices:
-
nsdiag -t disable
-
nsdiag -t disable --password <master password in plain-text>
After you run the command: nsdiag -t disable, it asks you to provide the master password shared by your IT administrator. Once the password is entered, it displays the following successful message: Enable/disable client successful.

The CLI displays the message Incorrect Password, Client cannot be disabled if you enter an incorrect password.
Enable/Disable Internet Security
Use this option to enable or disable Internet Security services on supported platforms. With this feature:
-
End-users can now easily disable Client while performing specific tasks that require disabling Netskope Client for Internet Security services.
-
It avoids uninstalling the Client, allowing the end user to disable the Netskope Client using a one-time password (OTP) if enabled in the Client Configuration.
Once the duration for the OTP expires, the Client re-enables automatically, eliminating the need for manual intervention by the admin.
To disable internet security services in Windows and macOS:
-
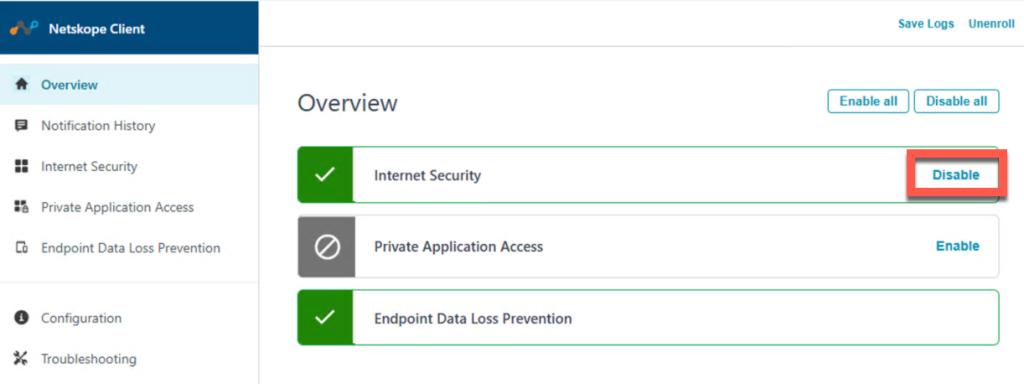
Click the Disable option available in Overview > Internet Security.
-
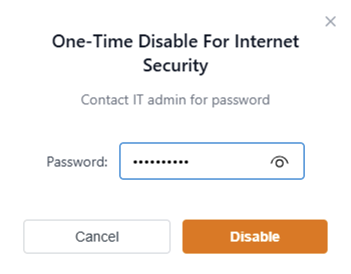
This prompts a dialog box with the option to enter the one-time password.
-
Enter the password.
-
Click Disable.
It disables Internet Security immediately.
Post Disabling Internet Security: After disabling Internet Security, the Overview section displays the following:
Enable/Disable Private Application Access
You can allow users to enable or disable the Client for Private Apps Access. Select the option Allow disabling of Private Apps Access from Client Configuration to view the Private Application Access option.
Notification History
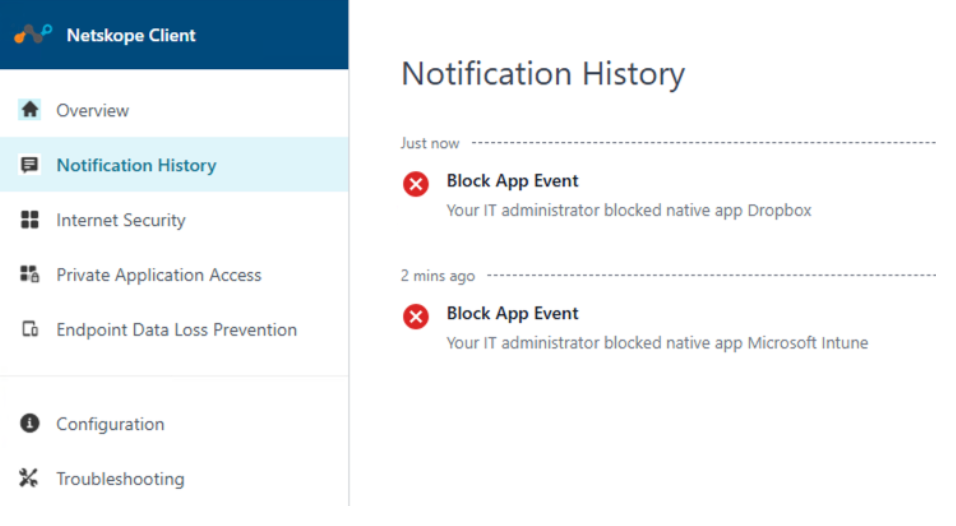
This section provides a consolidated list of recent alerts and blocked event notifications sent across services. Notification History helps you view notifications that you might have missed when they first appeared as pop-ups.
Internet Security
Internet Security displays the connection details for your Netskope Client tunnel, including the gateway and point of presence you are connected to.
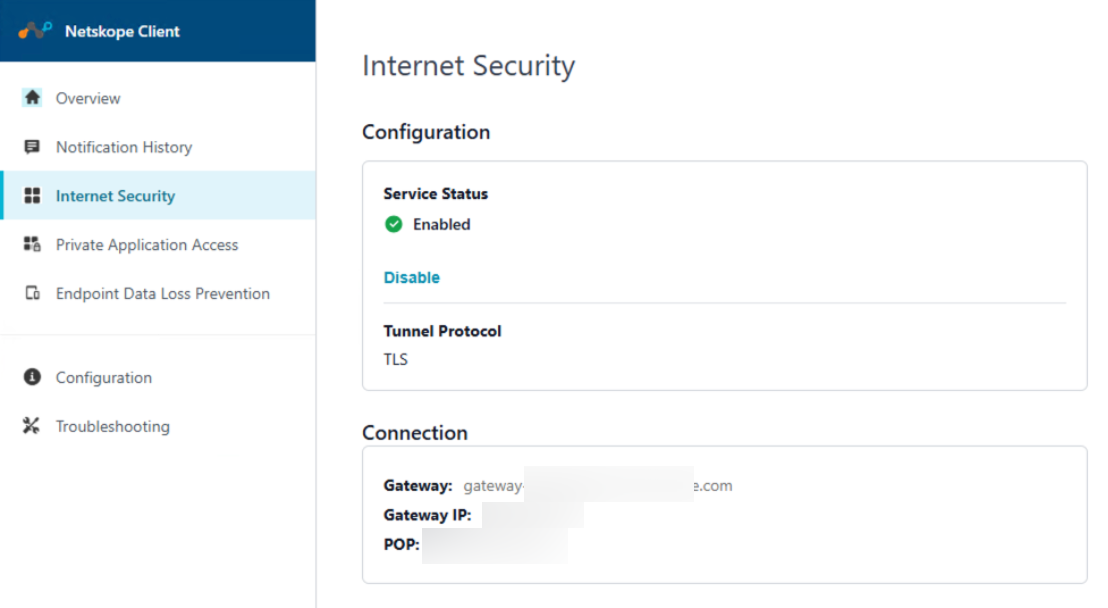
The Internet Security page shows:
-
Whether the service is enabled, with an Enable/Disable control.
-
The tunnel protocol currently in use.
-
Once connected, your gateway details (hostname, IP address, and POP name).
Private Application Access
You can allow users to enable or disable the Client for Private Apps Access. Select the option Allow disabling of Private Apps Access from Client Configuration to view the Private Application Access option.
Re-authenticate Private Access
The Re-authentication for Private Apps option forces the Netskope Client to re-authenticate the user. This resets the timer for the next periodic re-authentication. Contact Support to enable this functionality in your tenant.
In Windows and macOS:
If Re-authentication is enabled with Grace Period configured under Private App Segment in Client Configuration, the Netskope Client UI displays a message with the time remaining before the private access disconnects.The message displays the total time in Hours: Minutes: Seconds left to re-authenticate to Netskope Client.
For example, in Windows, if you configure 24 hours in the Re-Authentication Interval on the Client Configuration webUI and 30 minutes as the Grace Period, Private Application Access under Overview on the Client UI displays a warning message for 24:00:00.
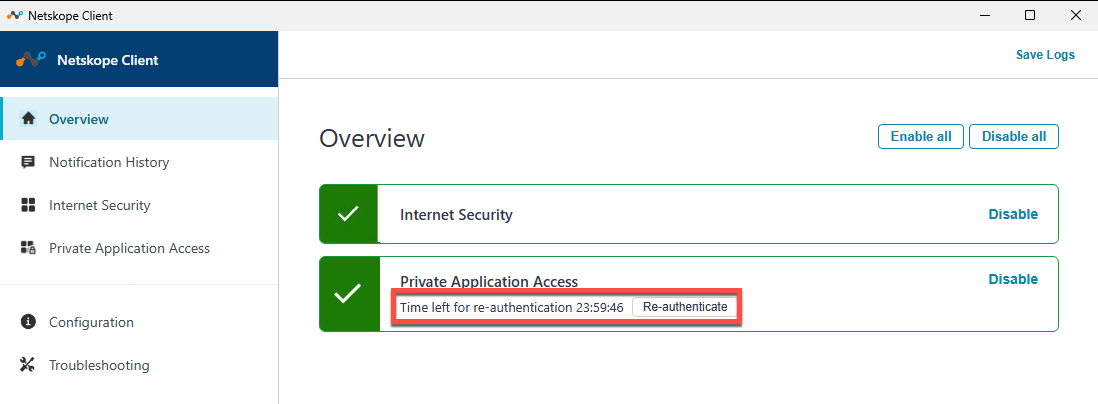
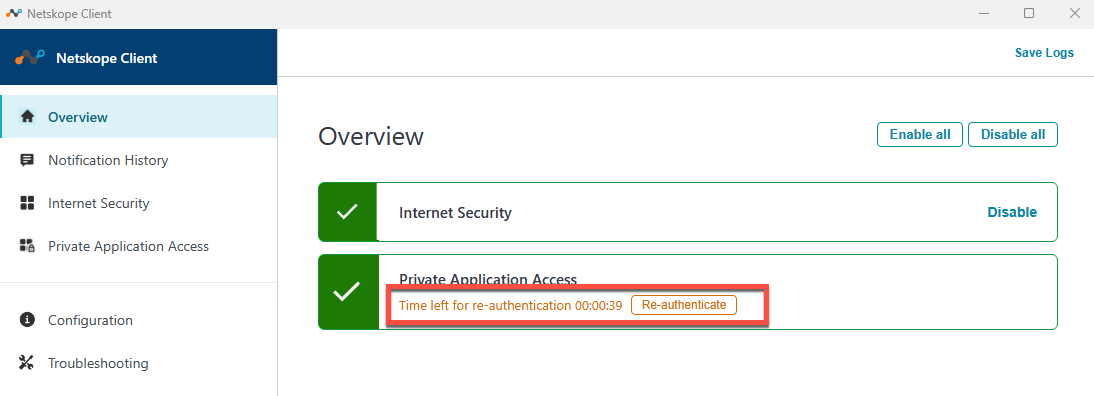
Once the 24 hours complete, the webUI displays another 30 minutes for the grace period. You can also notice the text displayed that indicates that the time left for re-authentication is going to expire soon.
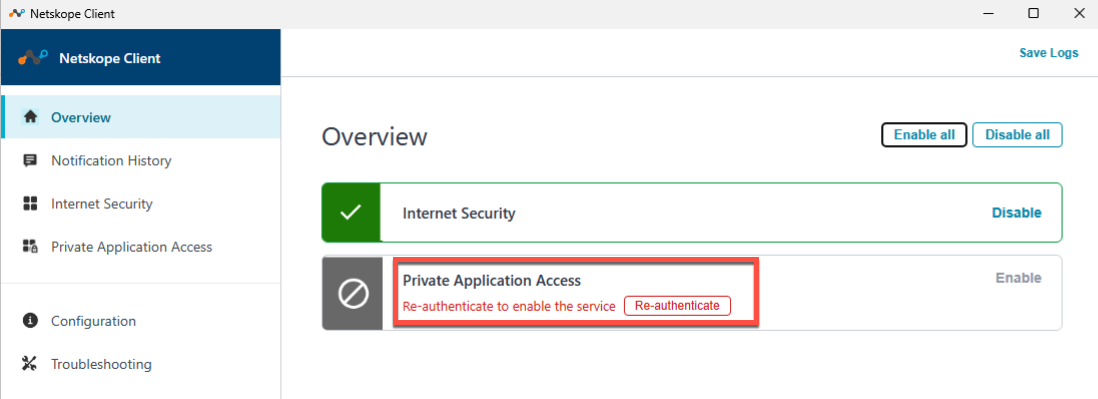
Once the re-authentication window expires, the Private Access status gets disabled with a proper error message.
Private Access Tenants
You can now access Private Applications across multiple Netskope tenants such as managed service provider, partner, or third-party organization, without unenrolling or uninstalling the Netskope Client. You can easily switch between primary and partner tenants with a single click.
Supported OS: Windows, macOS
-
Multi-tenant access: Seamlessly switch between partner organizations to access authorized private resources.
-
Client UI enhancements: View current tenant details and a sub-menu listing all available partner tenants.
-
No re-installation required: Eliminates the need to unenroll/ reinstall the Netskope Client when switching tenants.
Refer to the following user interface (UI) terms displayed under the Private Access Tenants option:
-
Primary tenant – Your main Netskope tenant with the Internet Security policies.
-
Partner tenant – Netskope tenant used by your partner. This tenant also contains policies for all users that need access to private applications.
The number of partner accounts displayed in this section depends on the number of partners added by the administrator in Client Configuration, with a maximum up to 20.
Here are some key points to be noted while using this functionality:
-
When you switch to a partner account, the Client UI displays the Private Access details of the selected partner tenant (for example, Reauthentication and Private Access status). However, Internet Security services display the details of the primary tenant.
-
The Private Access section UI varies with the partner tenant.
-
You can save only one partner configuration in your endpoint. When you switch to a new partner account, it un-enrolls from the previous partner account and then enrolls to the new partner.
-
Once you select a new partner tenant, you need to enroll using the IDP enrollment method.
-
If the end-user disables Netskope Private Access while being in the Partner account, Netskope Client switches to the Primary tenant’s prelogon connectivity (if Prelogon is enabled at the Primary Tenant).
-
Separate NPA logs are created for each partner tenant in %ProgramData%/Netskope/stagent/Logs.
Here’s an example to describe the workflow of Partner Access Tenants:
Org A is an automobile supplier to large car manufacturers with the Netskope Client installed in its environment. Org A works with more than 10 vendors who need access to applications that Org A uses. Some of these vendors already use services offered by Netskope and have the Netskope Client installed in their environments. Org A can now specify the group of users and the partner tenant information in the Client Configuration.
If the admin adds Org B and Org C as partner users in the Client Configuration, refer to the following scenarios to understand how the primary account user (User A) from Org A can switch between partner users Org B and Org C.
User A Switches to Org C (Primary to Partner Switch)

User A Switches to Org B From Org C (Partner to Partner Switch)

User A switch esto Primary Tenant Org A from Partner Tenant Org B ( Partner to Primary Switch)

Secure Enrollment Enabled and Enforced for Partner Accounts
If you enable and enforce the encryption token in Secure Enrollment Services, the end-user must provide the encryption token during a partner switch. Upon entering the encryption token, it downloads the branding file again and decrypts it successfully.
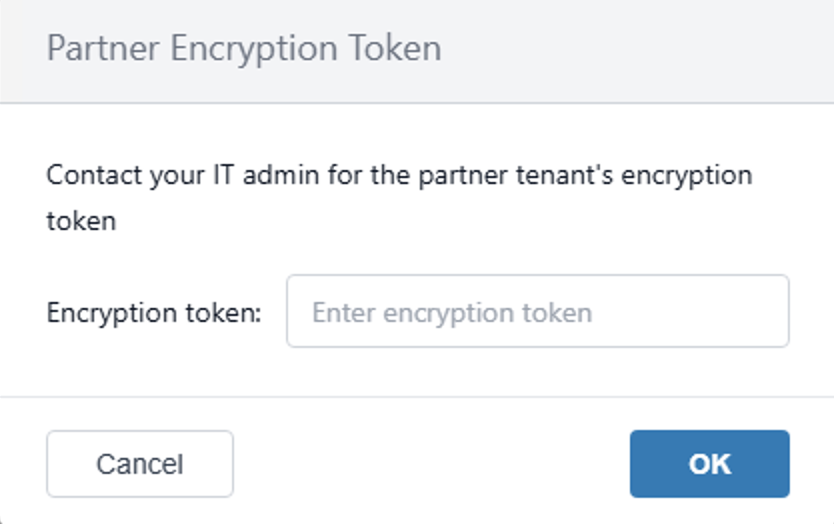
The tokens are stored in the registry key (Windows) and keychain (macOS).
-
Windows: HLM\\Software\\Netskope\NPAPartnerTenants
-
macOS: com.netskope.client.branding.encryptToken
Once these tokens are stored, the end-user is not prompted again to enter the token in the subsequent partner switches. However, once the token expires, the end-user must enter the new encryption token. When the partner tenant is deleted from the webUI, the registry entry is removed along with the partner configuration (if any) from the user machine. Registry/keychain entries will be removed if:
-
Partner tenant is removed from WEBUI
-
Partner Tenant Access feature is disabled
-
Client unenrollment
-
Client uninstallation
Limitation
Does not support Dynamic Steering configuration in partner tenants; ensure you match partner tenant users to a steering configuration without Dynamic Steering in the partner tenant.
Endpoint Data Loss Prevention
The Endpoint Data Loss Prevention page shows:
-
Enable/Disable control and current status.
-
The policy currently applied to your device, along with when it was last loaded.
Configuration
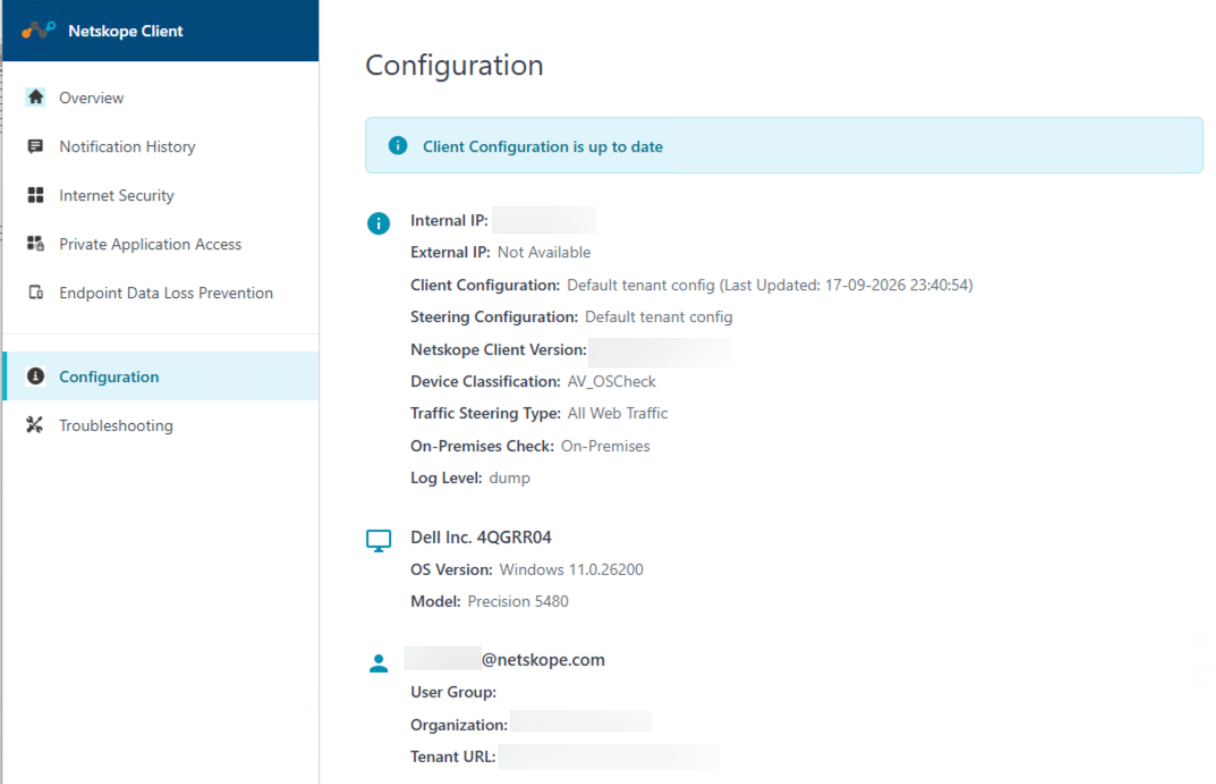
The Configuration page provides an overview of your device and its current setup. For example, your internal and external IP addresses, your assigned Client Configuration and Steering Configuration, device classification, and basic device and user information.
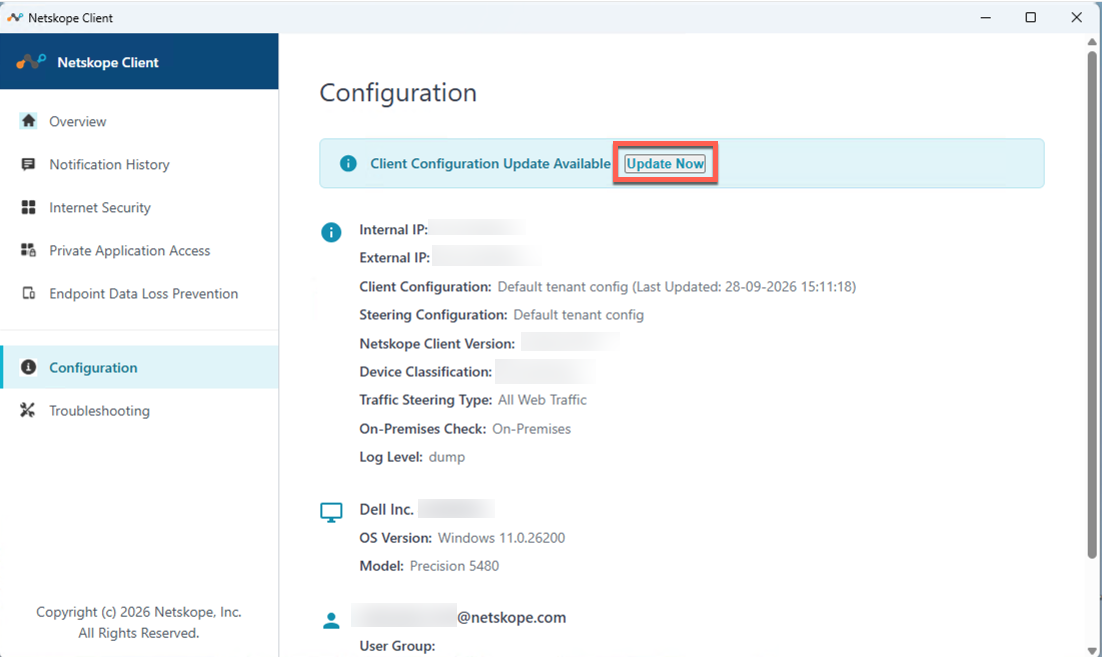
Whenever an updated configuration is available, a banner displays at the top of the page with an Update Now button. Clicking this button updates your settings across the Client, though applied changes may require a few moments to reflect.
Troubleshooting
In Troubleshooting, Netskope Client collects diagnostic data such as logs, packet captures, and system information into a single file that you can share with Netskope Support. Instead of adjusting the client log level directly, you choose a collection mode, let Netskope Client gather data for a short-timed window, and save the result as a compressed (.zip) file on your device.
This section consists of the tools to collect diagnostic data for Netskope Support. The Troubleshooting page replaces the previous “Save Logs” and “Advanced Debugging” options in the older Client UI with one page and three modes:
-
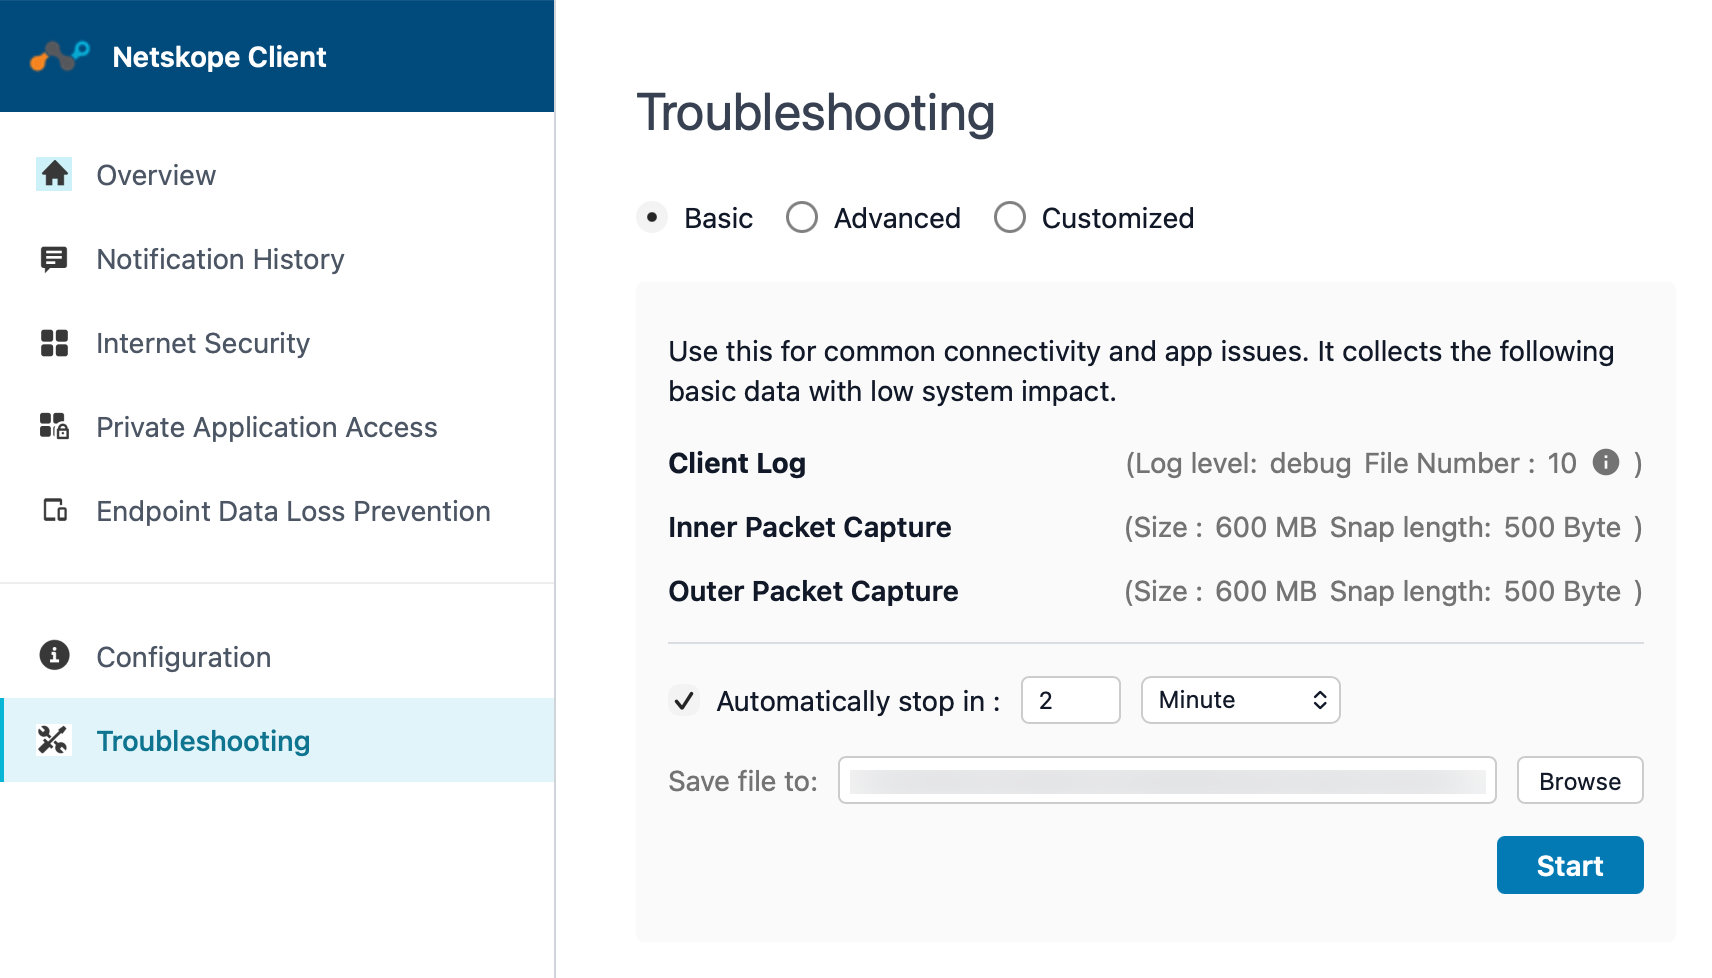
Basic: Collects the same information as the previous Save Logs option and allows the user to save logs between the configured time intervals along with the packet capture. Use this for routine troubleshooting.
-
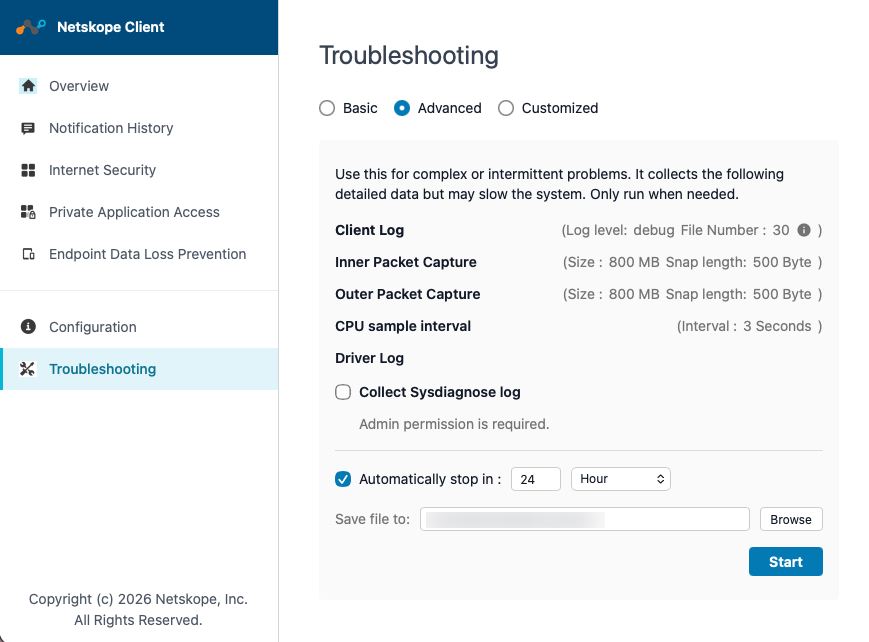
Advanced: Collects more detailed information (such as packet capture and driver logs) for a set period that you choose.
-
Customized: Lets you choose exactly the type of information to collect, such as debug logs, packet captures, and platform-specific diagnostics (for example, memory dumps on Windows or a Sysdiagnose log on macOS).
Basic
Using the Basic option, the Client verifies common connectivity and application issues and collects a low-impact set of data.
Advanced
Advanced mode collects more detailed data than the Basic mode. Once you start the troubleshooting process, the Client UI displays the in-progress state.
Customized
Customized mode is intended to let you tailor exactly what Netskope Client collects rather than relying on Basic or Advanced mode preset combinations.
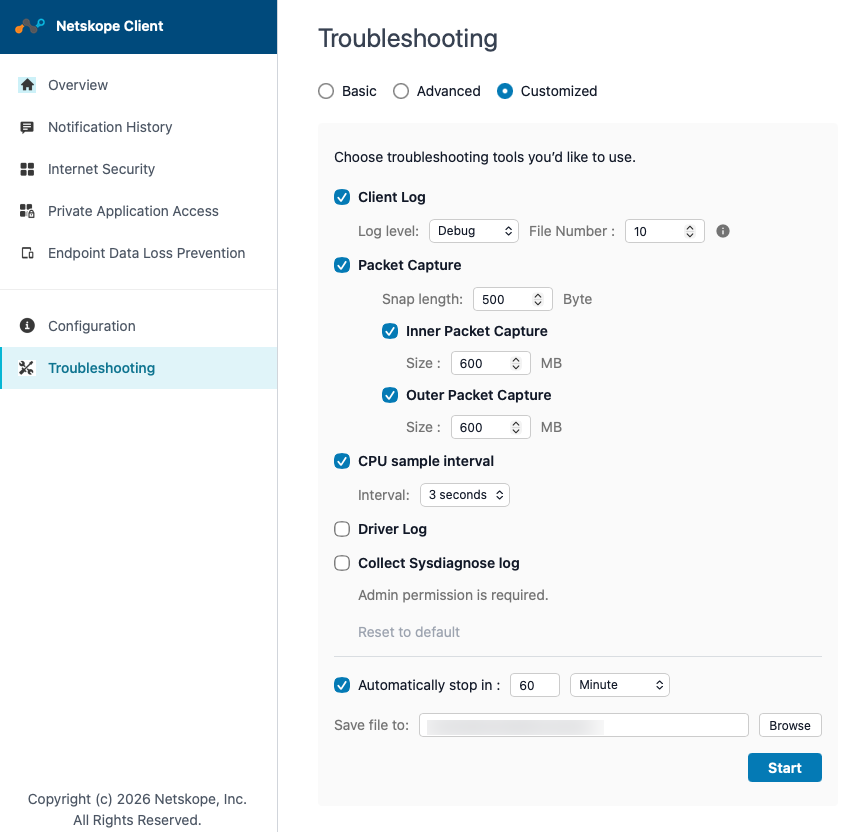
Refer to the following table to understand the various troubleshooting options available in the Basic, Advanced, and Customized modes:
| Troubleshooting Options | Description |
|---|---|
| Client Log | The Client log files captured using the current configured log level. |
| Inner Packet Capture | A packet capture taken from inside the Netskope tunnel, capped at a specific size in MB with each packet truncated to a certain byte snap length. This helps Netskope Support see the traffic your device sends and receives after it enters the tunnel. All packets captured are stored in the filename nspktdump.pcap in your local device. Inner Packet Capture maximum size limit:
|
| Outer Packet Capture | A packet capture taken from outside the Netskope tunnel (your device underlying network connection), also capped at a specific size in MB with a certain byte snap length. This helps Netskope Support compare traffic before and after it enters the tunnel. Outer Packet Capture maximum size limit:
|
| Automatically Stop In | A timer that stops collection automatically after a set duration, so the troubleshooting mode does not run indefinitely. You can set the timer in seconds, minutes, or hours. |
| Save File to | The folder and file name where Netskope Client saves the resulting log bundle (a .zip file). Click Browse to choose a location. There is no default path set until you choose one. |
| Log Level | Filter logs according to their severity. The Netskope Client uses the log level received from the Client Configuration webUI. Select any one of the following options in Set Log Level:
Setting the level to Dump generates more logs to files. The Netskope Client keeps two log files (fixed file size 10 MB) for rotation. The Dump level can expedite rotation, which may cause useful logs to be overwritten. The log files are stored by default in the following location:
|
| CPU sample interval | Periodic CPU usage sampling, taken at a fixed interval. This data helps Netskope Support correlate performance issues with what the Client was doing at the time. |
| Driver Log | Log data from the Client network driver component. |
| Collect memory dumps | A memory dump captures a snapshot of a computer's RAM and system state at a specific point in time, typically during a crash. Enabling memory dump collection helps to save these files for detailed memory trace analysis. |
| Windows Application and System Event logs | Collects entries from the Windows Application and System event logs. Selected by default. |
| Start | Initiate log generation based on user selection. |
| Reset to Default | It resets the customized value of Troubleshooting. |
To collect diagnostic data:
-
On the Netskope Client UI, click Troubleshooting.
-
Select Basic, Advanced, or Customized, depending on the level of detail you need.
-
Optionally, adjust Automatically stop in, then set a duration and unit (for example, 60 seconds). Leave this enabled so collection does not run indefinitely.
-
Under Save file to, click Browse and choose a location and file name for the log bundle.
-
If you select Advanced and want to include memory dumps or Windows Application and System Event logs, leave those checkboxes selected. Both require administrator rights on the device.
-
Click Start.
-
If you did not select a save location in step 4, the Netskope Client displays a warning asking you to select one before proceeding further.
-
A confirmation dialog appears showing the estimated maximum bundle size and expected save time. Review these details, then click OK to proceed or Cancel to return to the previous step.
-
Reproduce the issue you are troubleshooting while collection is running.
-
If you did not set an automatic stop timer, return to the Troubleshooting tab and stop collection manually.
Netskope Client Status Icons
The following table describes various Netskope Client status icons that are displayed on the user interface, according to the operating system that you use.
| Icon | Status | Description |
|---|---|---|
 | Enabled | The Client icon is in full color when either one of the following services or both are enabled:
|
 | Disabled | The Netskope client has failed to download the required configuration. The color here denotes that if all services are disabled and there is no Client Configuration download failure. The client will continue to be in this state until the configuration is downloaded. Possible causes are:
|
 | Enabled with warning | The icon is orange in color which states at least one of the services is enabled but has a warning in at least one of the services. Possible causes:
|
 | Enabled with error | The icon is red in color which states at least one of the services is enabled but has an error with at least one of the services. Possible causes:
|
 | Disabled with warning | All services are disabled and one of the services has a warning. |
 | Disabled with error | All services are disabled and one of the services has an error. The icon is grayed out with a red circle. The tooltip displays the following when both services are disabled and one of the services are disabled due to an error:
 Possible causes are:
|
 | Disabled due to fail close. | The icon is in red color when:
Possible cause: Tunnel connection could not be established. |