

The Netskope CMDB Integration leverages Netskope APIs to seamlessly pull entities such as assets, NPA policies, Private Apps, Publishers, and tags information into the ServiceNow instance, offering a streamlined and integrated approach to managing and viewing Netskope entities directly from their ServiceNow environment. This integration also provides a feature to create or update Private Apps, plus NPA policies on the Netskope platform. This integration also provides support for fetching the device OTP to disable any device activities.
Application Features
The main features of the integration include:
- Private Application Synchronization
Automatically synchronize Private Applications between ServiceNow and Netskope through scheduled jobs, creating or updating applications based on configured Auto or Manual rules. - Asset Ingestion into CMDB
Ingest Netskope asset data into the appropriate CMDB tables with configurable mapping and create/update logic to prevent duplicate CI creation. - Additional Data Synchronization
Synchronize related entities such as Ports, Publishers, Tags, Users, and User Groups to maintain data consistency between ServiceNow and Netskope. - NPA Policy Management
Fetch existing NPA policies from Netskope and support creating new NPA policies directly on the Netskope platform through integration APIs. - Device OTP Operations
Enable secure OTP requests for devices to temporarily disable Netskope services, such as Client, EPDLP, and NPA.
Compatibility Matrix
ServiceNow Version: Xanadu, Yokohama, Zurich
Netskope API Key Version: V2
Netskope CMDB Integration
This section describes how to download and install the Netskope – CMDB Integration application from the store.
Prerequisites
The user must have admin access to the Netskope Platform to generate an api key for authentication. Provide below permissions for the endpoints.
| Endpoint | Method | Permission |
|---|---|---|
| /api/v2/steering/apps/private | POST | Read + Write |
| /api/v2/steering/apps/private/${private_app_id} | GET | Read |
| /api/v2/steering/apps/private/${private_app_id} | PATCH | Read + Write |
| /api/v2/steering/apps/private/tags | GET | Read |
| /api/v2/infrastructure/publishers | GET | Read |
| /api/v2/policy/npa/policygroups | GET | Read |
| ${url}/api/v2/events/datasearch/clientstatus | GET | Read |
| /api/v2/policy/npa/rules | POST | Read + Write |
| /api/v2/policy/npa/rules/{id} | PATCH | Read + Write |
| /api/v2/deviceclassification/tags | GET | Read |
| /api/v2/scim/Users | GET | Read |
| /api/v2/steering/apps/private | GET | Read |
| ${url}/api/v2/events/dataexport/events/alert | GET | Read |
| /api/v2/policy/npa/rules | GET | Read |
| /api/v2/scim/groups | GET | Read |
| /api/v2/devices/otp | GET | Read |
ServiceNow Plugins
The following ServiceNow plugins must be activated:
| Dependency | Version |
|---|---|
| Integration Common For CMDB | 2.22.1 |
Application Installation
Steps to install the application from the ServiceNow Store:
- Users with the System administrator(admin) role can install the application from the ServiceNow Store.
- Go to https://store.servicenow.com
- Search for and select Netskope – CMDB Integration.
- Click Get and enter the ServiceNow ID of your ServiceNow account.
- After it is added successfully, open the instance and go to Applications > All Available Applications > All.
- Find the application using the filter criteria and search bar.
- Next to the application listing, click Install.
Configuration Instructions
Permission and Roles
Note: Netskope – CMDB application can be used by app administrators.
Create Users
This step is optional, if you do not want to create a user then System Admin can access the Netskope CMDB Application.
ServiceNow platform admin creates the various users for the application.
| Username (for example) | Description | Minimum Role to be Assigned |
|---|---|---|
| App Admin | This user will be accessing the Netskope CMDB Integration for, Fetching the Data, and accessing various modules of the application. |
|
| App User | This user should be able to access following modules of netskope CMDB integration with read access:Netskope Credentials, Private App Configurations, Asset Configurations, NPA Policies -> All, Netskope Change Request, Publishers, Tags, Private Applications |
|
Here is an example showing how to create an App Admin user and assign the x_netsk_cmdb_app.admin role to it. Other users can be created similarly by giving them the appropriate roles.
Role Required: System Administrator (admin)
Procedure:
- In ServiceNow, go to Organization > Users.
- Click the Users module.
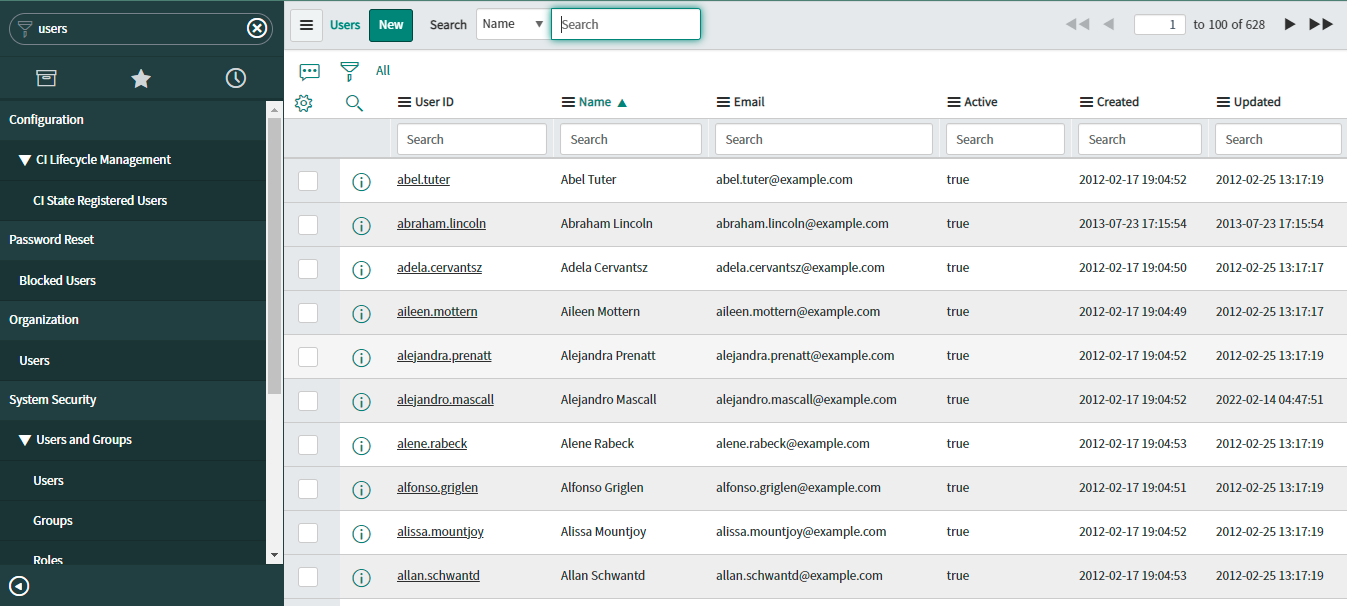
- On the Users list that is displayed, click New. A new user form is displayed.
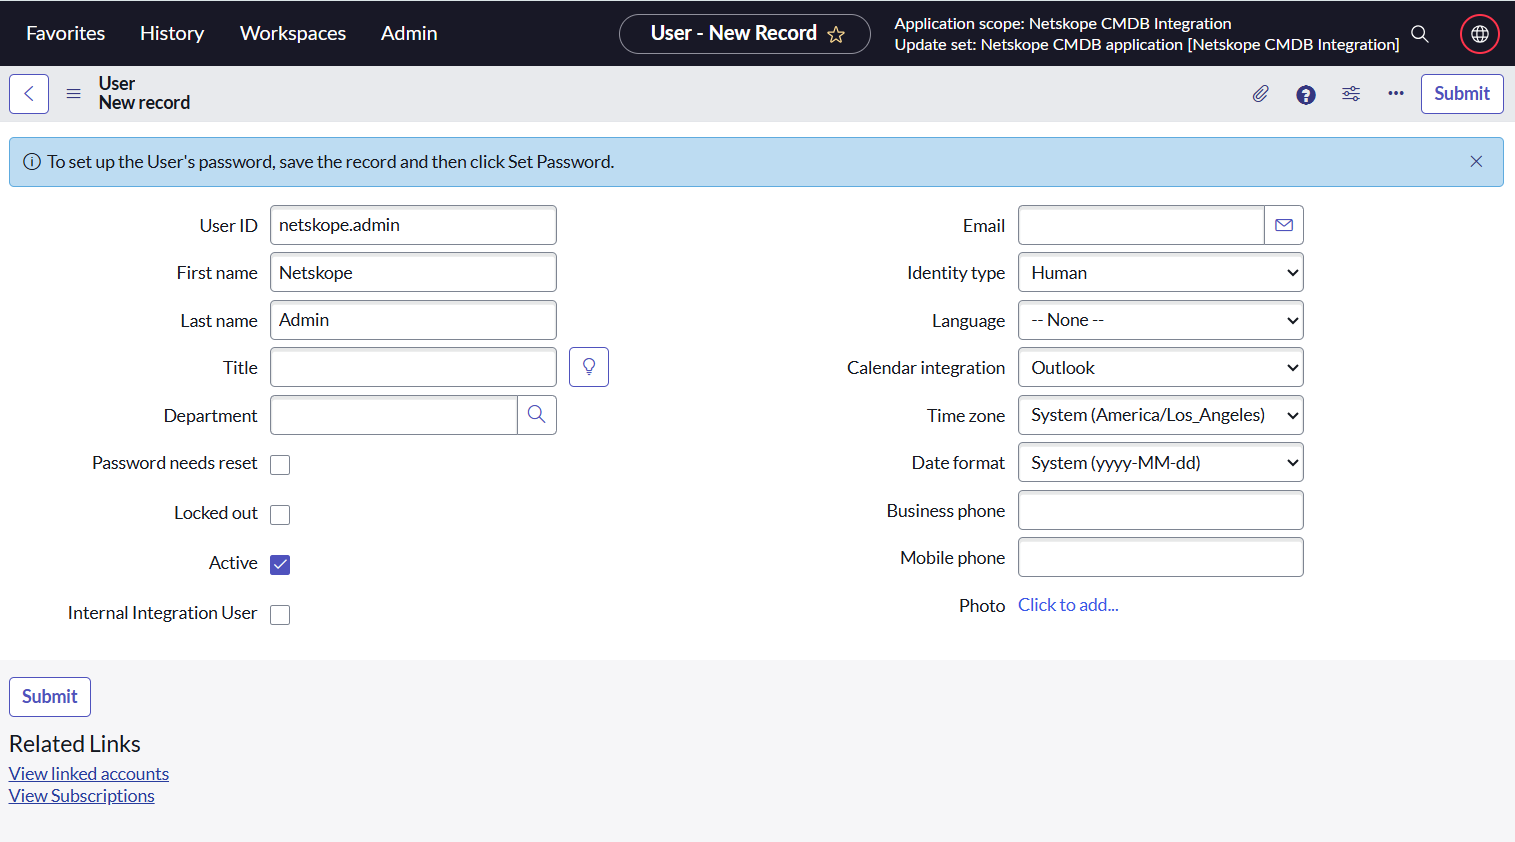
- Enter the required details in the form.
The values shown in the following table and figure are example values.
Field Description User ID Unique User ID for the role in your ServiceNow Platform instance. An example is XM Cyber Admin First Name First name of the person you are assigning Last Name Last name of the person you are assigning Password The unique password created for this user Email Unique email address of a user - Click Submit. Once submitted, you can assign the role.
- On the Users list, click on the name of the new user you have created just now, for example, Netskope Admin.
- In User, the record goes to the Roles section, and click Edit.
- In the Collection column, select x_netsk_cmdb_app.admin and move it to the Roles list. Similarly, you can add other roles to the user.
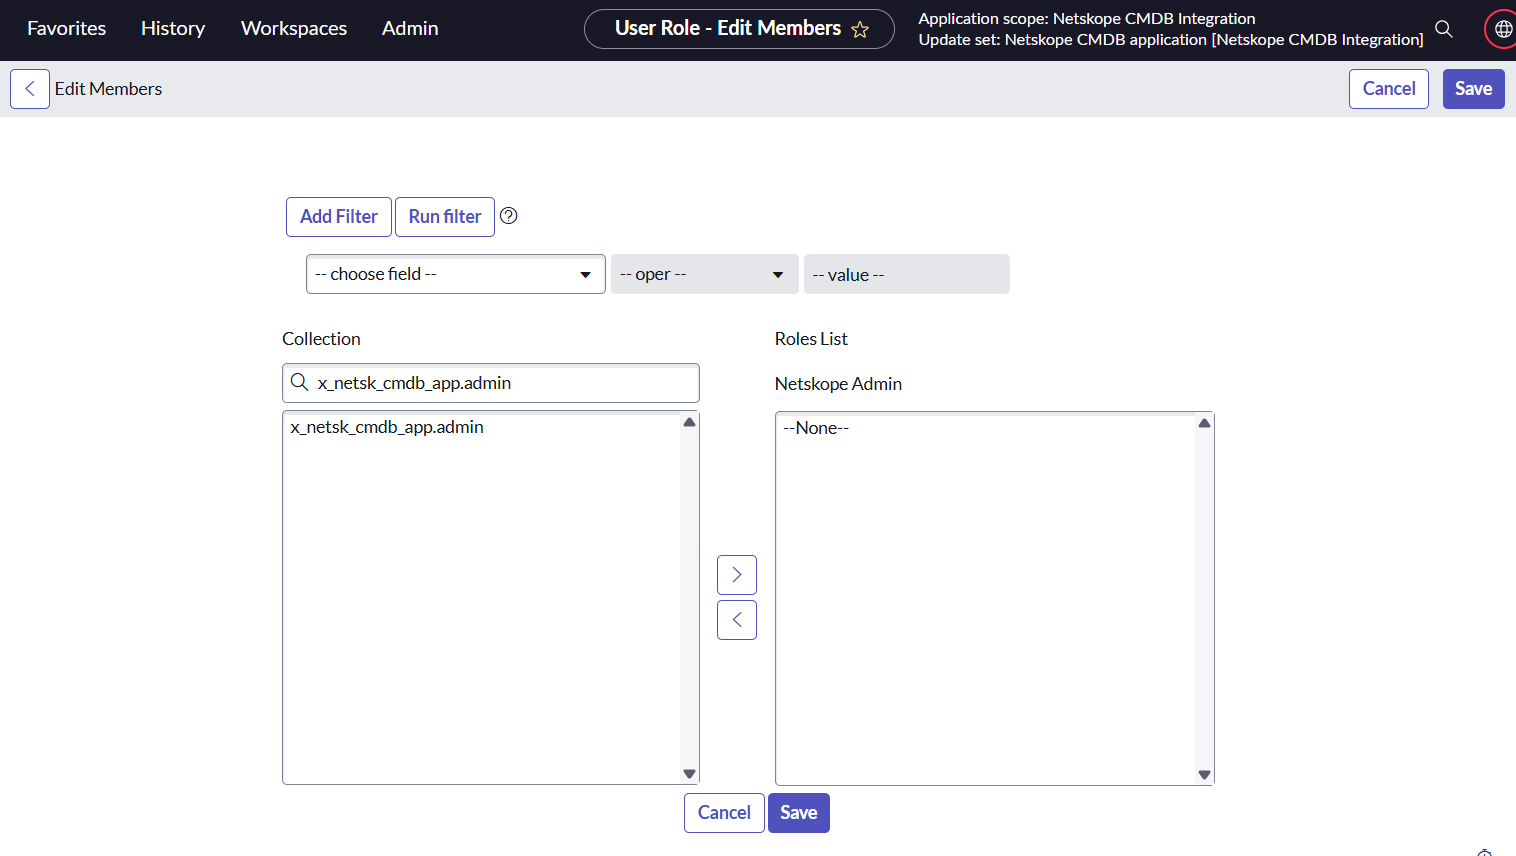
- Click Save.
Use Cases
Netskope Credentials
This section describes how to authorize Netskope CMDB Integration to fetch data from Netskope platform. This module will help the user configure the API Key for authorization or in case of API Key expiration.
Prerequisites
You need to get an API Token from your Netskope tenant to complete this procedure.
Role Required: x_netsk_cmdb_app.admin
Procedure:
- Log in to ServiceNow.
- From the Search bar on the homepage, search for Netskope CMDB Integration and select the Netskope Credentials menu.
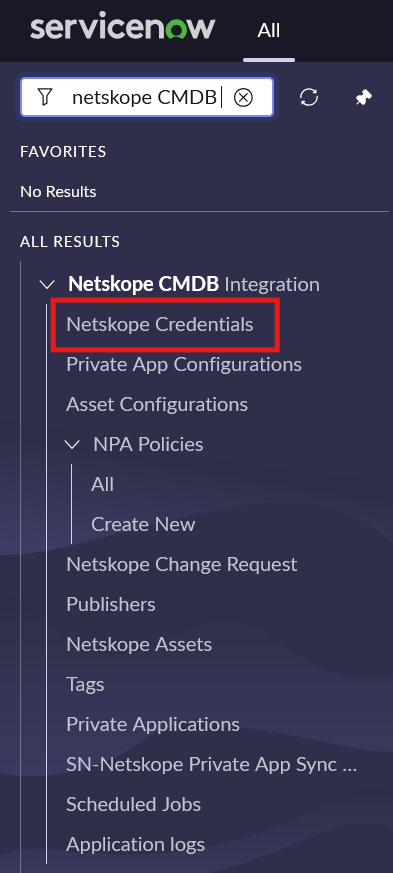
- Click New from the list view.
- Enter the Name for this configuration, Base URL derived from the URL provided by the Netskope team, and the API Token generated from the Netskope platform.
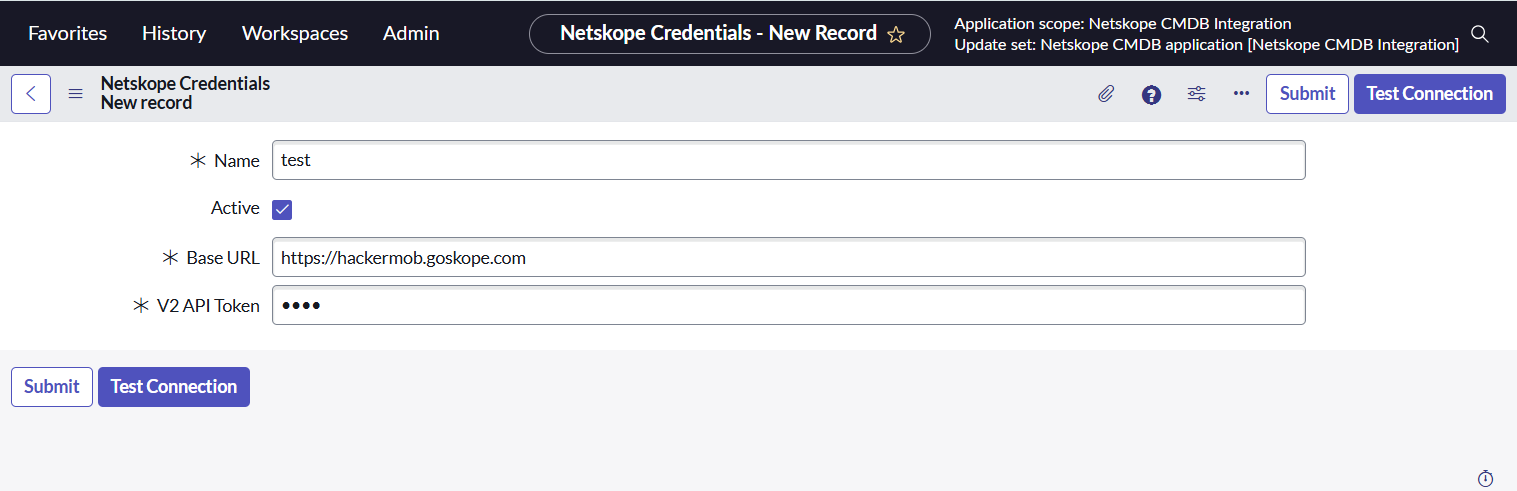
- Test Connection to authenticate and save the configuration. Upon successful authentication, The Netskope CMDB Configuration for Profile: <profile_name> is correct. The profile must be active to start the Integration. message will be displayed.
Private App Configuration
The Netskope CMDB Integration provides the functionality to create or update a private application on the Netskope platform, and also provides the functionality to fetch private application details from Netskope and store it into ServiceNow Private apps table.
Role Required: x_netsk_cmdb_app.admin
Procedure:
- In ServiceNow, go to Netskope CMDB Integration > Private App Configurations.
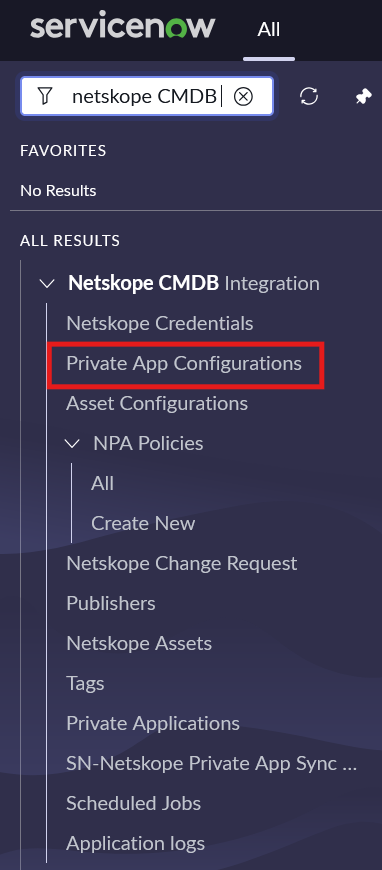
- Click New.
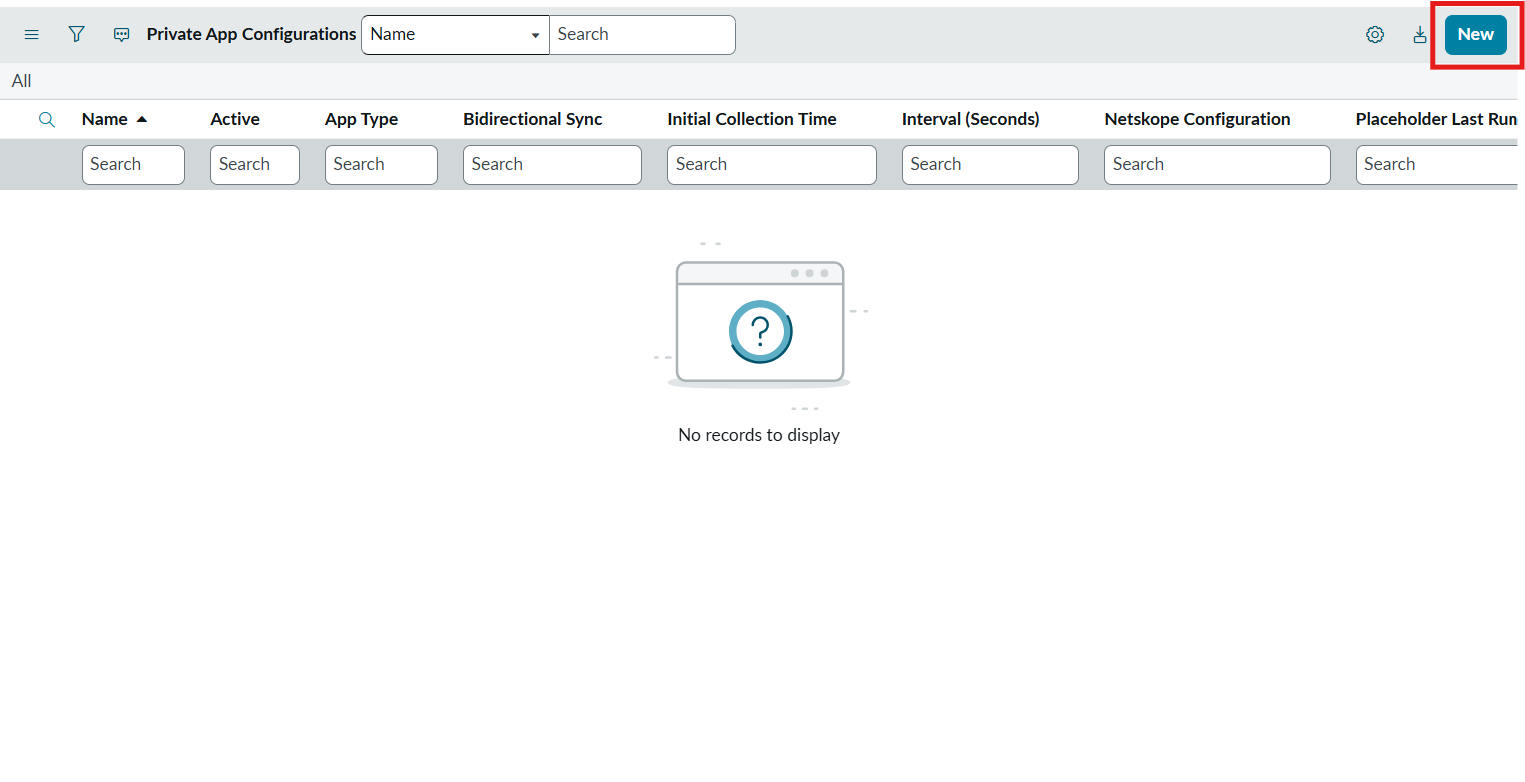
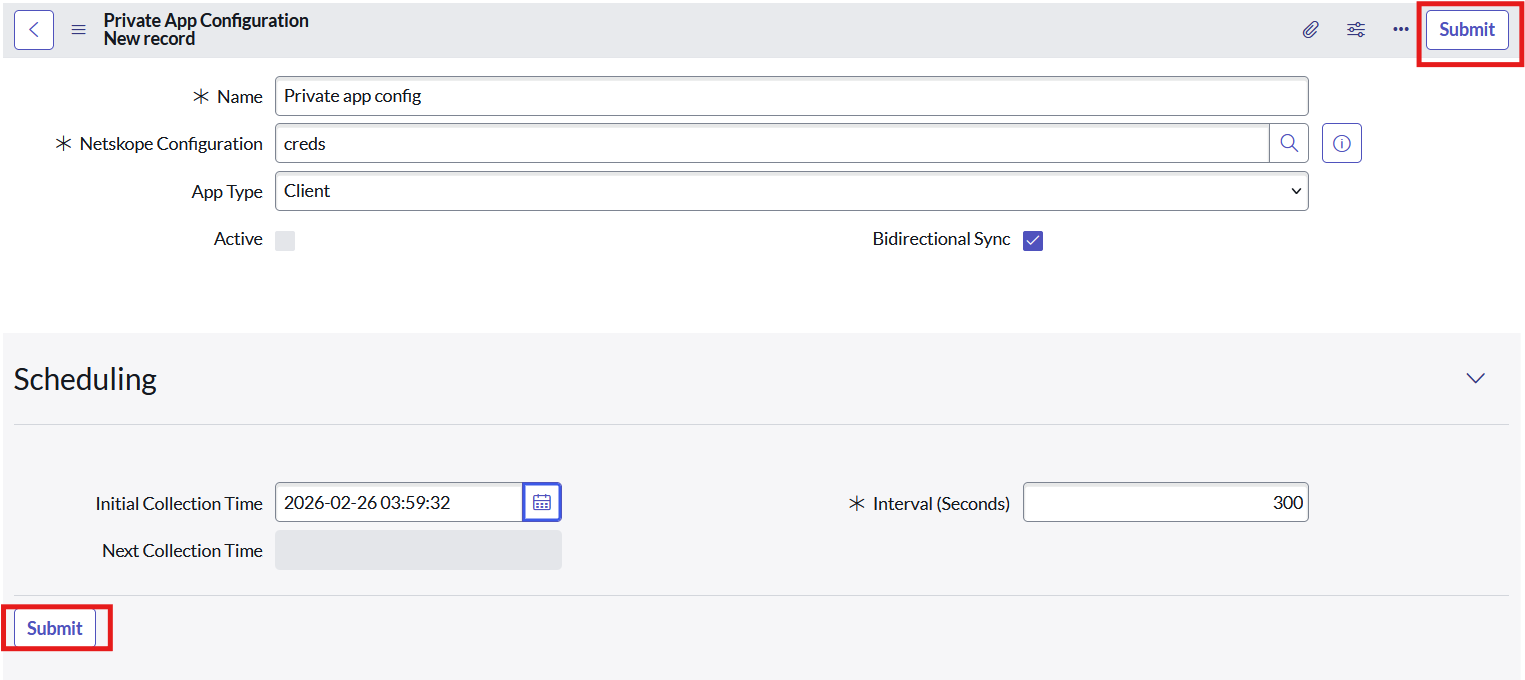
- Provide Name – Enter the configuration name.
- Netskope Configuration – Select the required configuration.
- App Type – Choose Client or Browser.
- Bidirectional Sync – Enable to fetch private apps from the Netskope platform or keep it disabled to prevent fetching.
- If Bidirectional Sync is enabled, Initial Collection Time, provide a future collection time. Next Collection Time – readonly, Interval (Seconds) – default value: 300.
- Click Submit.
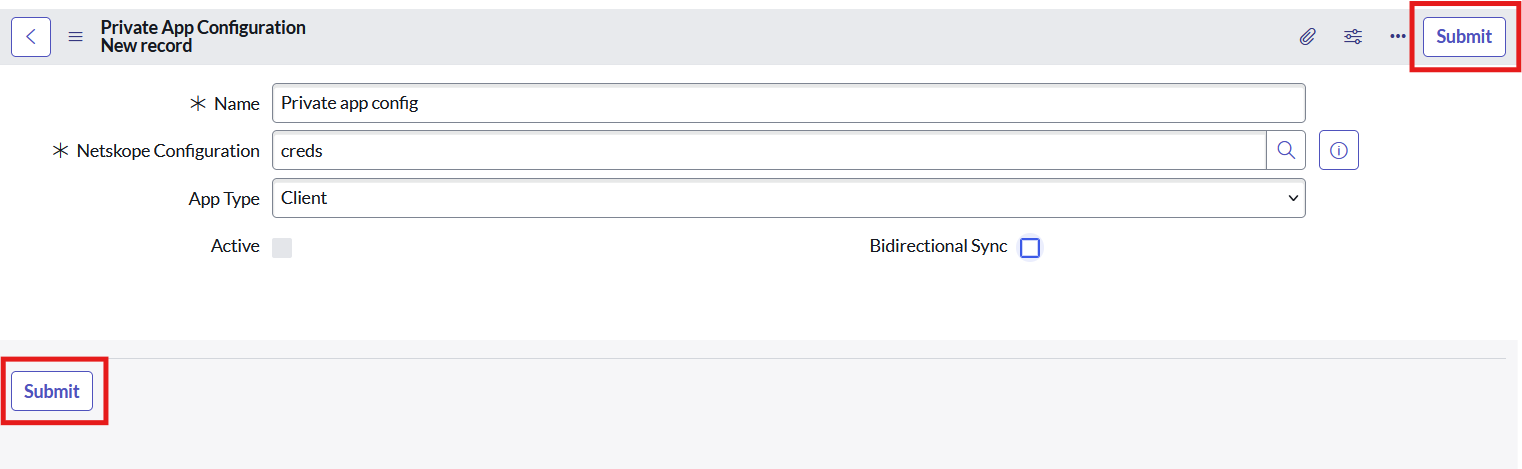
- The record should be visible in the list view after successful creation.

- The record will be inactive at the time of creation. Activate the record.
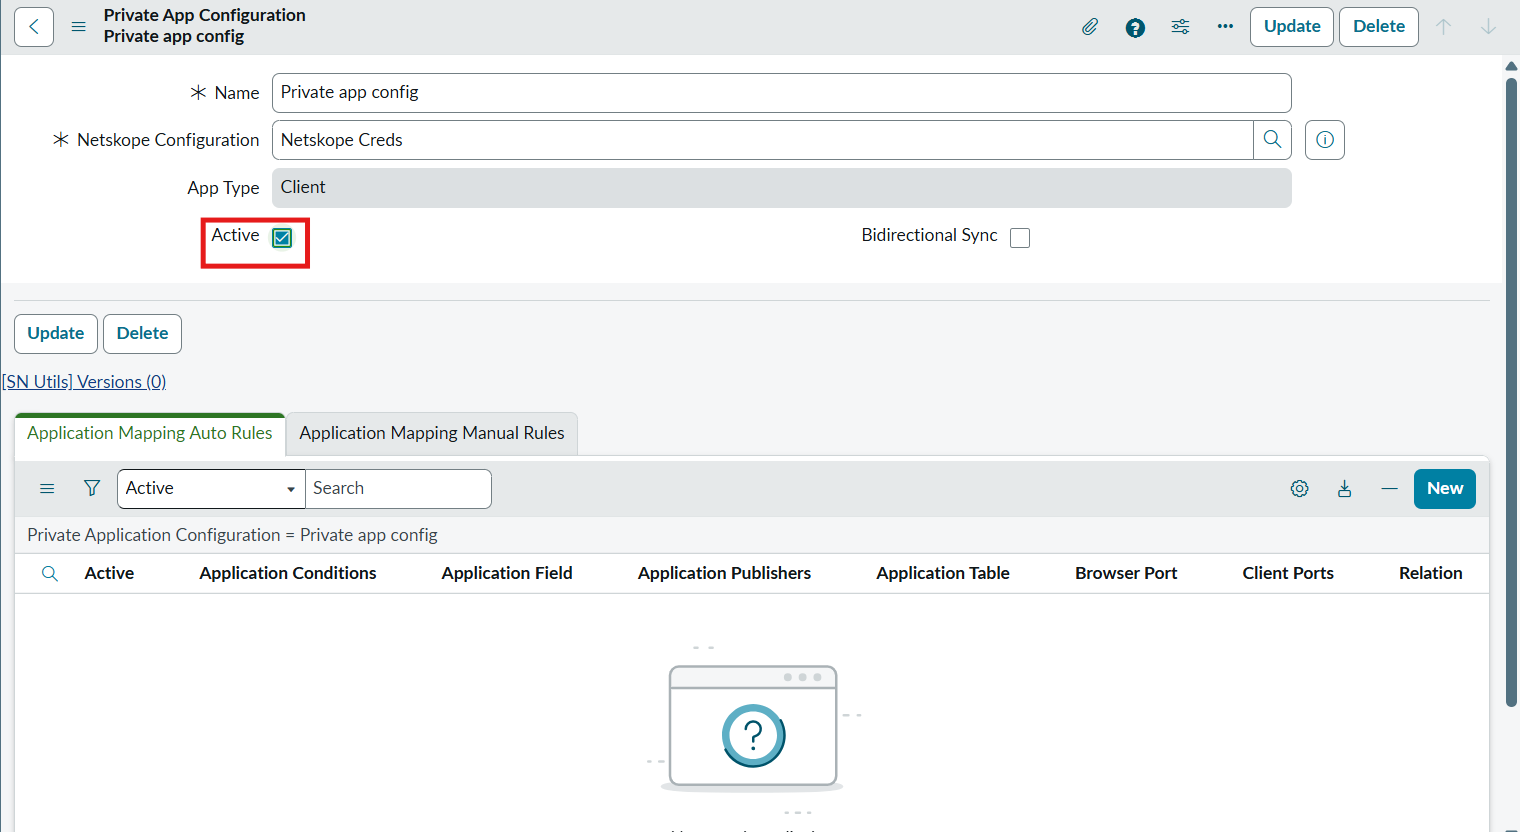
Mapping Rules
Mapping Rules provides the functionality to create or update the private application on Netskope platform. Users can not create the auto rule for the same application table and also it can not create manual rule for the same application twice.
Application Mapping Auto Rule
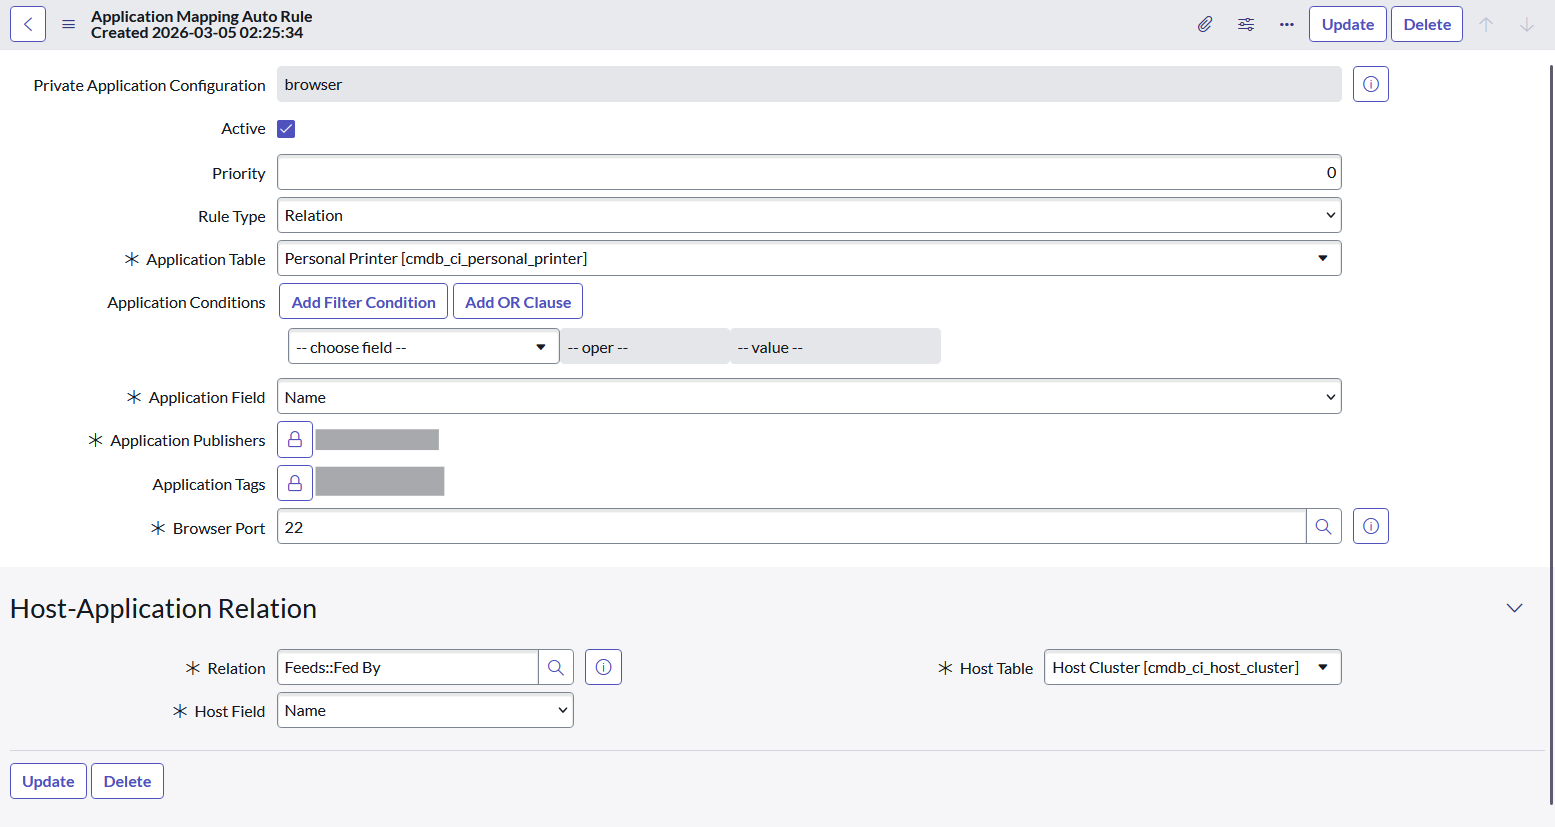
- Application Table: Select the CMDB table from which you want to create the application on the Netskope platform.
- Application Conditions: Provide the condition if you want to create only specific applications on netskope platform.
- Application Field: The value present in this field will be considered as the application name. ServiceNow will create the application with the same name on the netskope platform.
- Application Publishers: Provide the application publisher which you want to attach with the application on netskope platform.
- Application Tags: Provide the application tags which you want to attach with the application on netskope platform.
- Rule Type: Select Rule type as a relation to create an application based on the CMDB relationship. Select rule type as script to create an application based on the Script provided by the user.
- Ports: Provide the ports which you want to attach with the application on netskope platform. If the private application configuration type is a Client, then you need to provide the Client ports; otherwise, enter the browser ports.
- Active: Make sure this flag is active to create the application on netskope platform.
- Host-Application Relation: Defines the hosts to be added for the applications to create private applications.
- Relation, Host Table, and Host Field: Host name will be selected based on the relation between the Application table and Host table. The Host field value will be added as Host for the private application.
Application Mapping Manual Rule
- Application: Select the application which you want to create on netskope platform.
- Application Table Field Name: Column Name of the selected application cmdb_ci table field.
- Host Table Field Name: Column Name of the host record cmdb_ci table field.
- Application Publishers: Provide the application publisher which you want to attach with the application on netskope platform.
- Ports: Provide the ports which you want to attach with the application on netskope platform. If the private application configuration type is a client then the user needs to provide the client ports otherwise browser ports.
- Hosts: Select multiple Hosts if the application configuration type is Client; if the application configuration type is Browser, select a single Host.
- Priority: Provide the priority for this rule. The rule with less priority value will run first. Ex. Rule with priority 100 will run before rule with priority 200.
- Active: make sure this flag is active to create the application on the Netskope platform.
App type: Client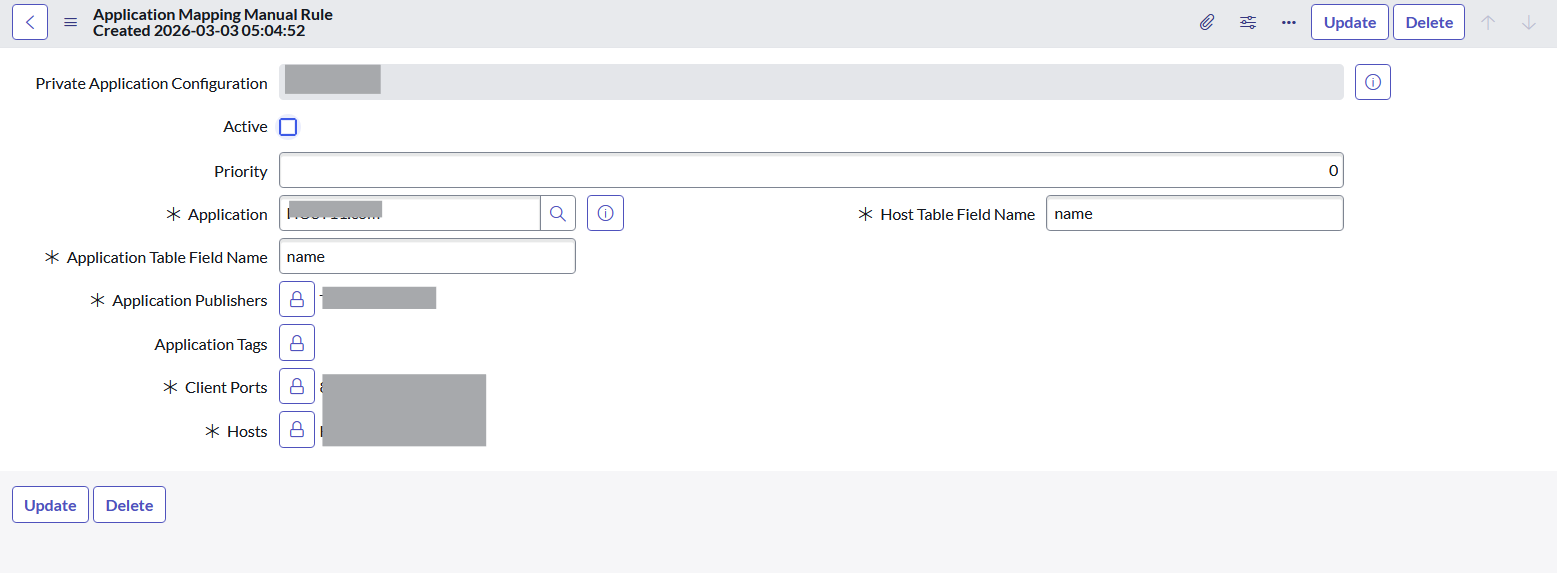 App type: Browser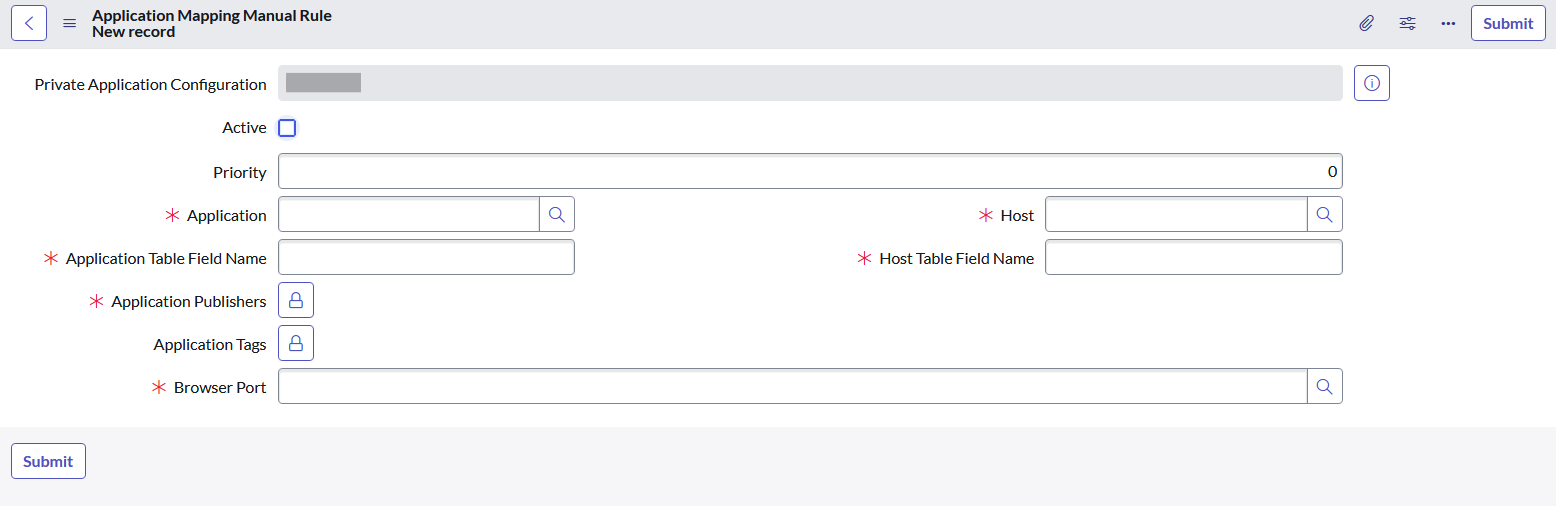
In case of Browser app type, the host selected should follow a valid domain naming pattern that ends with (e.g., *.com, *.in, *.org, etc.).
Asset Configurations
Asset Configuration provides the functionality to fetch Netskope assets from the platform and store them into ServiceNow Netskope Assets (custom table) and the cmdb_ci tables (i.e., Computer, Network Adapter, IP Address, Software Package, Software Instance, or Software Installation), or only in the custom table (x_netsk_cmdb_app_netskope_asset_attributes).
Factors to Consider
With the SAMS plugin: Data is stored in Software Installation.
Without the SAMS plugin: Data is stored in Software Package and Software Instance.
- Open the Data Source Configuration Record.
- Replace instance_name with your actual ServiceNow instance name.
For example:
https://instace_name.service-now.com/nav_to.do?uri=sys_db_object.do?sys_id=cb2991c1f42322104f3475eb2440bc36
Provide Can read, Can create, Can update, and Can delete permissions as shown below.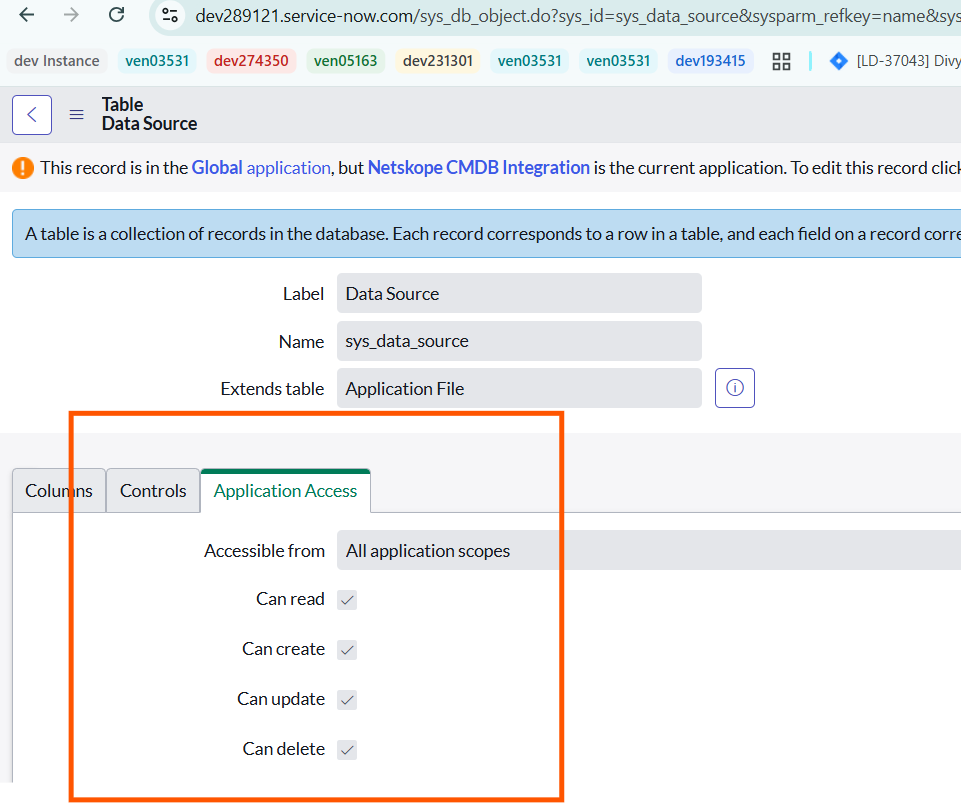
- Open the Scheduled Import Set Configuration Record.
- Replace instance_name with your actual ServiceNow instance name.
For example:
https://instance_name.service-now.com/nav_to.do?uri=sys_db_object.do?sys_id=883915c1f42322104f3475eb2440bc2d
Provide Can read, Can create, Can update, and Can delete permissions as shown below.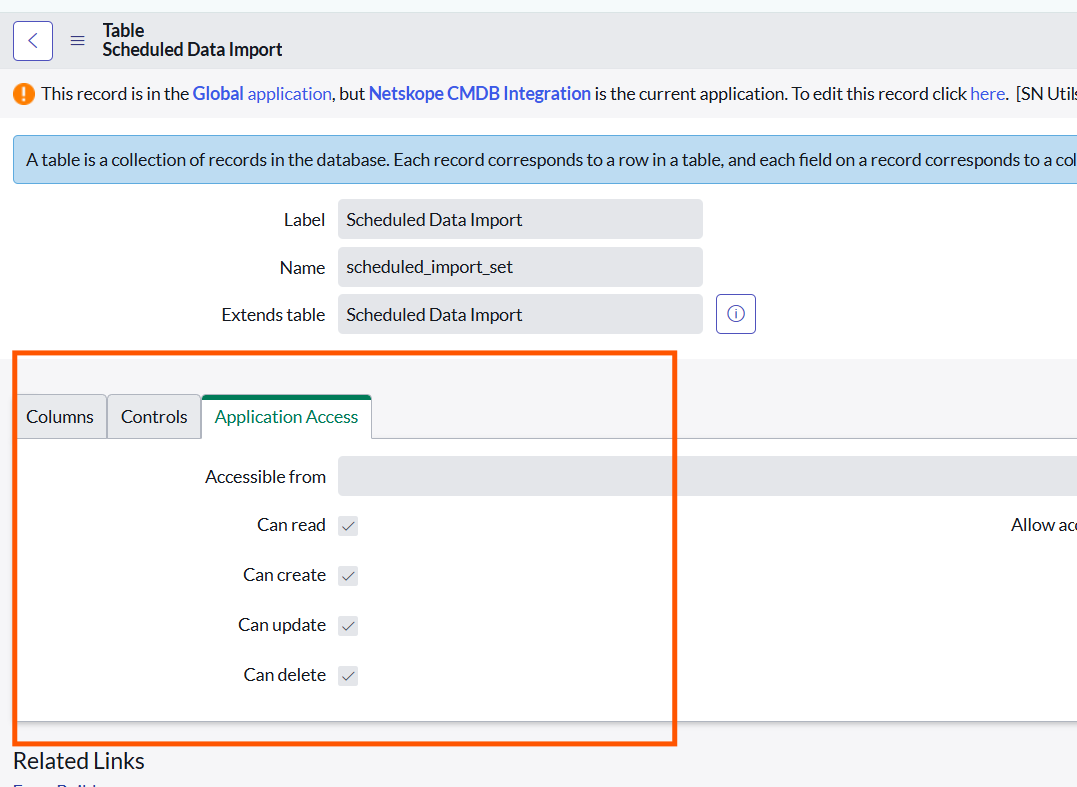
- Clear Instance Cache.
- Run the provided background script in Global scope to clear the instance cache memory.
GlideTableManager.invalidateTable("sys_data_source"); GlideCacheManager.flushTable("sys_data_source");GlideTableManager.invalidateTable("scheduled_import_set");
GlideCacheManager.flushTable("scheduled_import_set");
GlideTableManager.invalidateTable("sys_db_object");
GlideCacheManager.flushTable("sys_db_object");
Configuration Steps
Role Required: x_netsk_cmdb_app.admin, cmdb_inst_admin
- In ServiceNow, go to Netskope CMDB Integration > Asset Configurations.
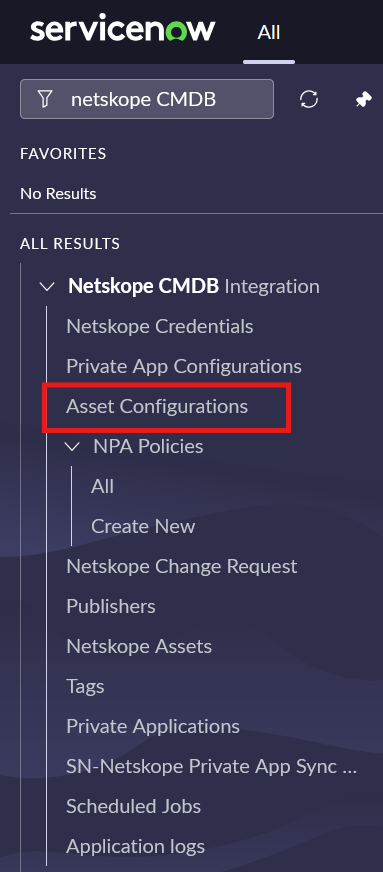
- By default, Netskope Assets should be present in the list view.
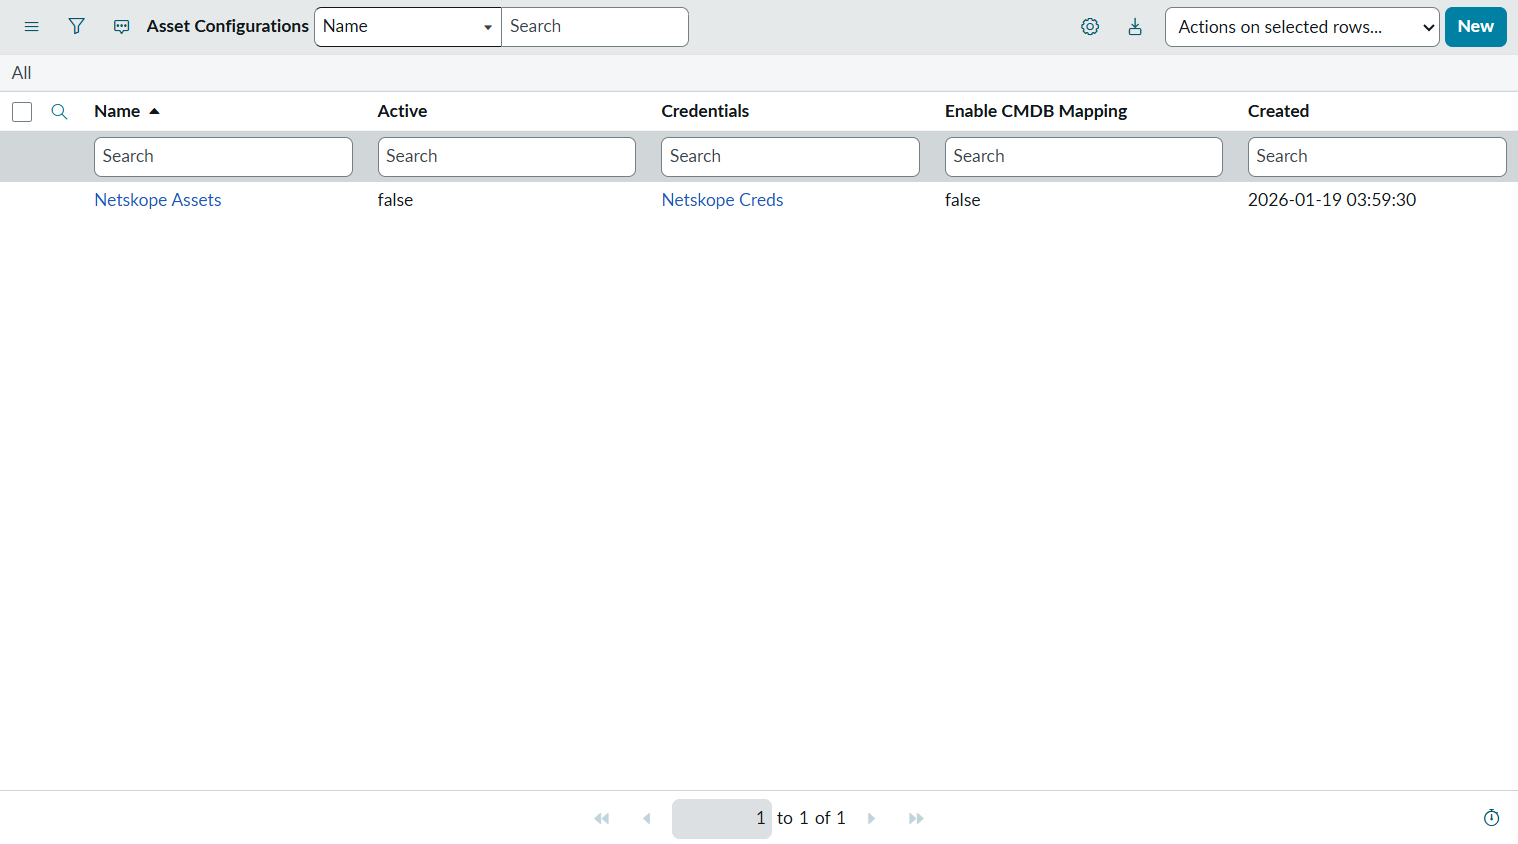
- Update the following:
- Select the newly created Netskope Credentials record.
- Enable CMDB Data Mapping (if you want the data to be mapped into CMDB tables).
- Activate the configuration.
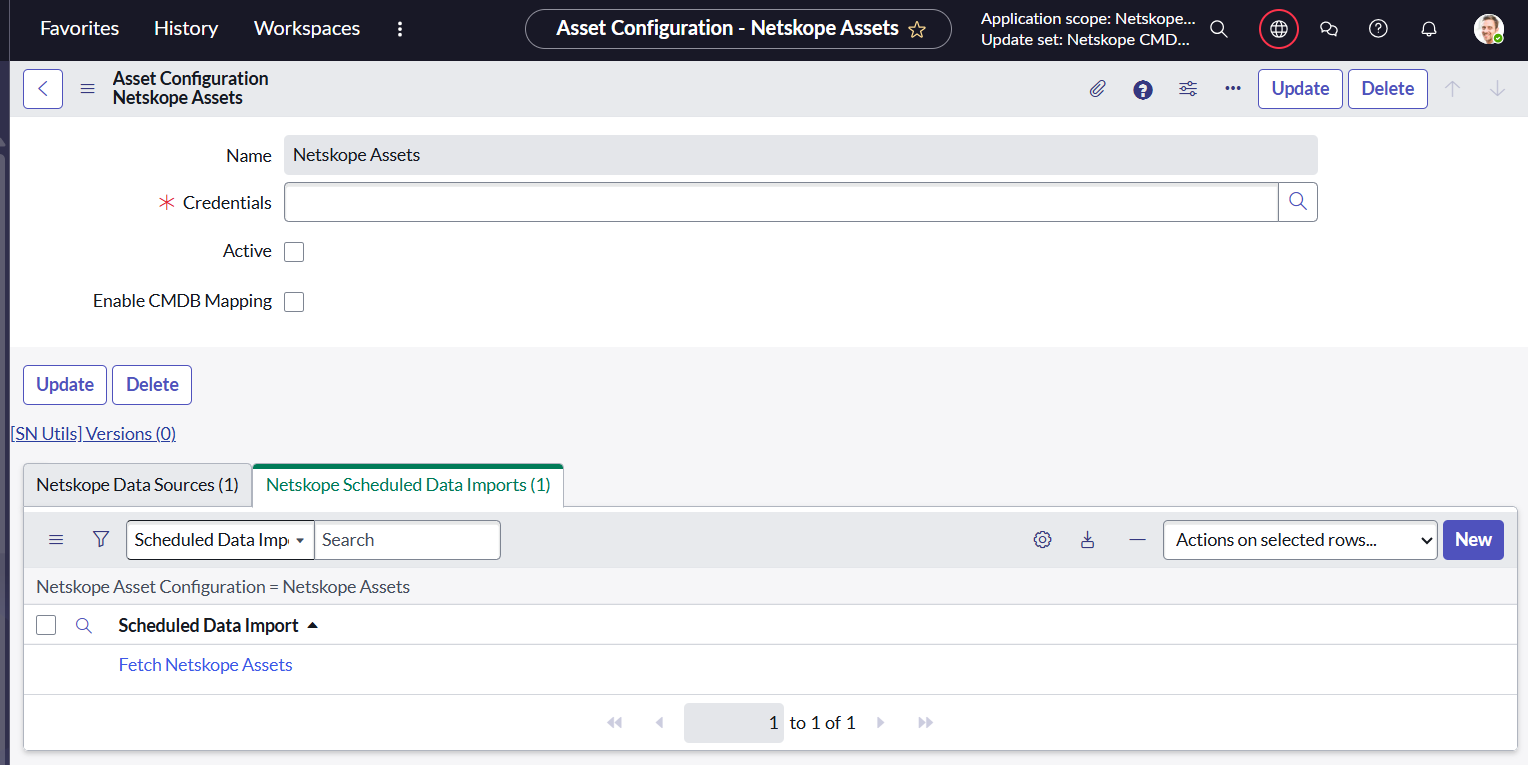
Important Notes About CMDB Mapping
- If Enable CMDB Mapping = True
- Data will be stored in:
- Netskope Assets table
- CMDB tables
- Data will be stored in:
- If Enable CMDB Mapping = False
- Data will be stored only in:
- Netskope Assets table
- No records will be created in CMDB tables.
- Data will be stored only in:
Data Ingestion Behavior
- During the first data ingestion, the system fetches data from the last 7 days.
- After that, it fetches data from the last successful run time to the current time.
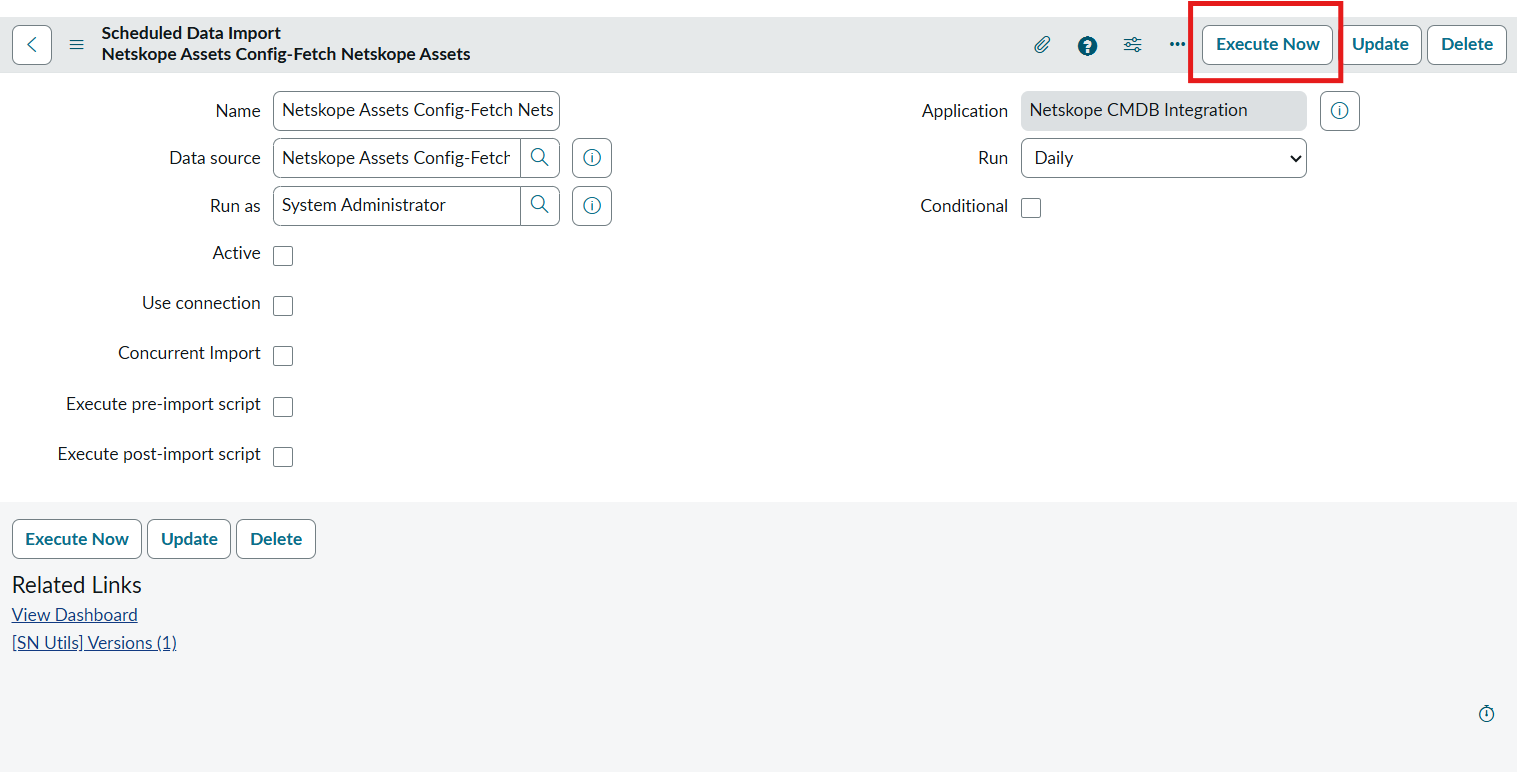
- Check the Active checkbox and click Execute Now. If the scheduled job needs to be run immediately or you can configure it as a scheduled job based on its requirements to pull data daily, periodically, or monthly. You can also configure based on custom date and time.
Factors to consider:- Configure the scheduled job based on the expected data volume. For example, if data needs to be fetched daily, set the Run field in the Schedule tab to Daily (or Weekly/Monthly as required).
- Additionally, ensure that the data ingestion frequency is aligned with the data volume. An incorrect or overly frequent schedule may lead to job conflicts or performance issues.
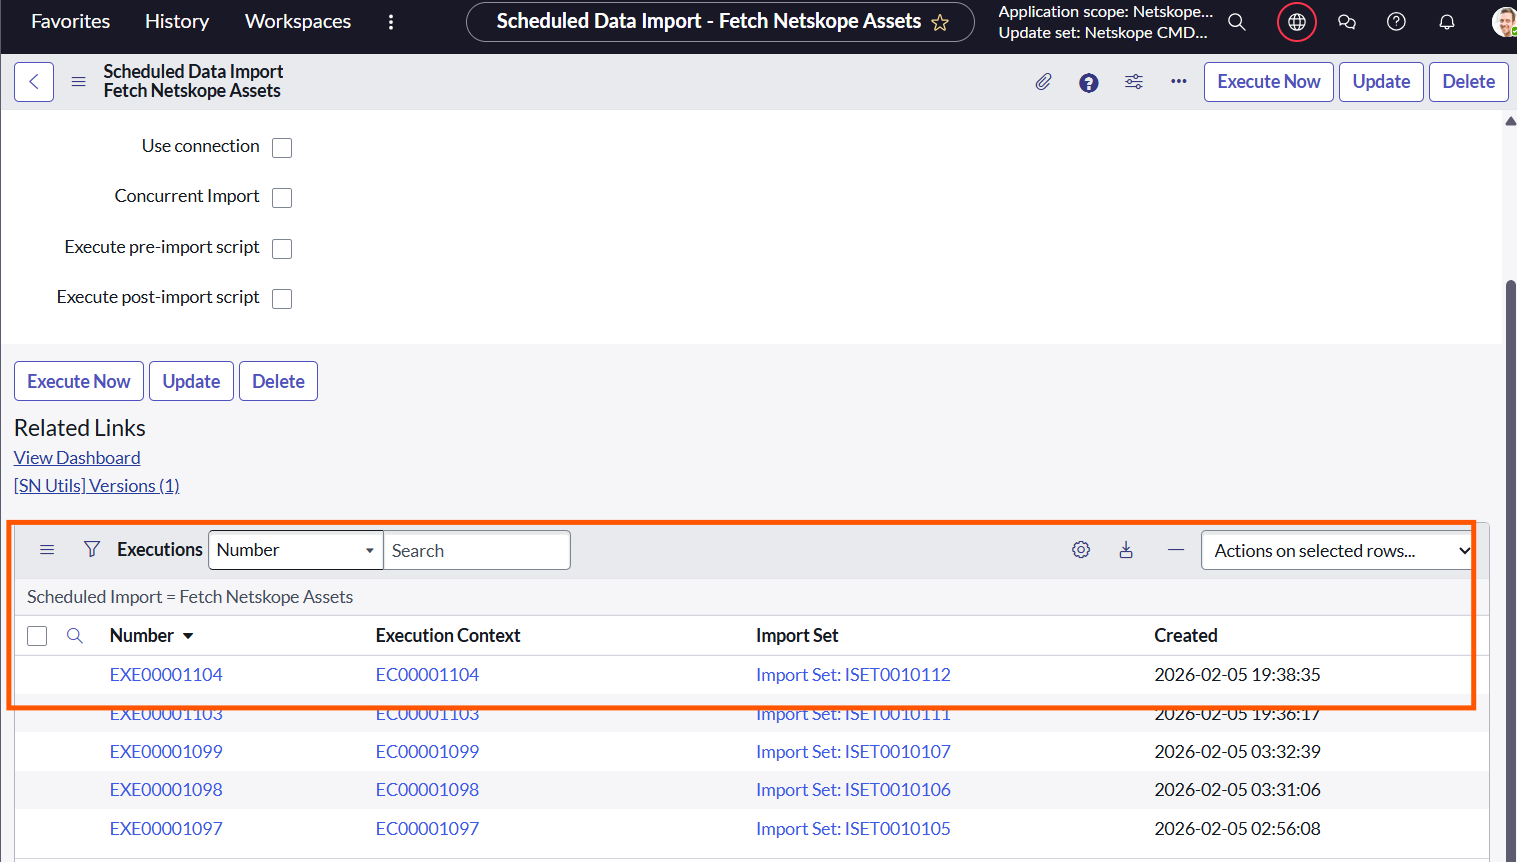
Monitor the Execution
- Once execution starts, you can monitor the status in the Executions related list.
- Open the corresponding Import Set record to check the current status.
View the Imported Data
- To view Netskope data:
- Go to the Netskope Assets module.
- To view CMDB data:
- Navigate to the cmdb_ci table.
- Search using discovery_source = Netskope-CMDB
Additional Clarification
-
- If CMDB Mapping is disabled, no CMDB records will be created and the Configuration Item field will remain empty.
- If you enable CMDB Mapping later:
- CMDB records will only be created when new events for the same assets are received from the Netskope API.
- If no new events are received, CMDB records will not be created and the Configuration Item field will remain empty.
- After successful run, to check fetched data, go to Netskope CMDB Integration > Netskope Assets.
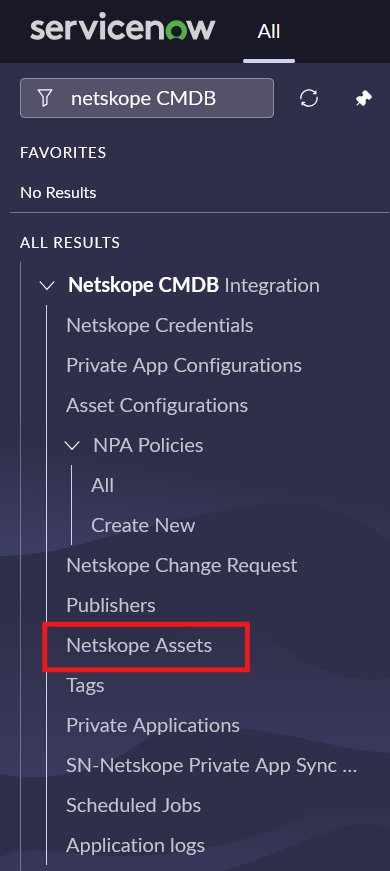
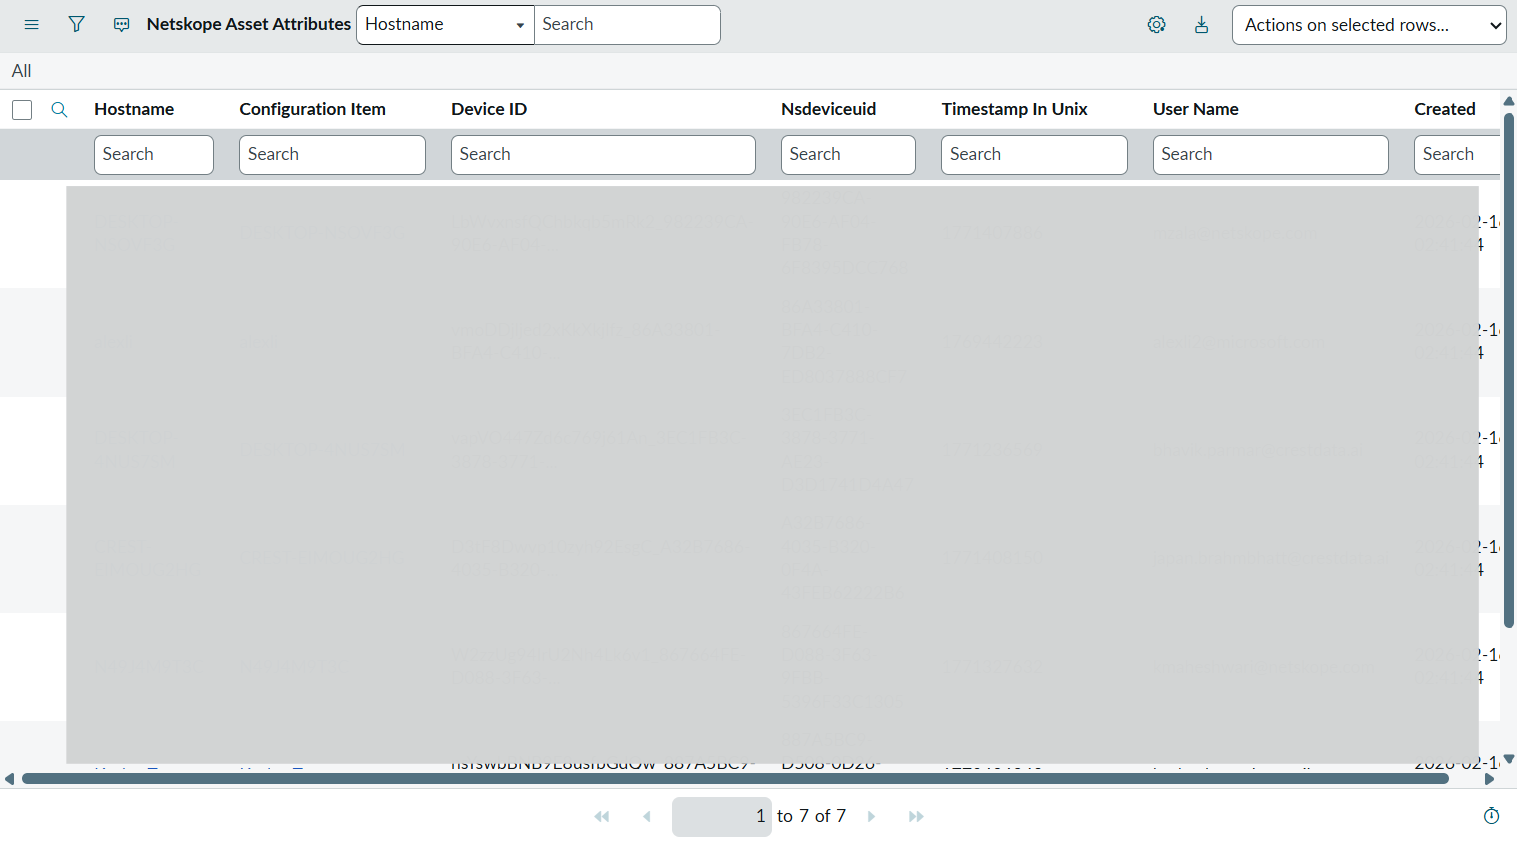 This will only fetch assets data from the past 7 days from the current time during the first run.
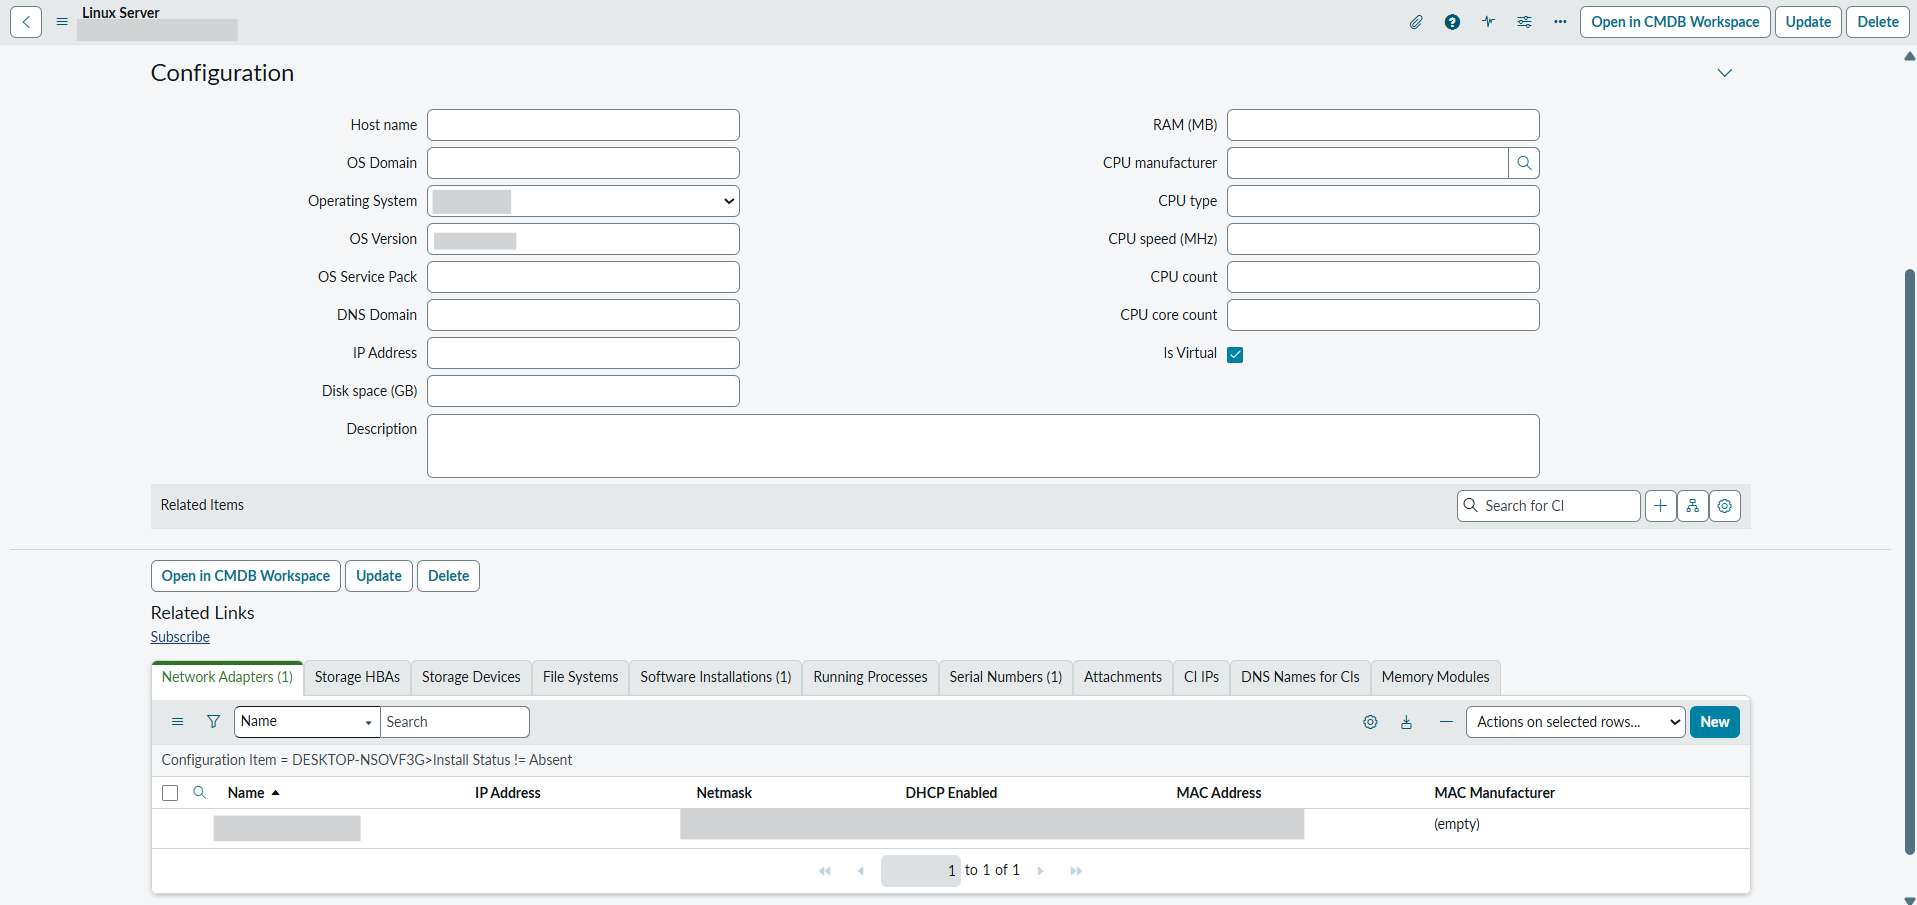
 - Open an Asset CI record.
- This contains information about the asset, such as class, MAC address, OS, OS version, serial number, and other related details.
NPA Policies
NPA Policies provides the functionality to create and push NPA policies for Private App Segment Access, as well as to fetch NPA policies from the Netskope platform.
- In ServiceNow, go to Netskope CMDB Integration > Private App Configurations.
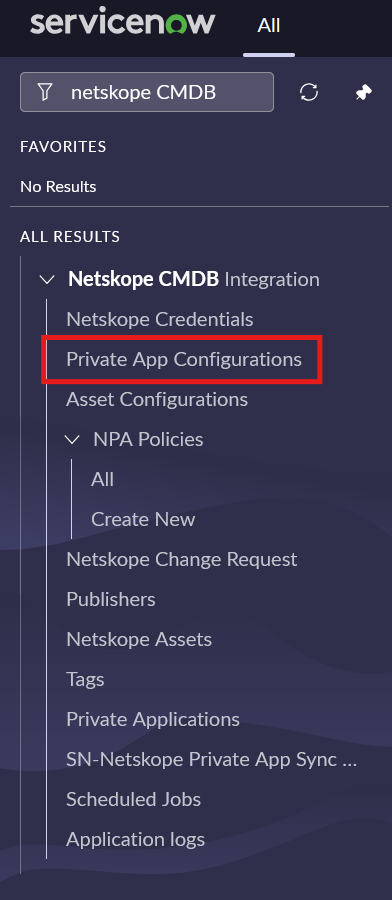
- Click New.
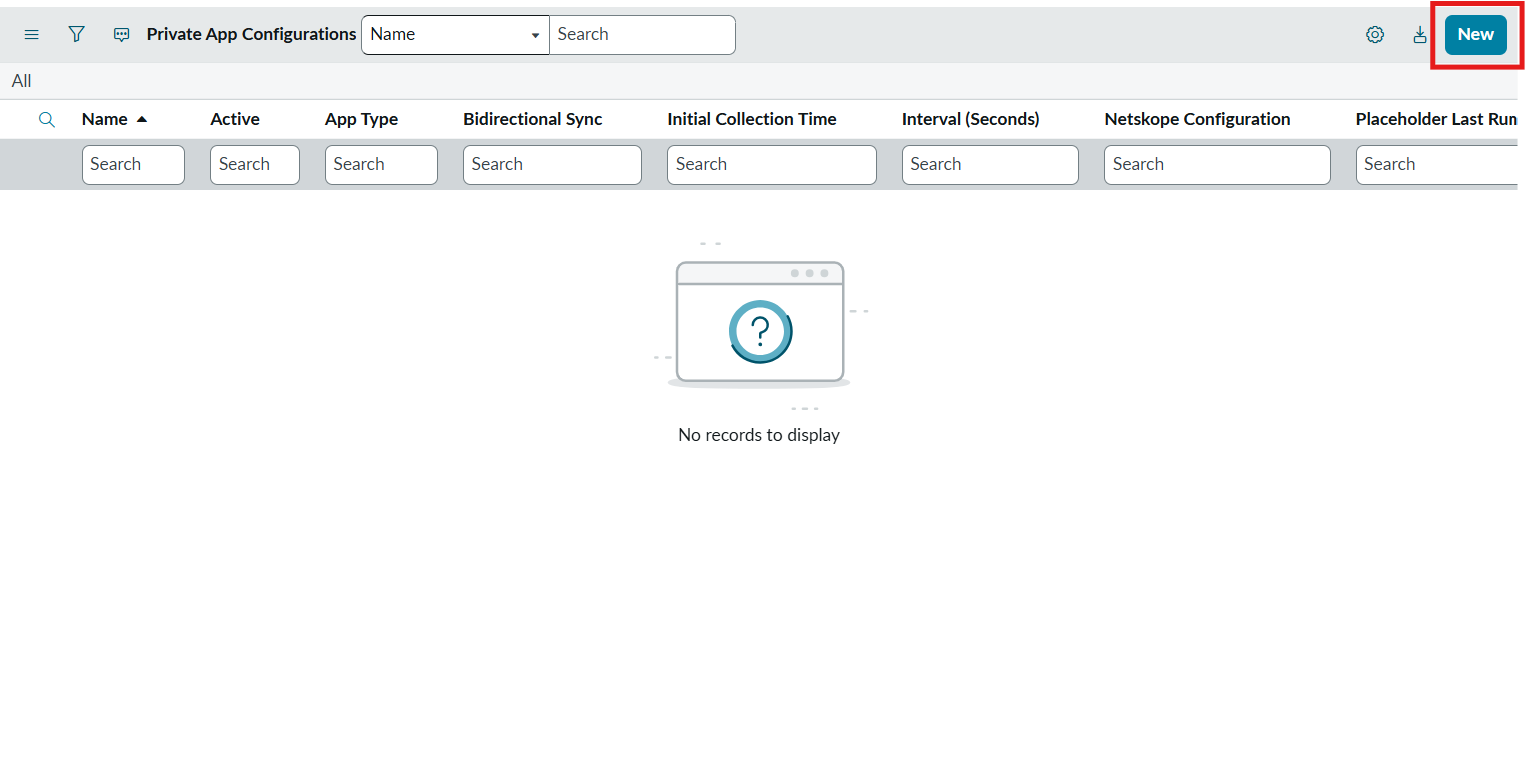
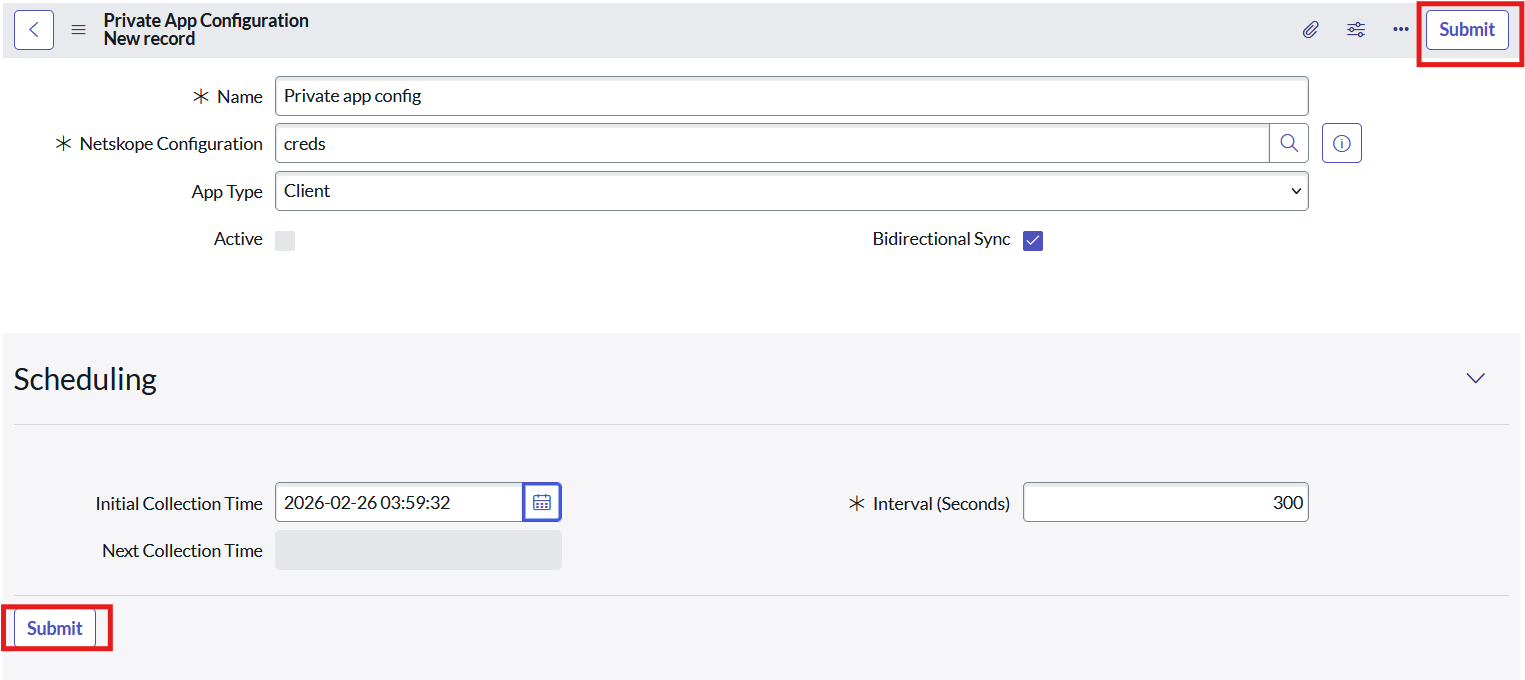
- Enter these parameters:
- Name: Enter the configuration name.
- Netskope Configuration: Select the required configuration.
- App Type: Choose Client or Browser.
- Bidirectional Sync: Enable to fetch private apps from the Netskope platform.
- Click Submit.
- Check the Active checkbox as true after creating.
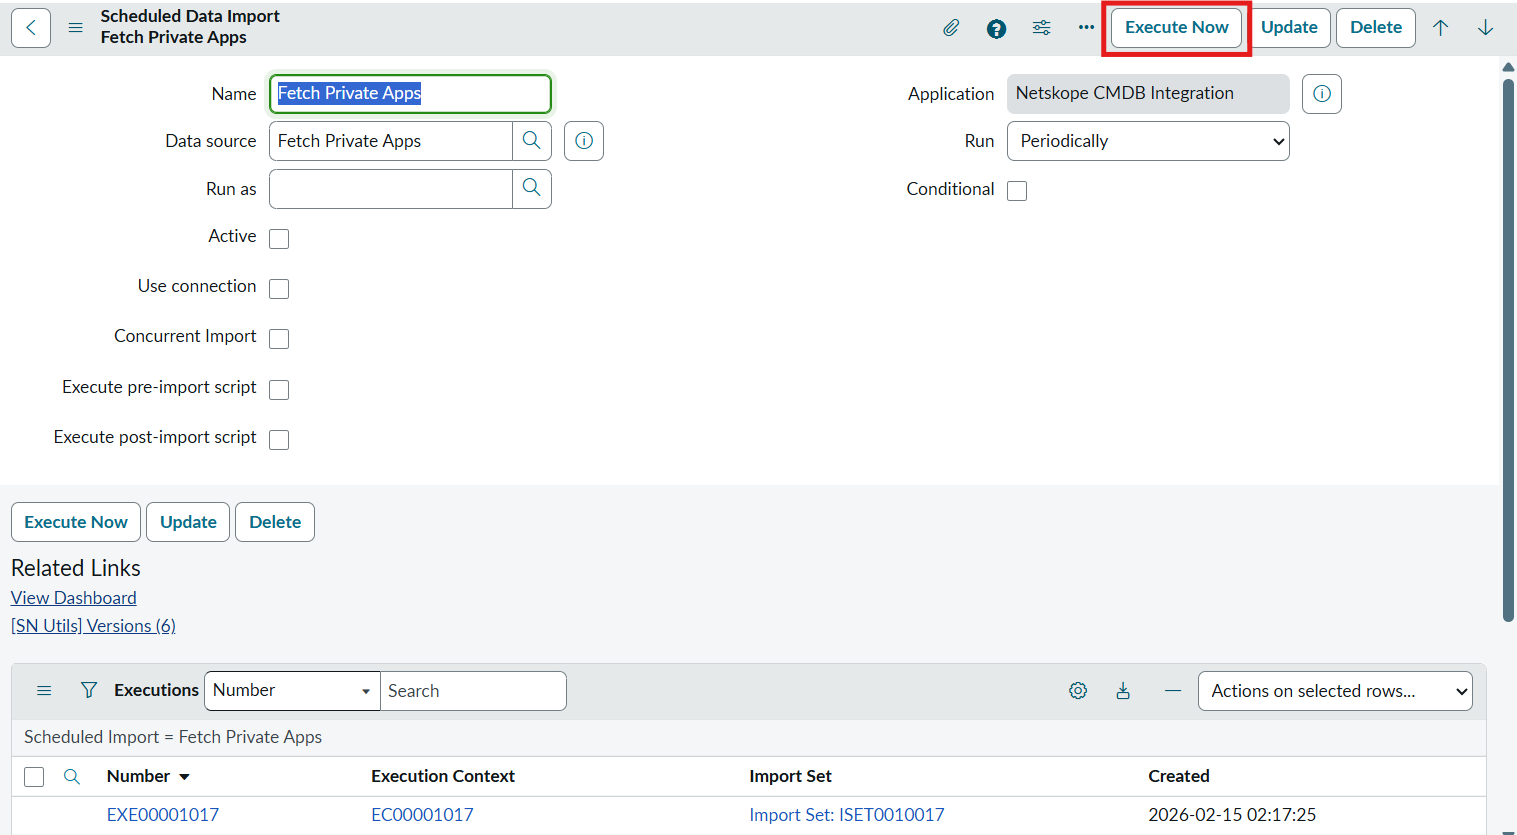
- Go to Netskope CMDB Integration > Scheduled Jobs.
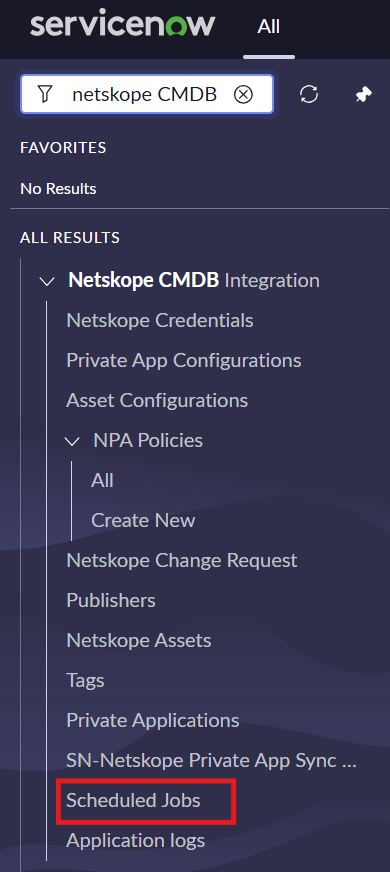
- Open the Fetch Private Apps scheduled job.
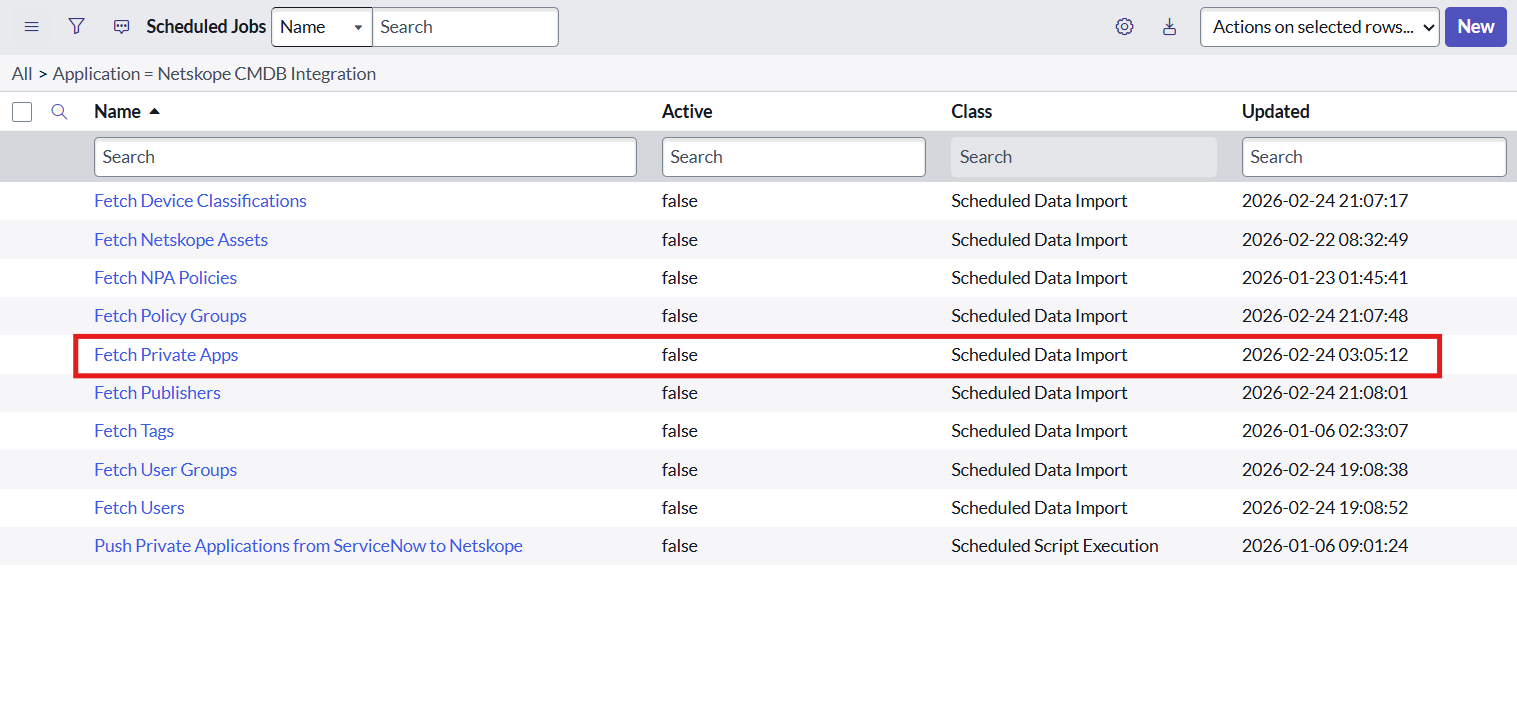
- Either set the desired frequency, or click Execute Now to run the import immediately.
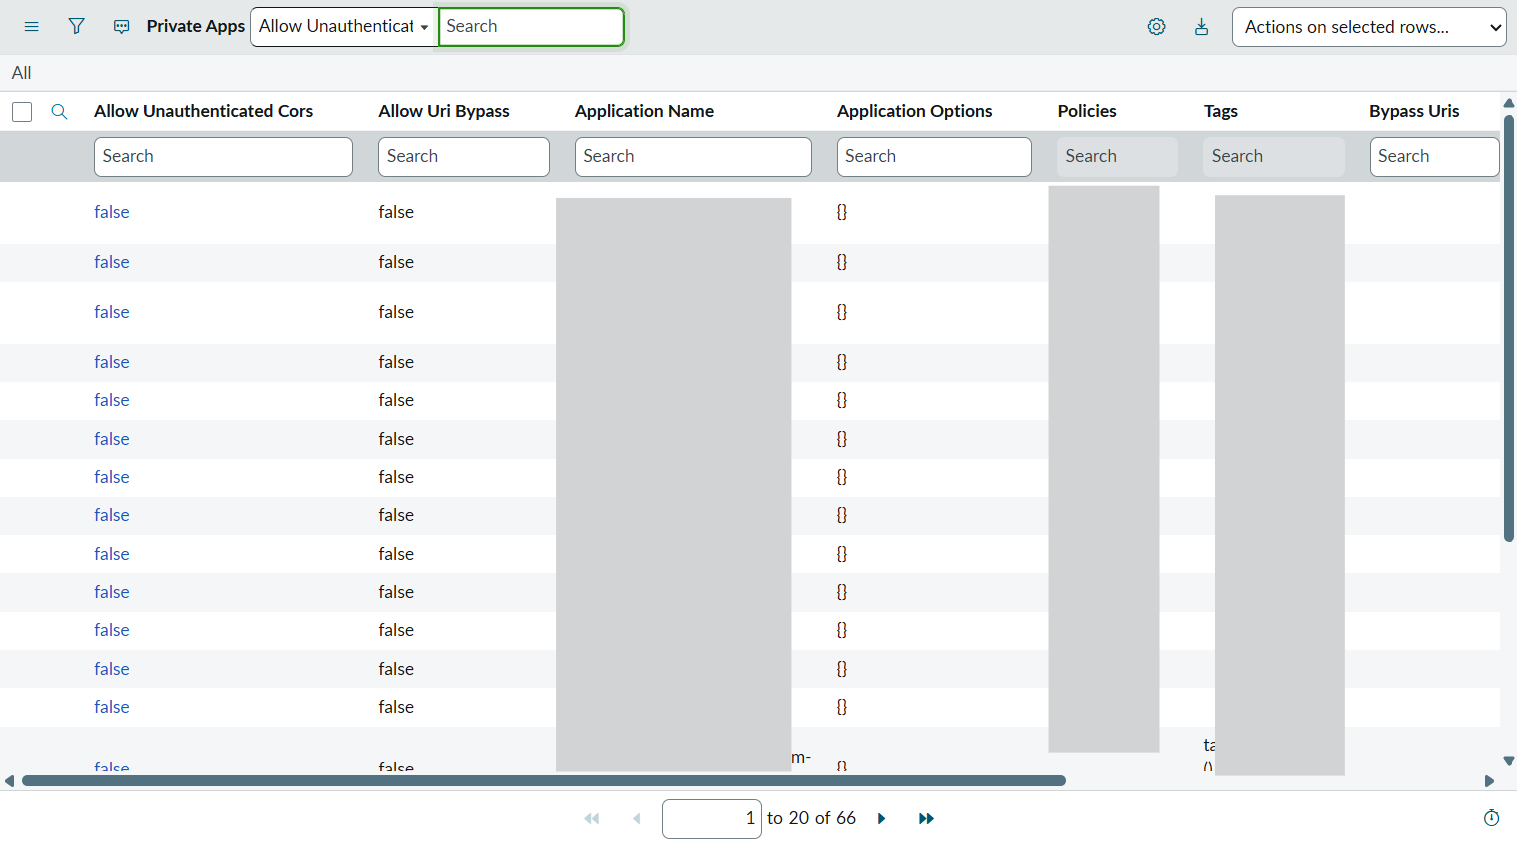
- To Check fetched private apps , go to Netskope CMDB Integration > Private Applications.
- Similarly, run scheduled jobs for Fetch Device Classifications, Fetch Policy Groups, Fetch Tags, Fetch User Groups, and Fetch Users.
Role Required: x_netsk_cmdb_app.admin
Procedure:
- In ServiceNow, go to Netskope CMDB Integration > NPA Policies > Create New.
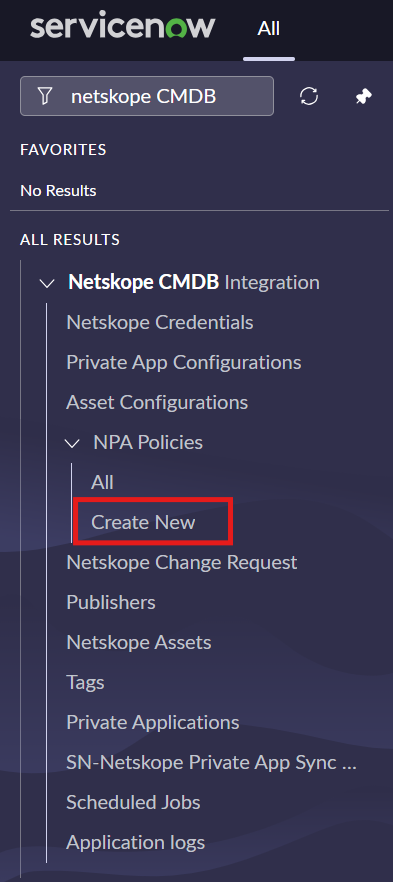
- Form view should open.
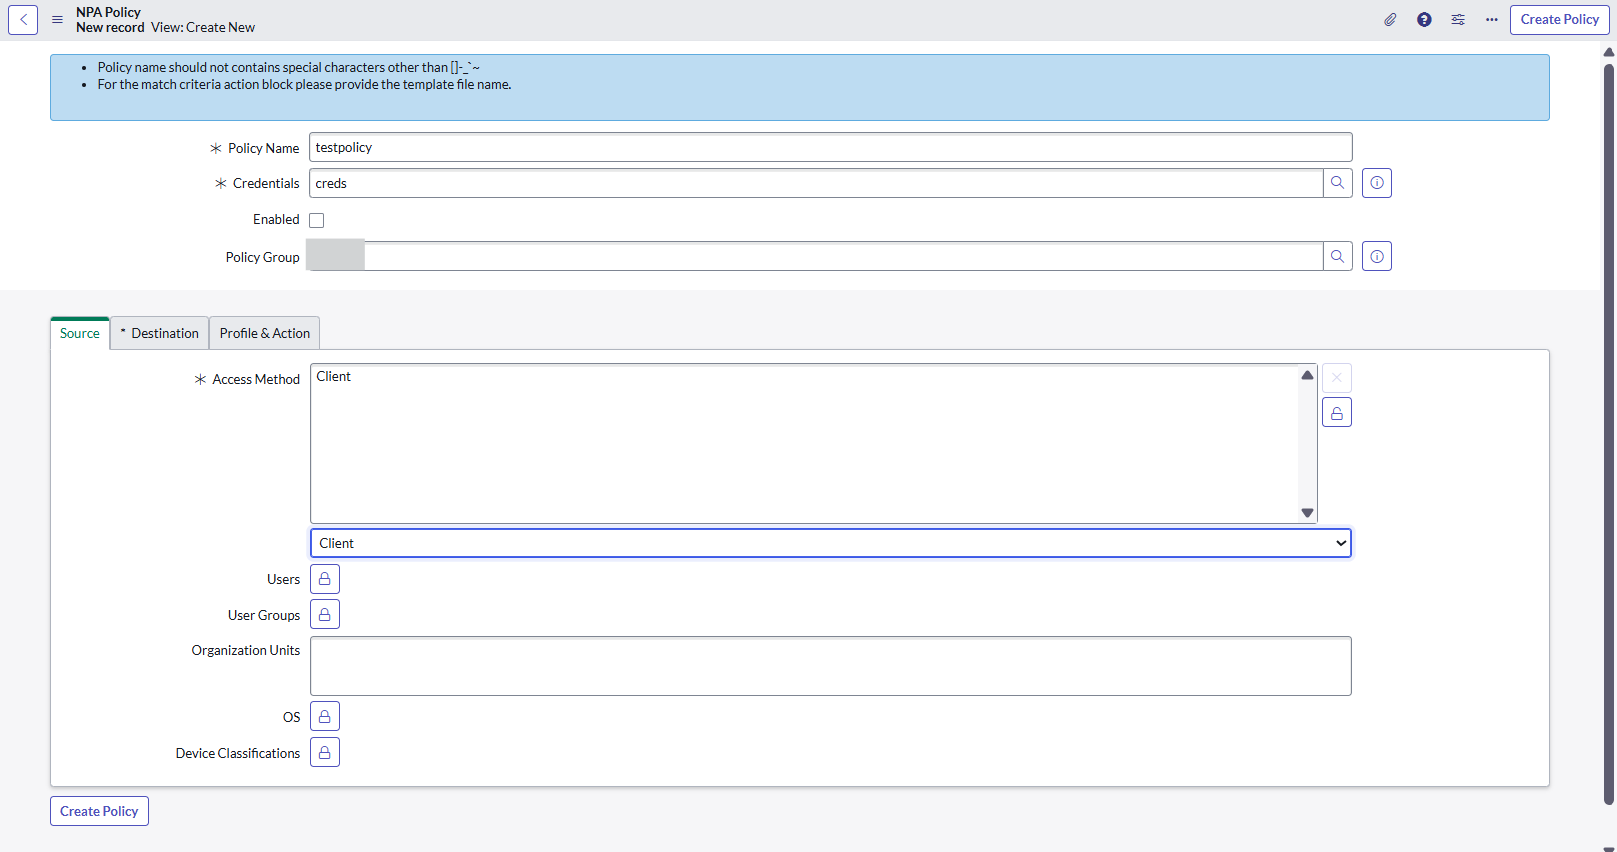
- Enter these parameters:
- Policy Name: The Policy Name should not contain special characters except -_[]~`
- Access Method: Client or Browser.
- Enabled, Policy Group : Select the required policy group.
- Source tab fields > Access Method: Client and Browser.
- Users: Select required fetched users.
- User Groups: Select required fetched user groups.
- Organization Units, OS: Select the required OS.
- Device Classifications: Select the fetched Device Classifications.
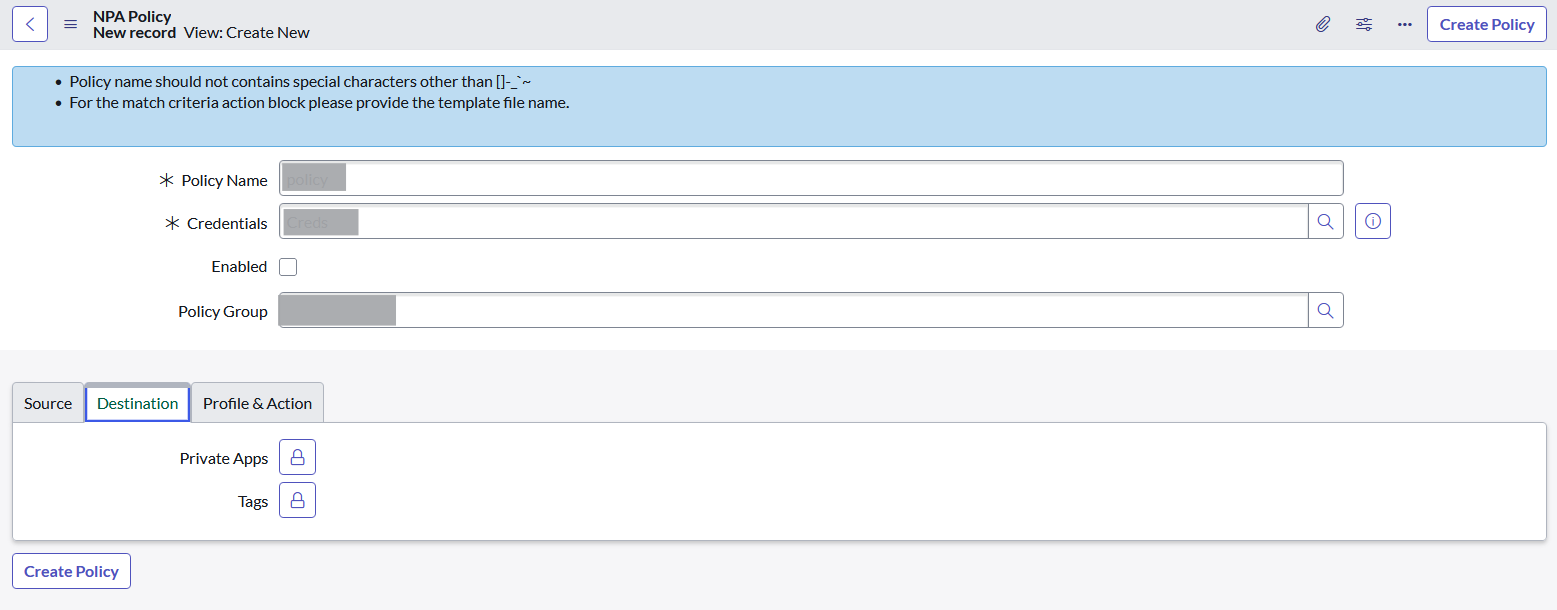
In case the Browser type is selected, OS and Device Classifications will not be visible. - Destination fields:
- Private Apps: Select required fetched private apps.
- Tags: Select required fetched tags.
- Profile & Action > Method Criteria Action: Allow or Block (if Block is selected, provide a valid match criteria template name. The template name could be found on the Netskope platform.)
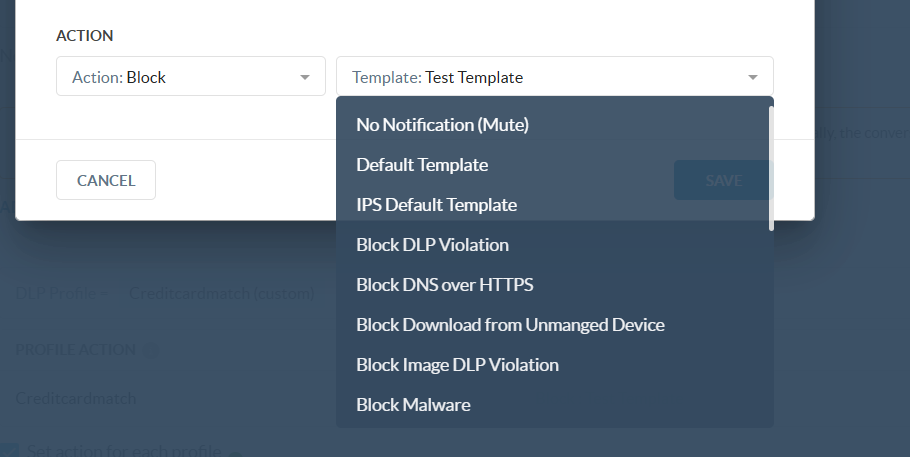
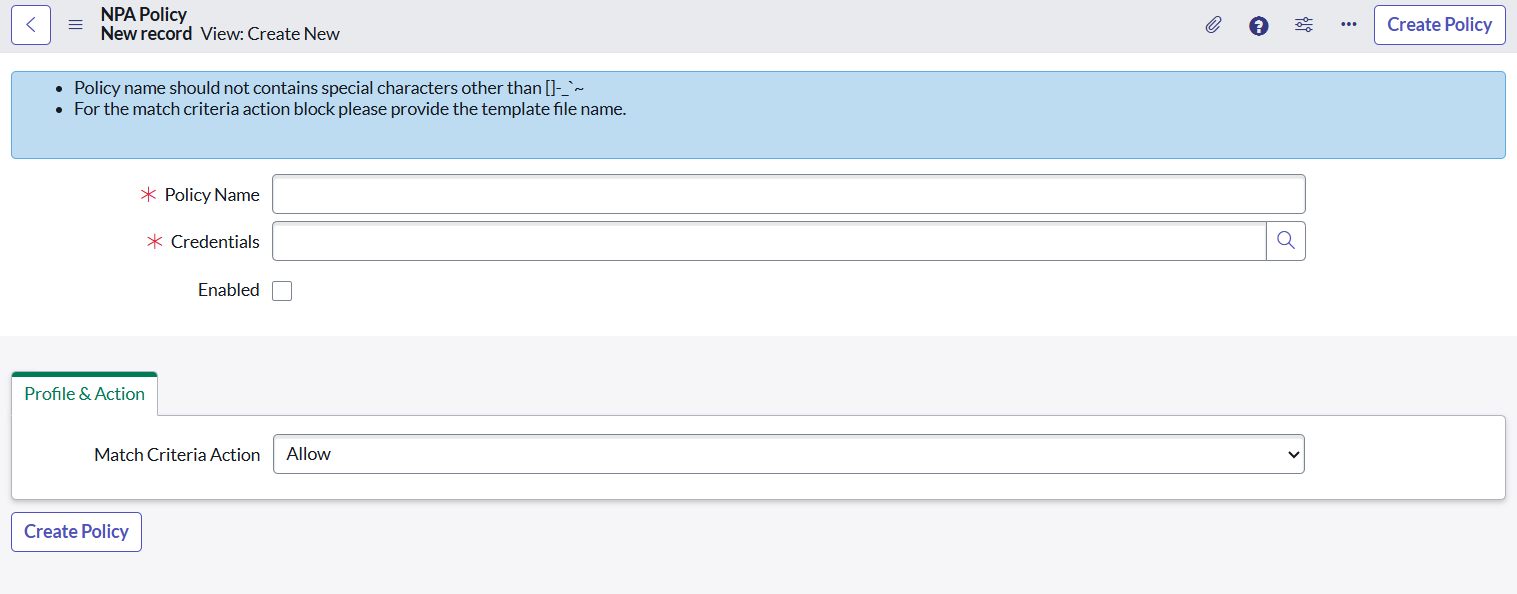
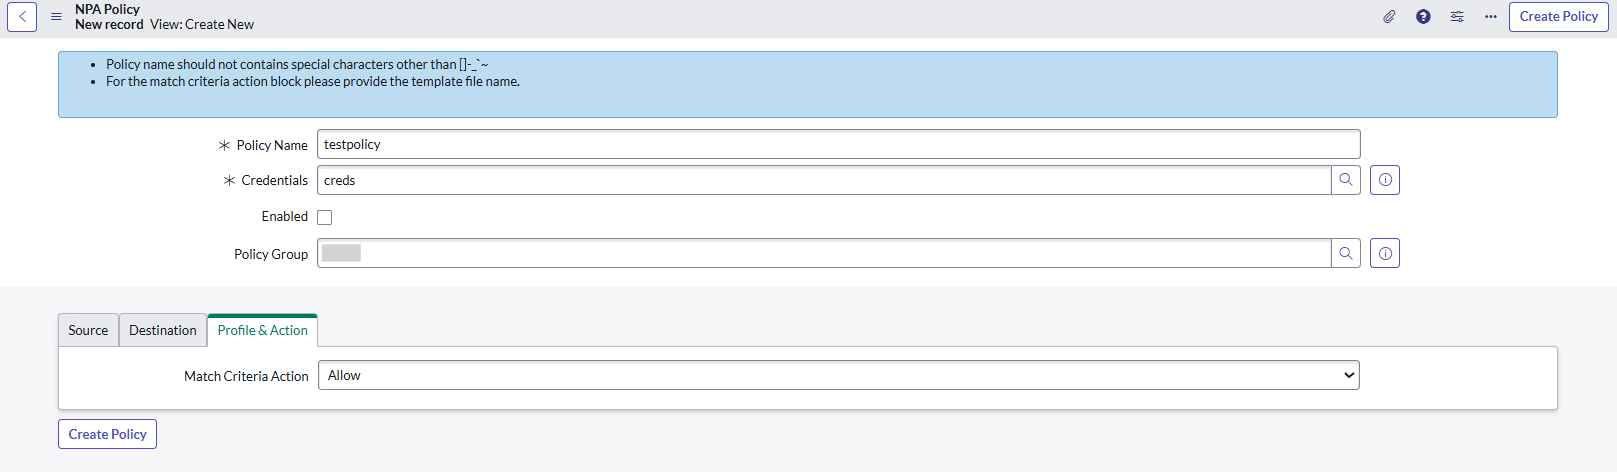
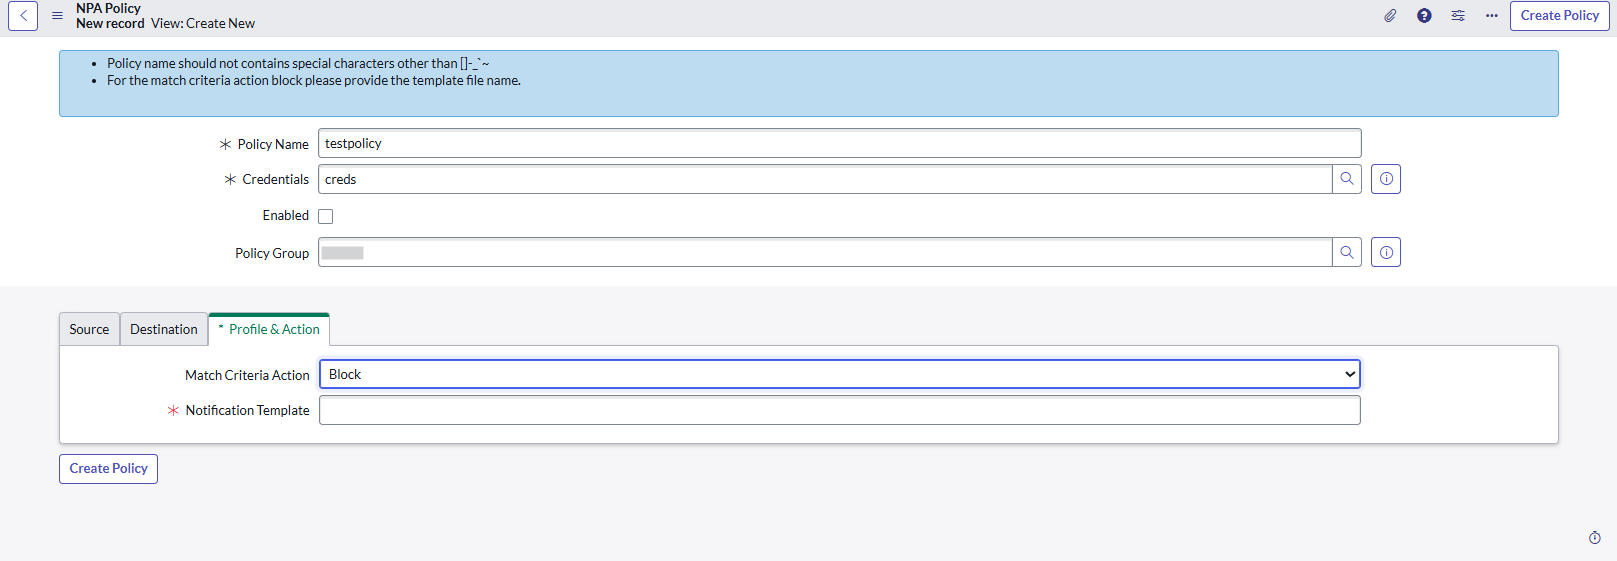
- Click Create Policy. Upon clicking, the policy will be directly pushed and created on the Netskope platform.
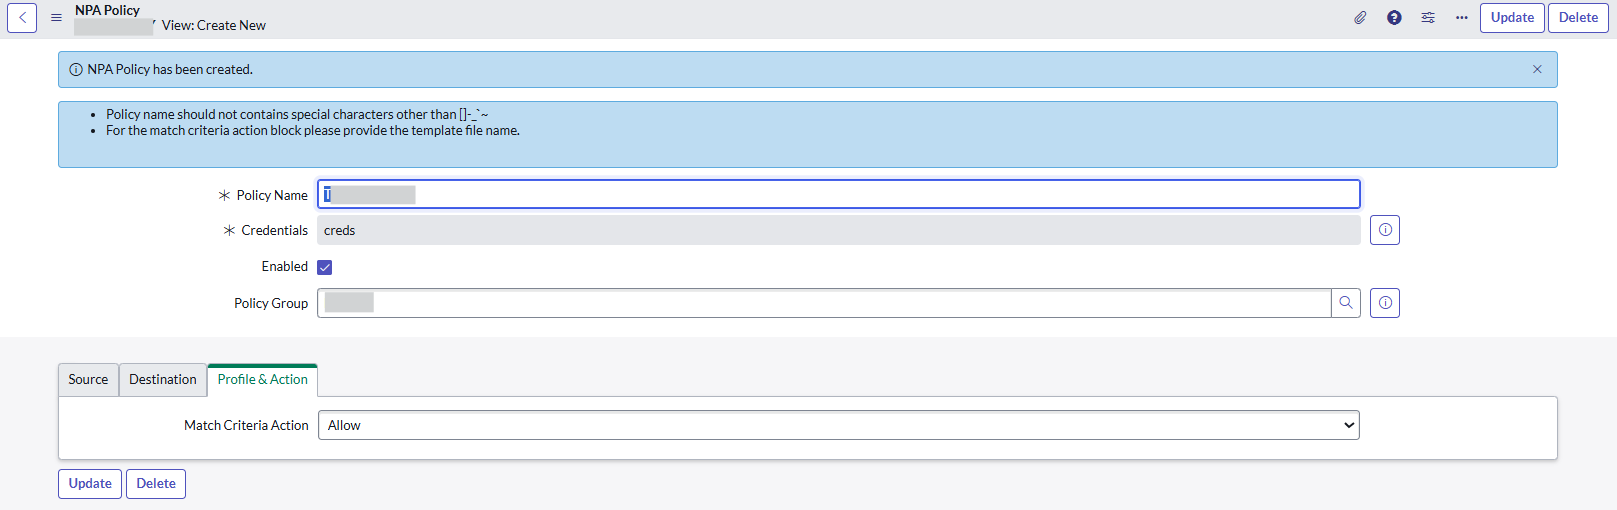
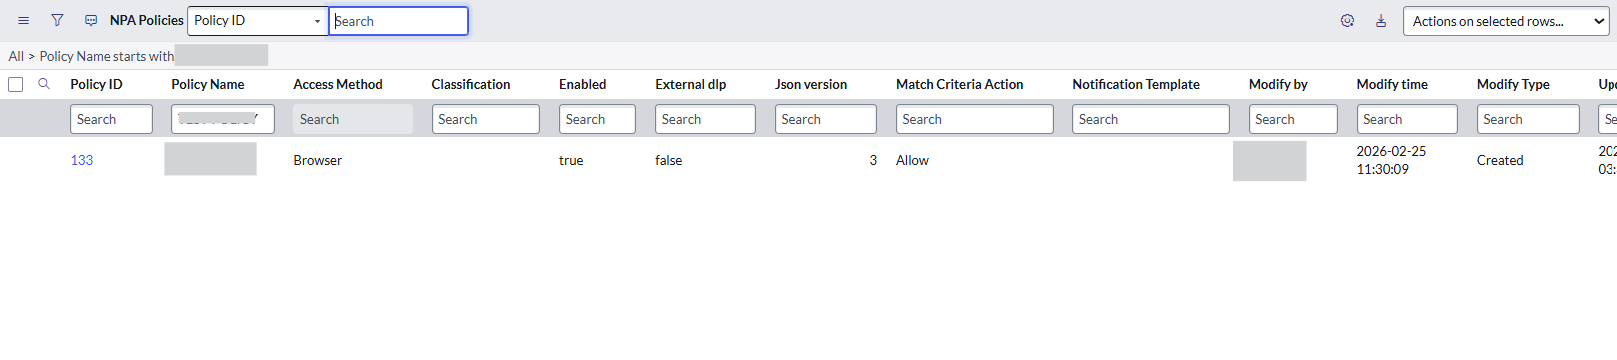
- Go to Netskope CMDB Integration > NPA Policies > All to verify the created NPA policy.
The same policy will also be created on the Netskope platform.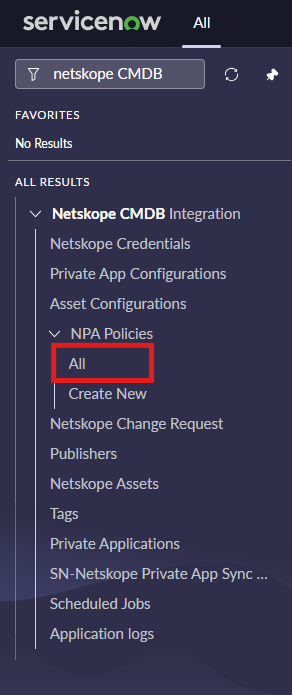
- To fetch Private App Segment NPA policies available on the Netskope platform, go to Netskope CMDB Integration > Scheduled Jobs.
- Open the Fetch NPA Policies scheduled job.
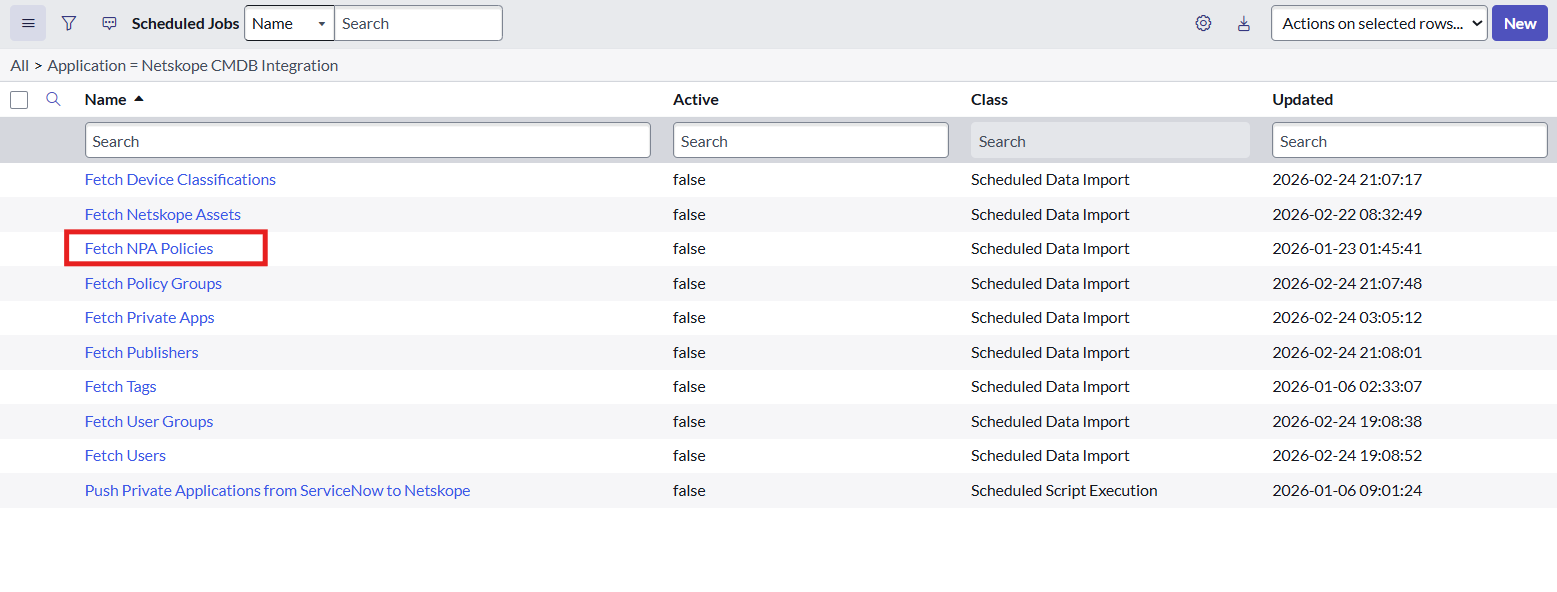
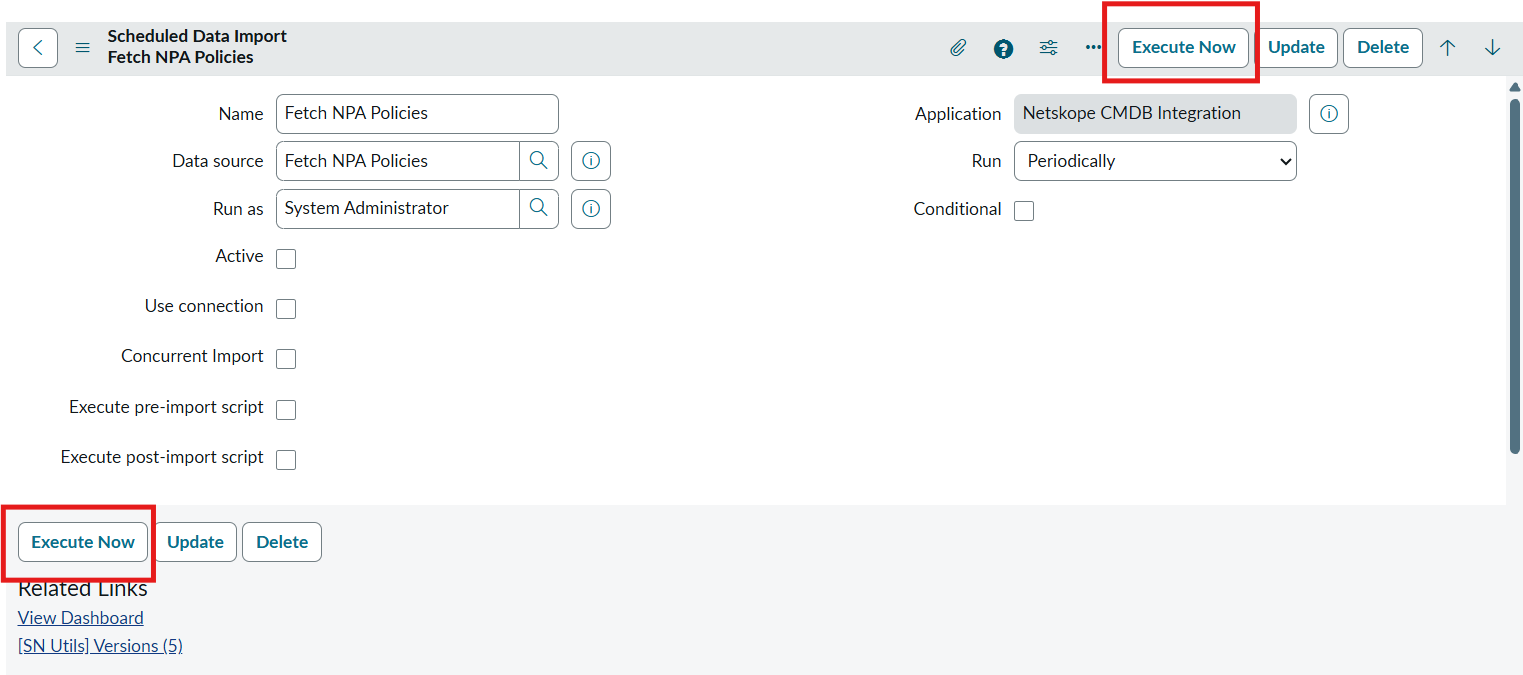
- Run it on demand by Execute Now, or set the frequency as required. Make sure to check Active checkbox as true.
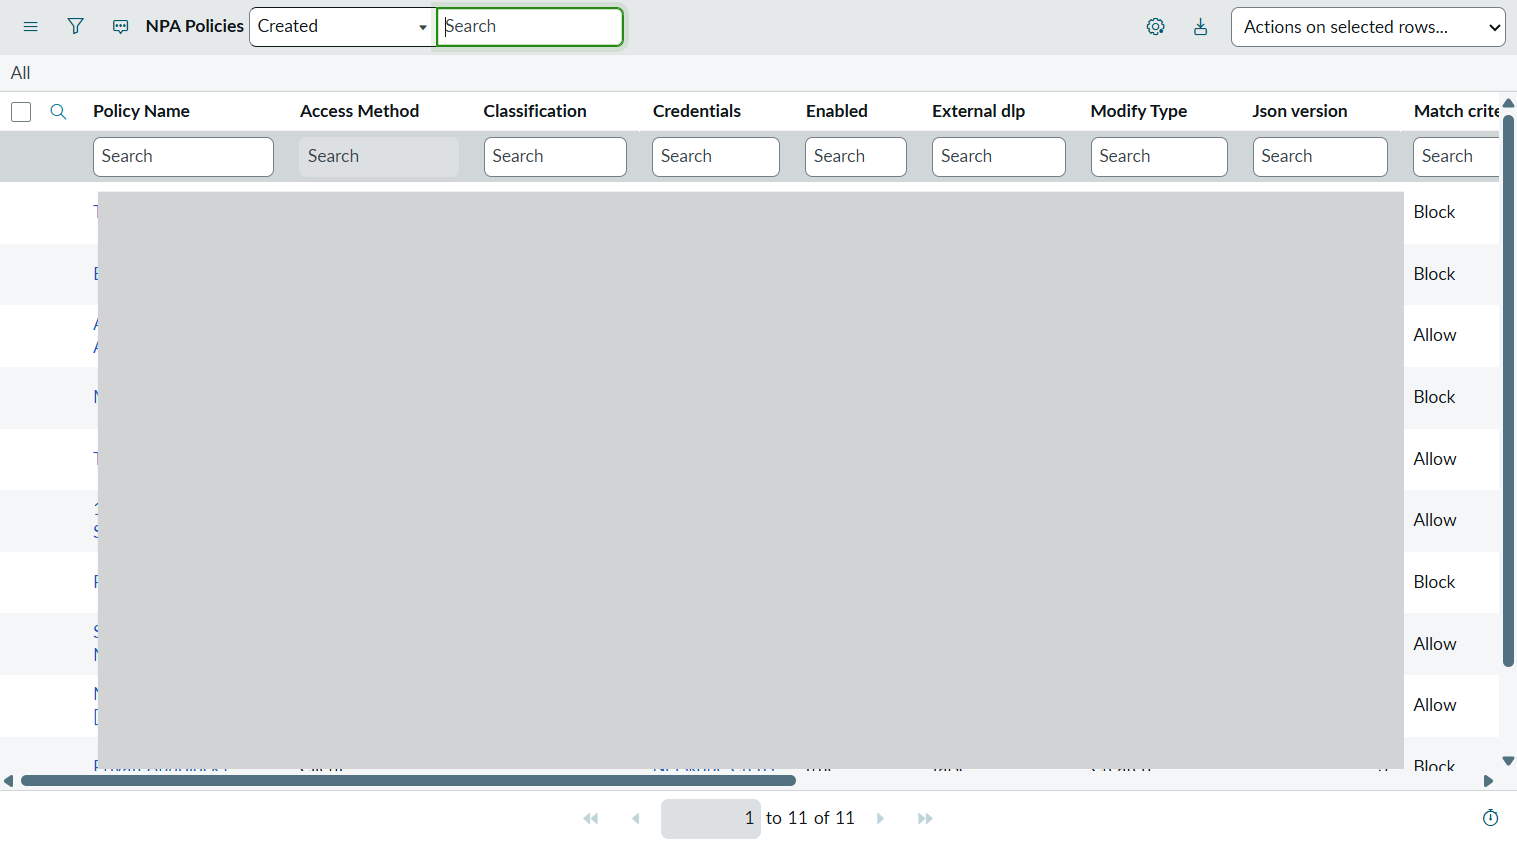
- Check the fetched NPA policies under Netskope CMDB Integration > NPA Policies > All.
Netskope Change Request
Netskope Change Request provides the functionality to create a change request to generate an OTP for Client, EPDLP, and NPA types for Netskope assets.
NOTE:
Email addresses must be consistent between your IdP (e.g. Entra) and Servicenow. For example, the use of case sensitive emails such as user1@Netskope.com versus user1@netskope.com.
Role Required: x_netsk_cmdb_app.admin,itil and cmdb_inst_admin
Procedure:
- In ServiceNow, go to Netskope CMDB Integration > Netskope Change Request.
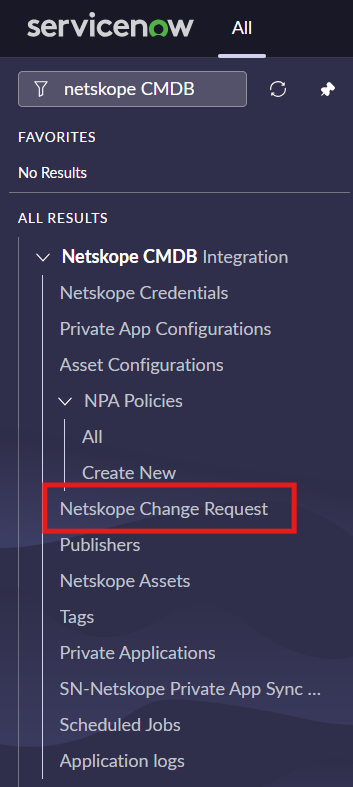
- Click New.
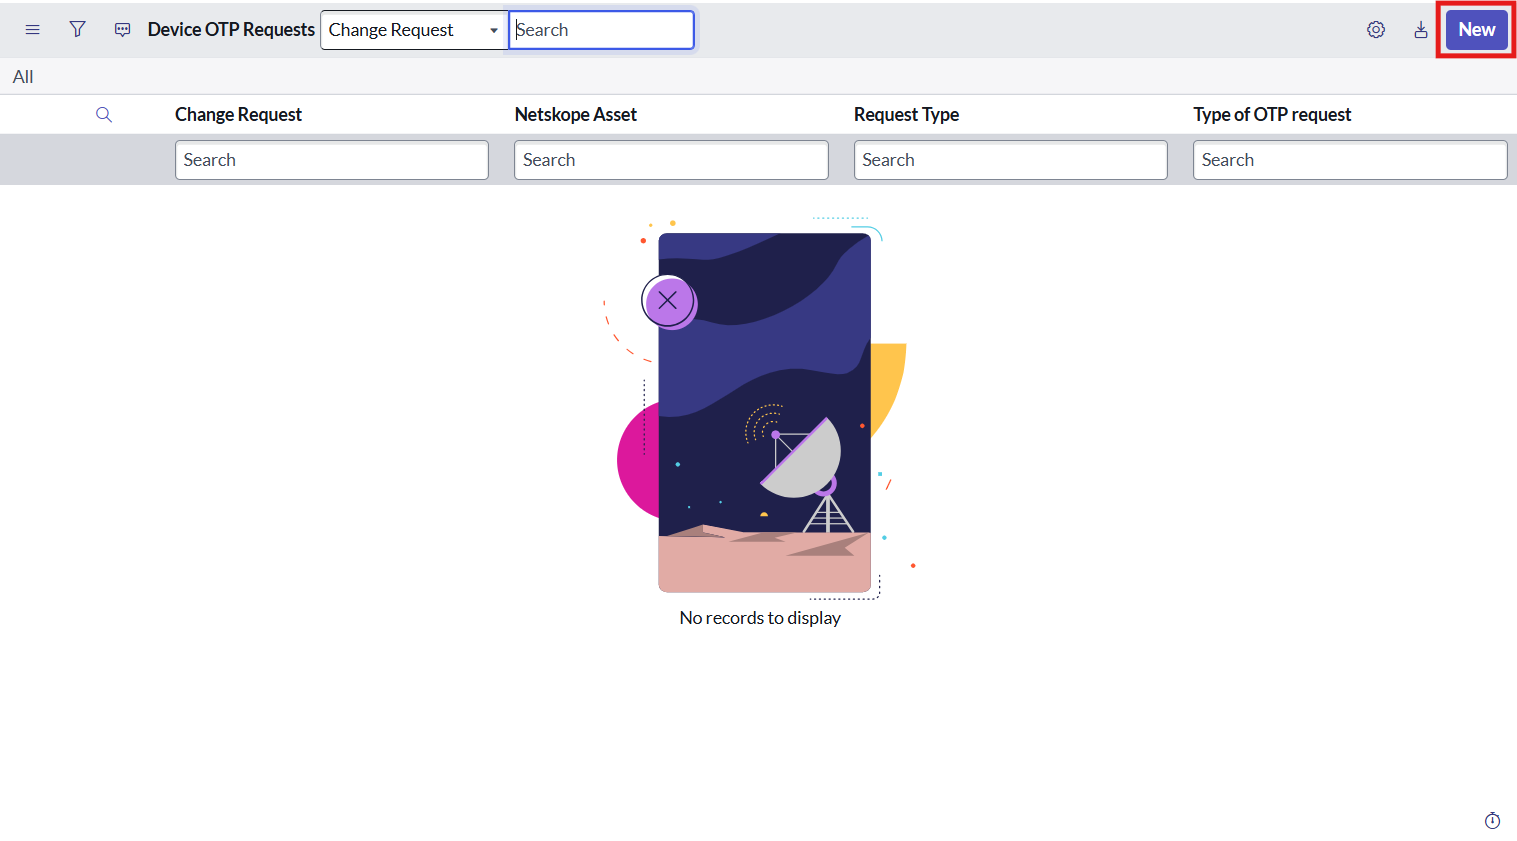
- For Type of OTP Request, select All, Client, EPDLP, or NPA.
- Select the Netskope asset that is linked to the current user.
If no Netskope Asset is selected, the OTP request will be sent to all assets linked to the current user.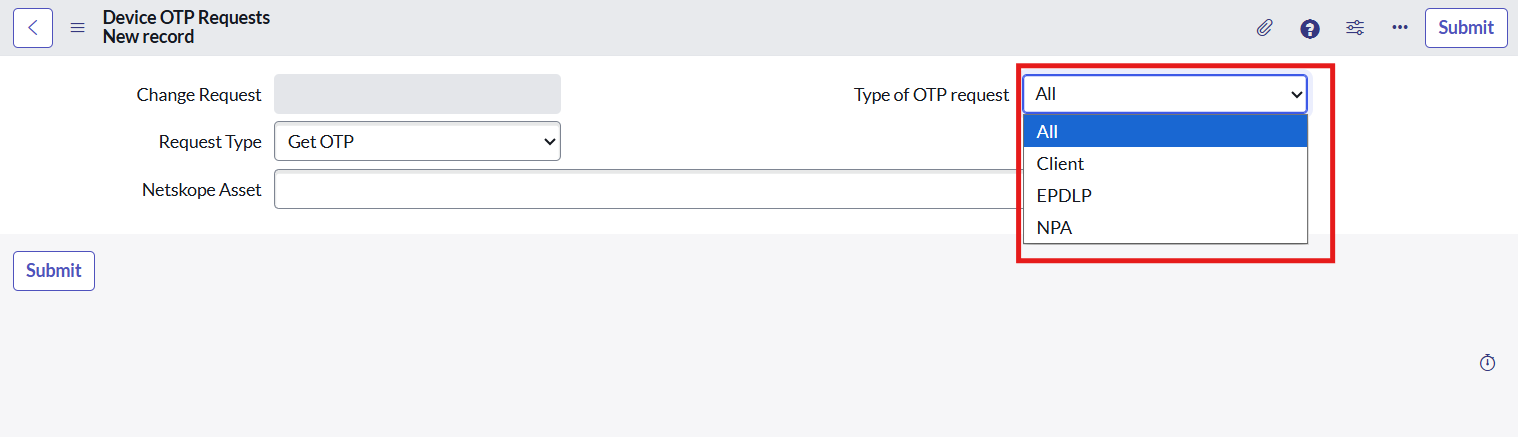
- Click Submit.
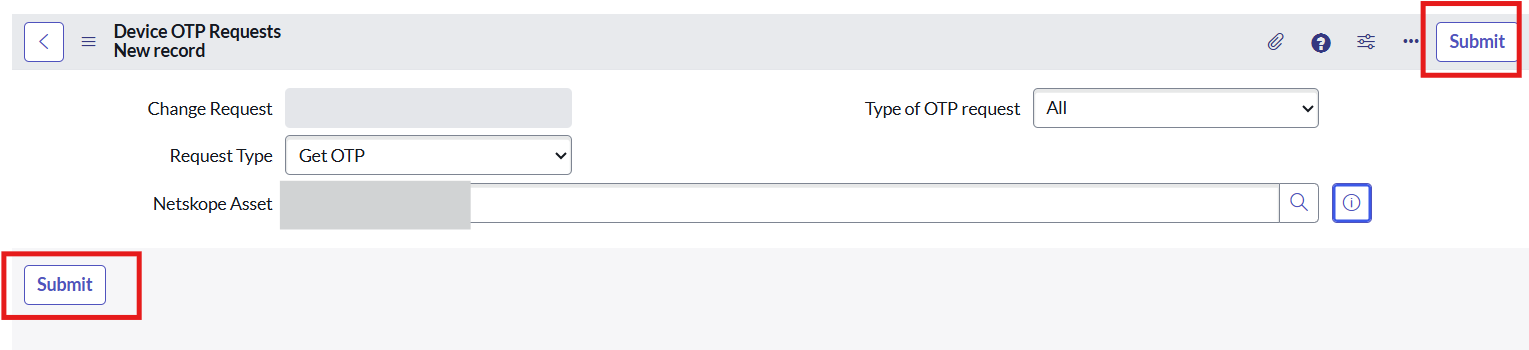
- The created change request should be visible under the list view.
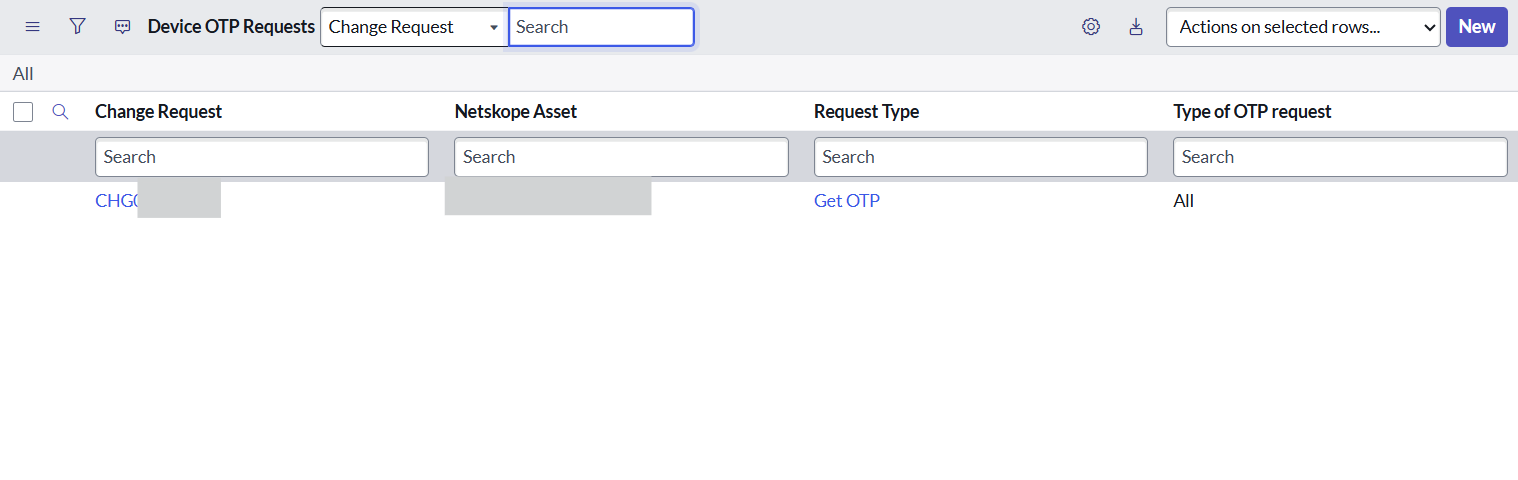
- Open the created change request. In the Description field, the OTP request type should be mentioned. Then, click Request Approval to send the request for approval.
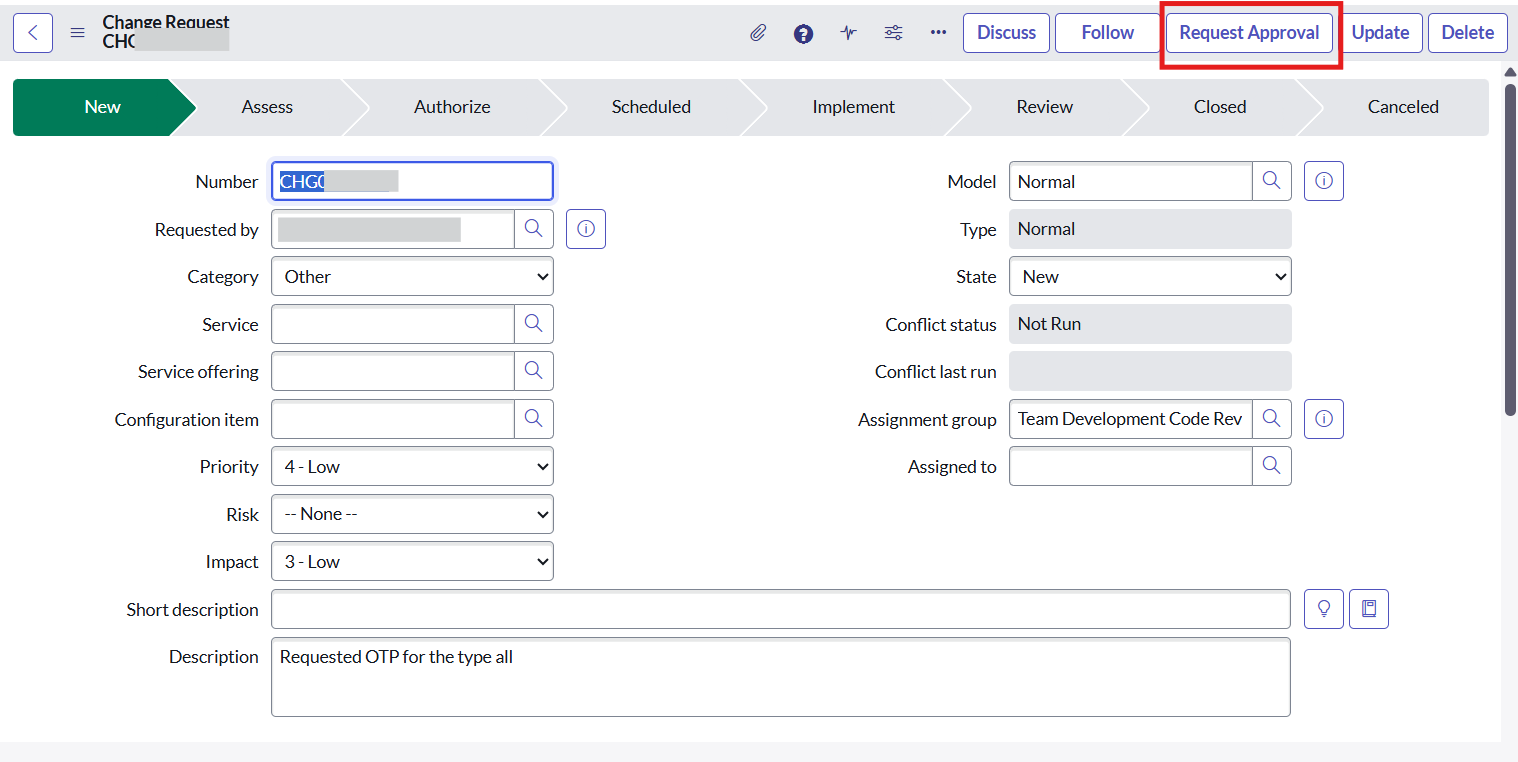
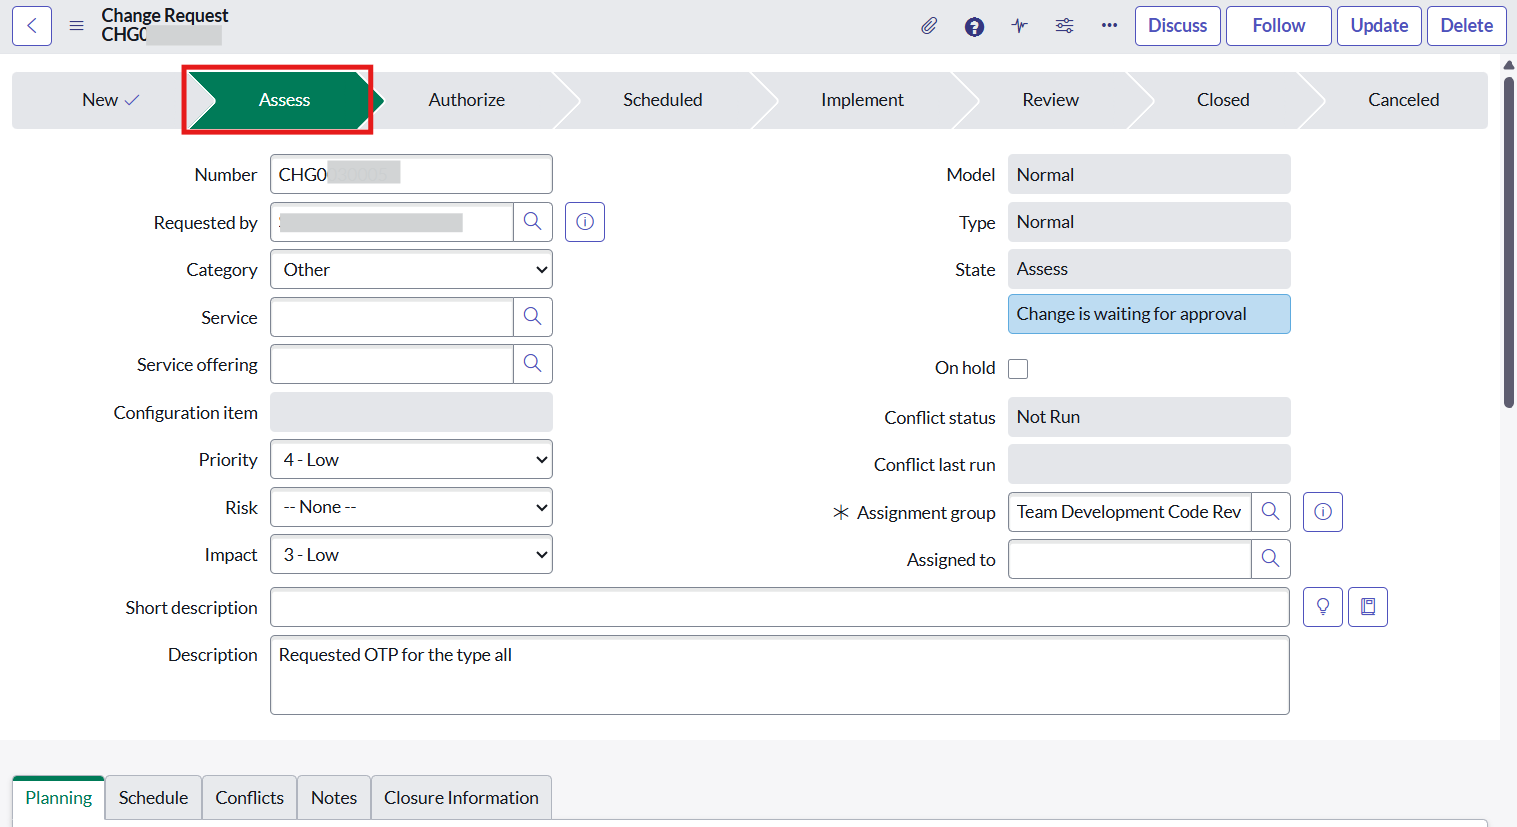
- The state should change from New to Assess and will wait for the appropriate group approver to approve the request.
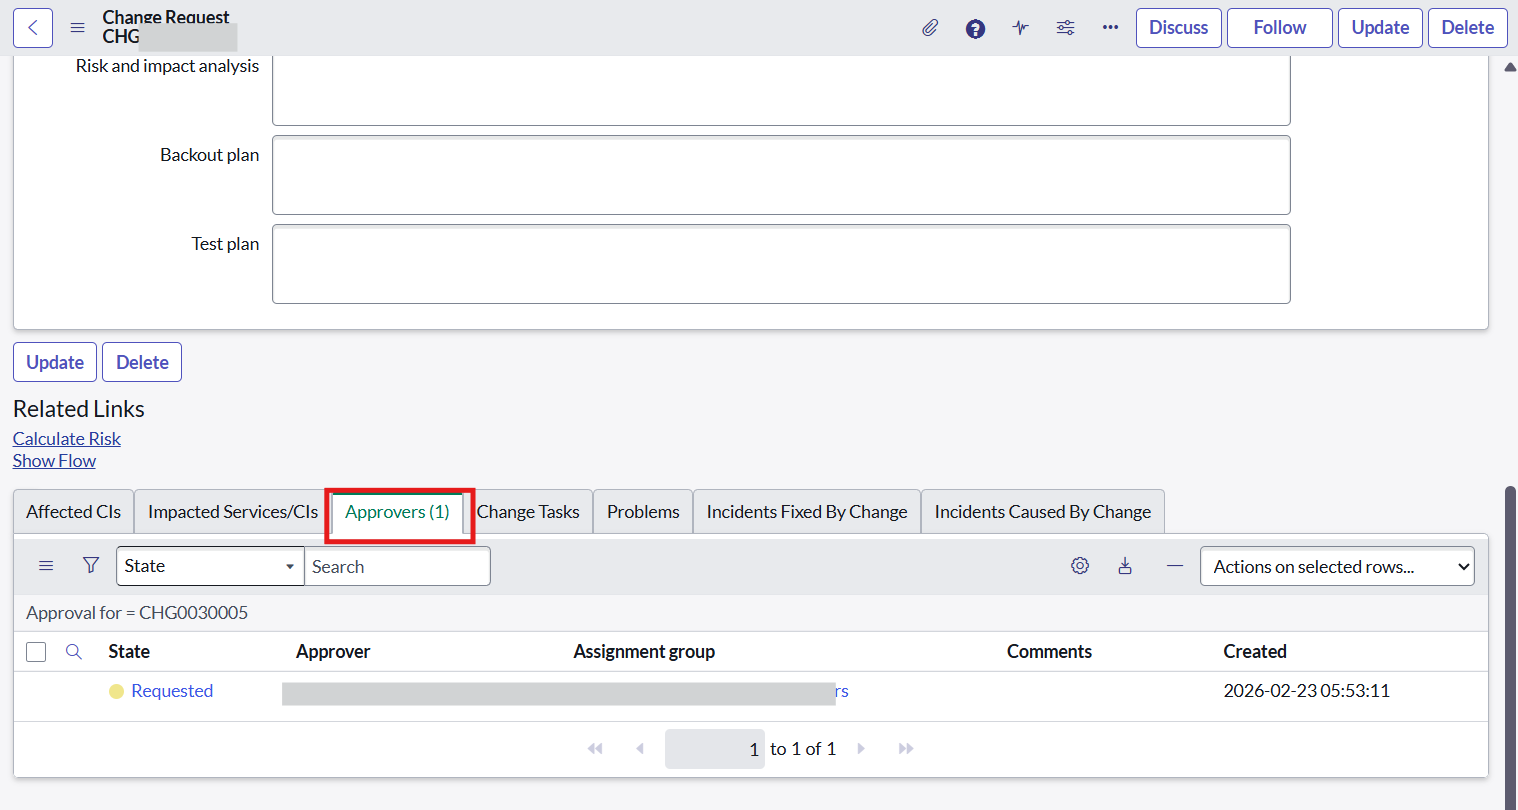
- To check the list of approvers, scroll down and under the related tabs, click on the Approvers tab.
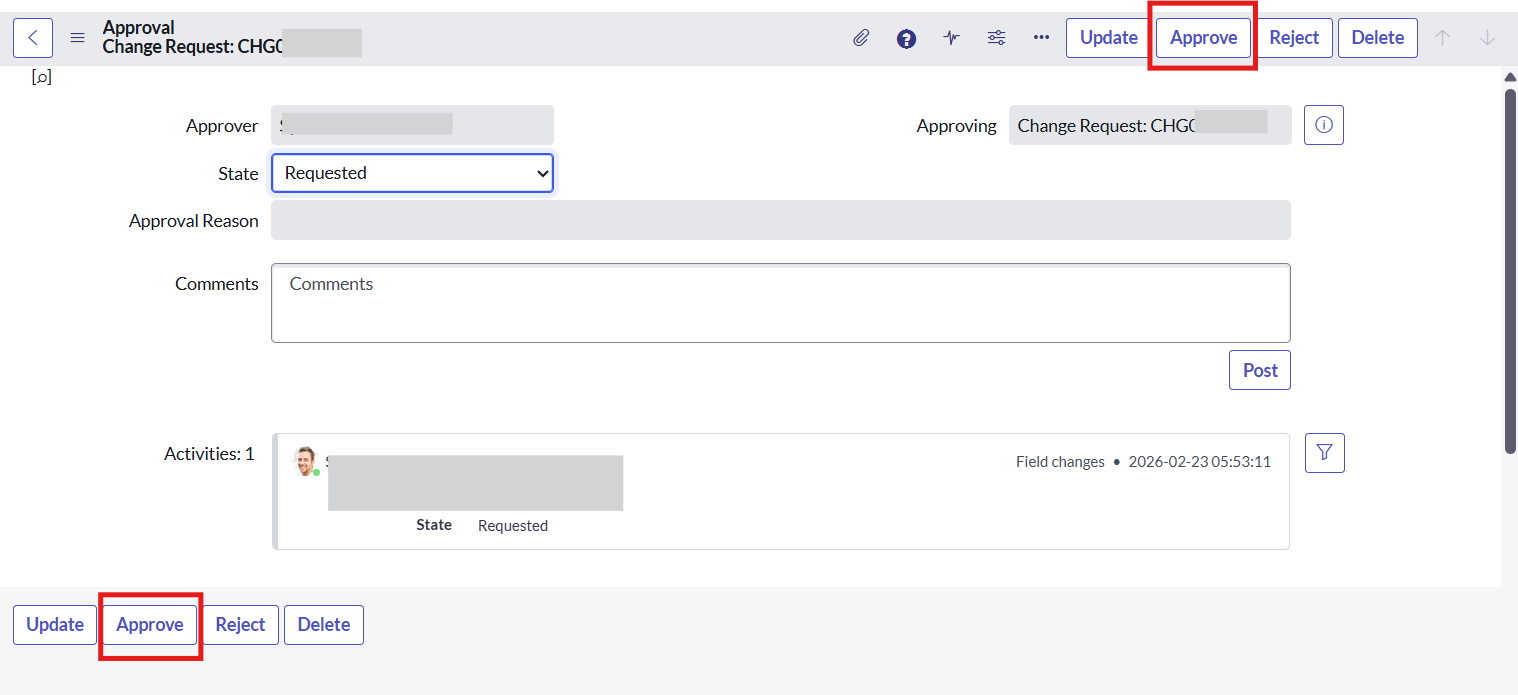
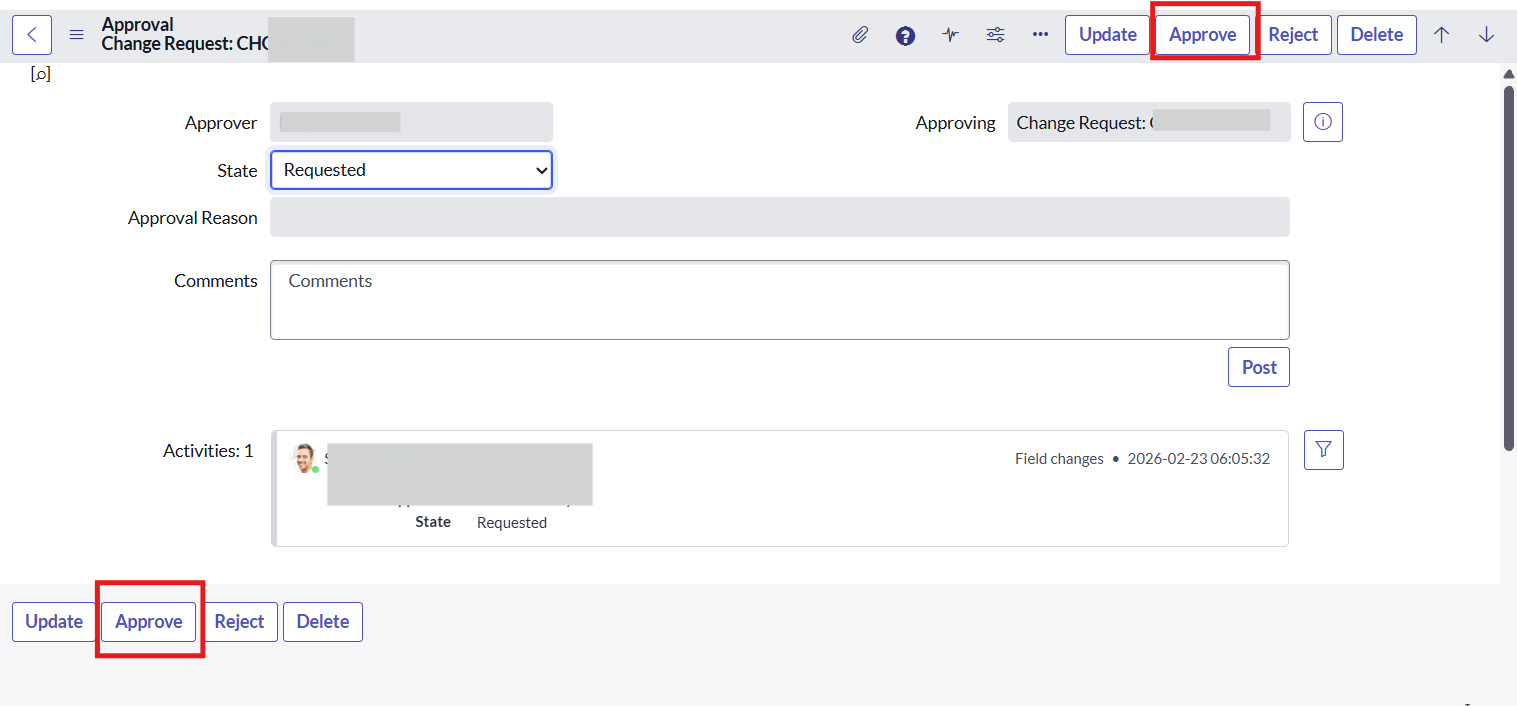
- Approve the request from the respective approver.
- After approval, the state should change from Assess to Authorize.
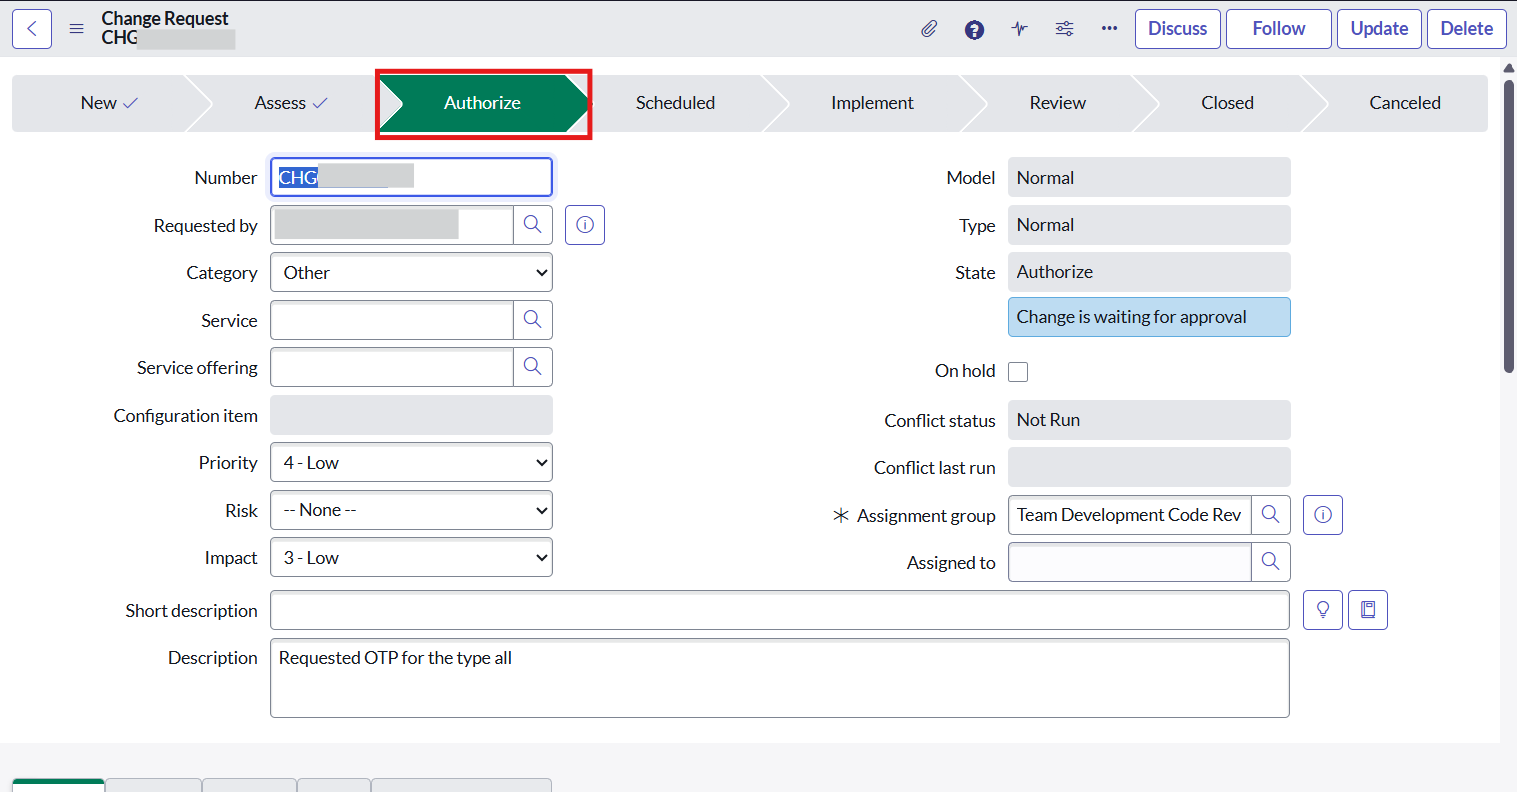
- Scroll down and under the Related Links, open the Approvers tab to check the list of approvers.
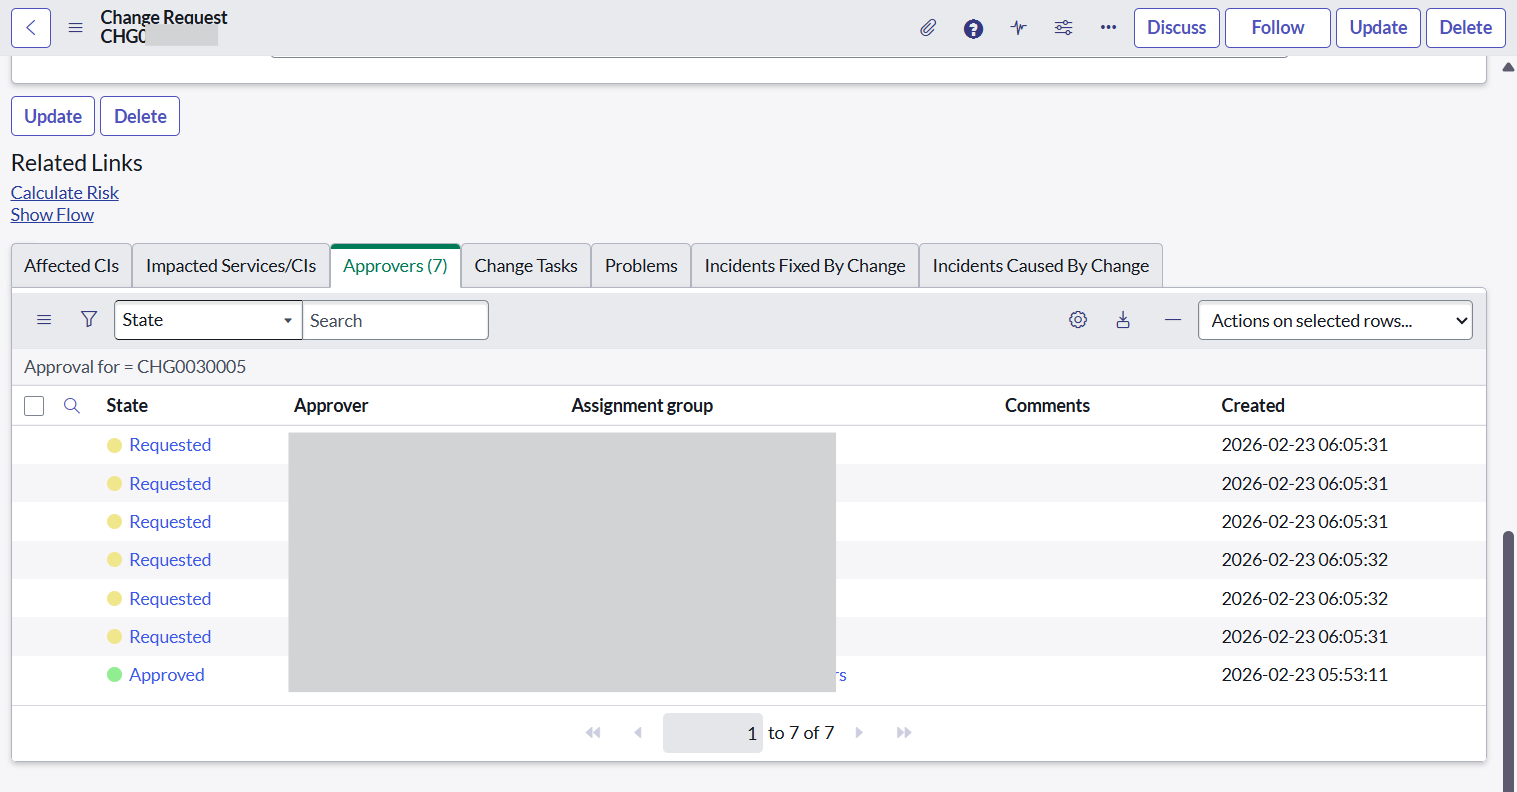
- Approve the request from the respective approver.
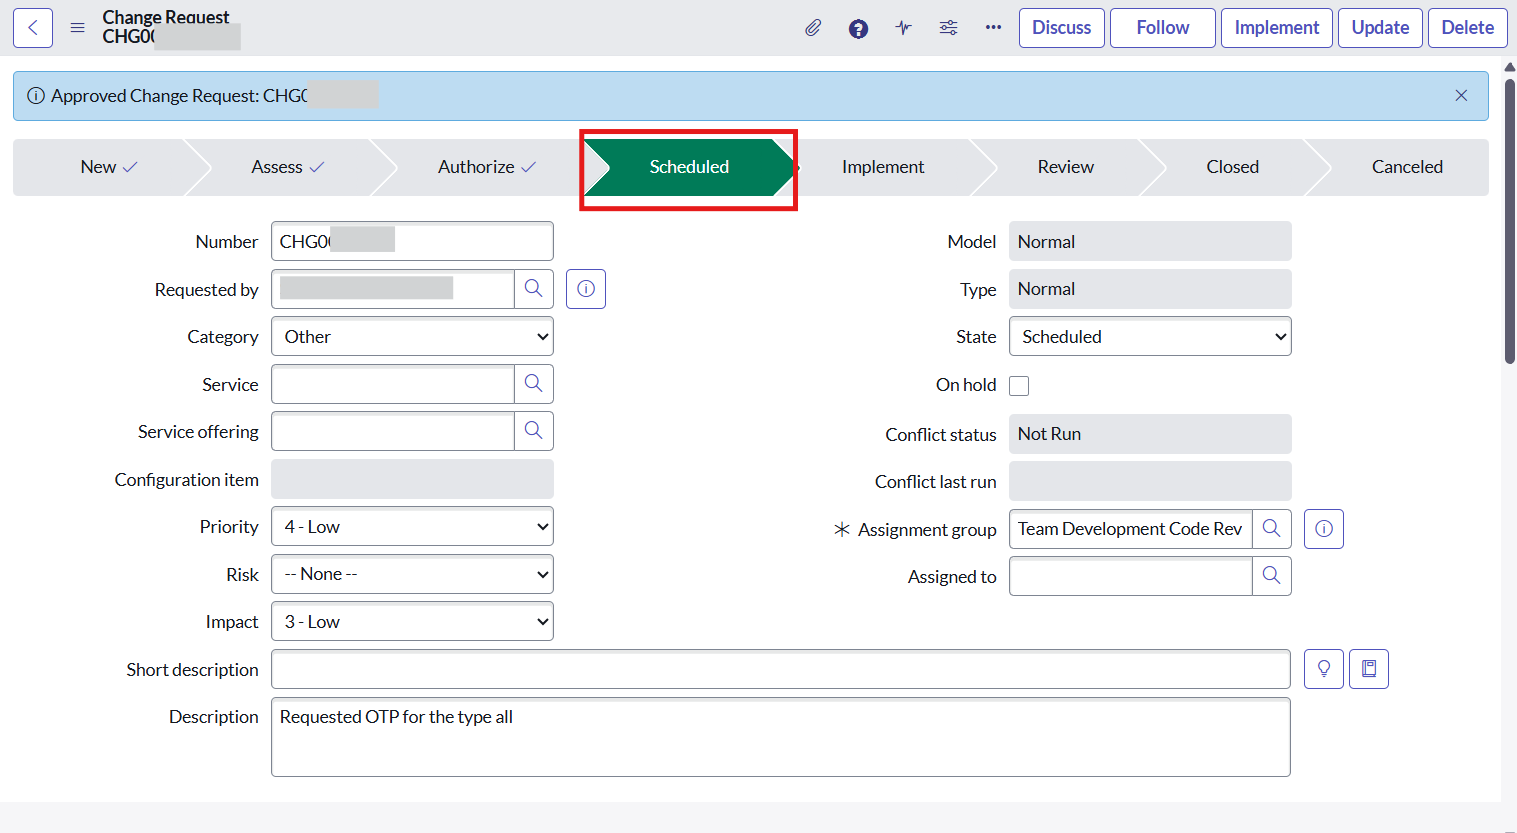
- After approval, the state should change from Authorize to Scheduled.
- Go to Netskope CMDB Integration > Netskope Assets.
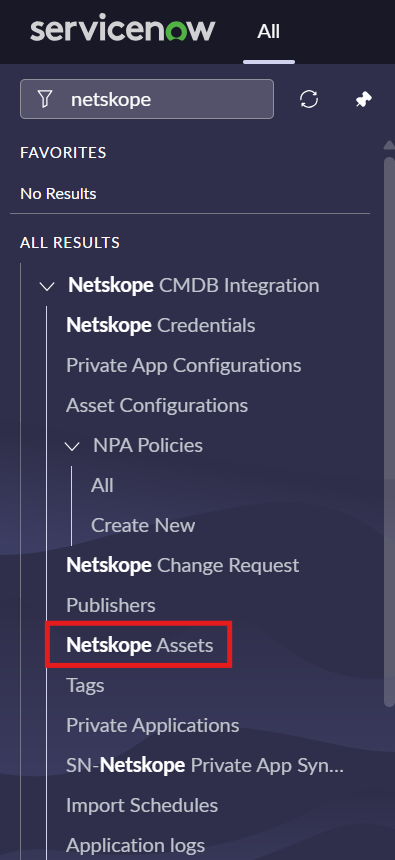
- Open Netskope Asset linked with the user.
- Click Request OTP.
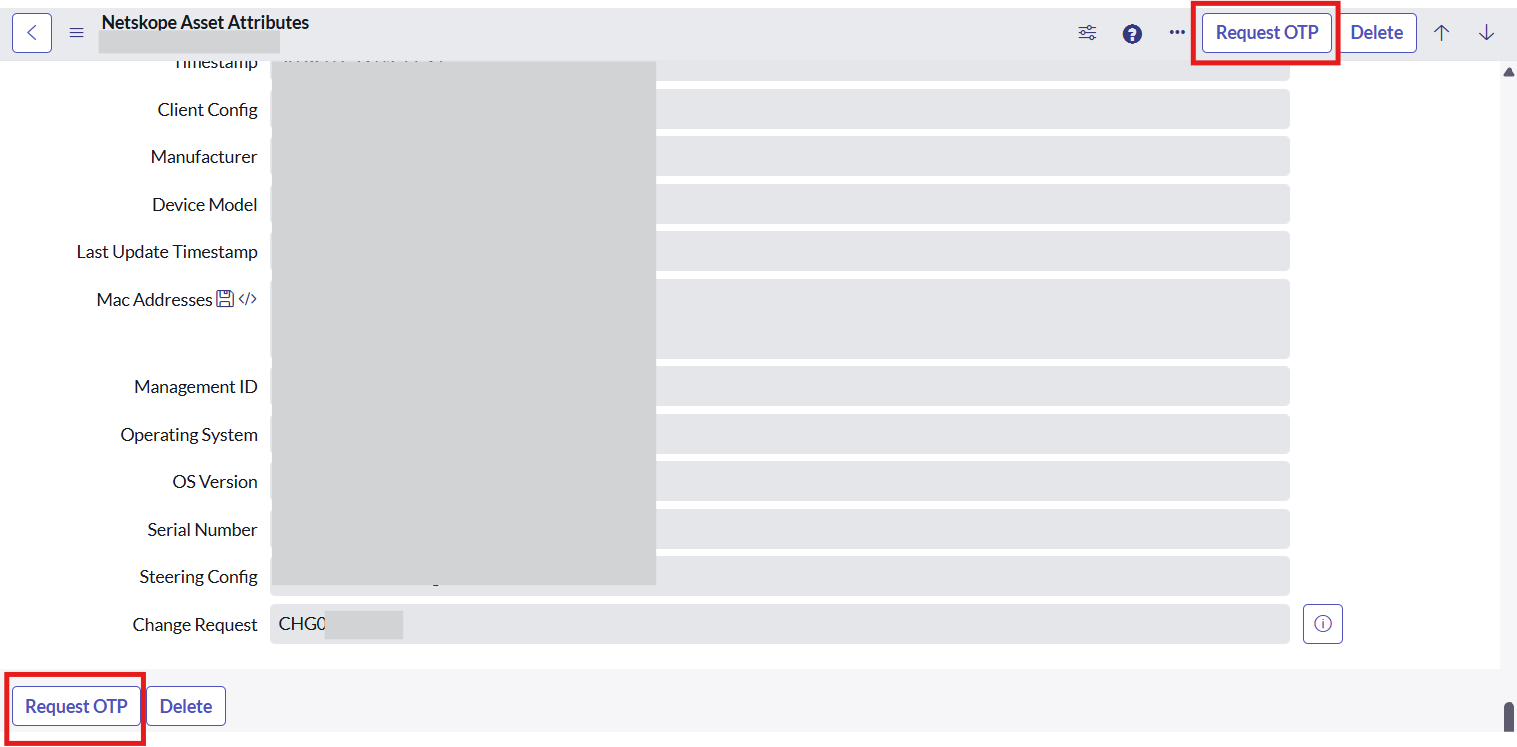
- The following info message should be displayed.

- Go to Netskope CMDB Integration > Netskope Change Request, open the change request, and under the related tabs, click Notes.
- The generated OTP for the requested type should be visible.
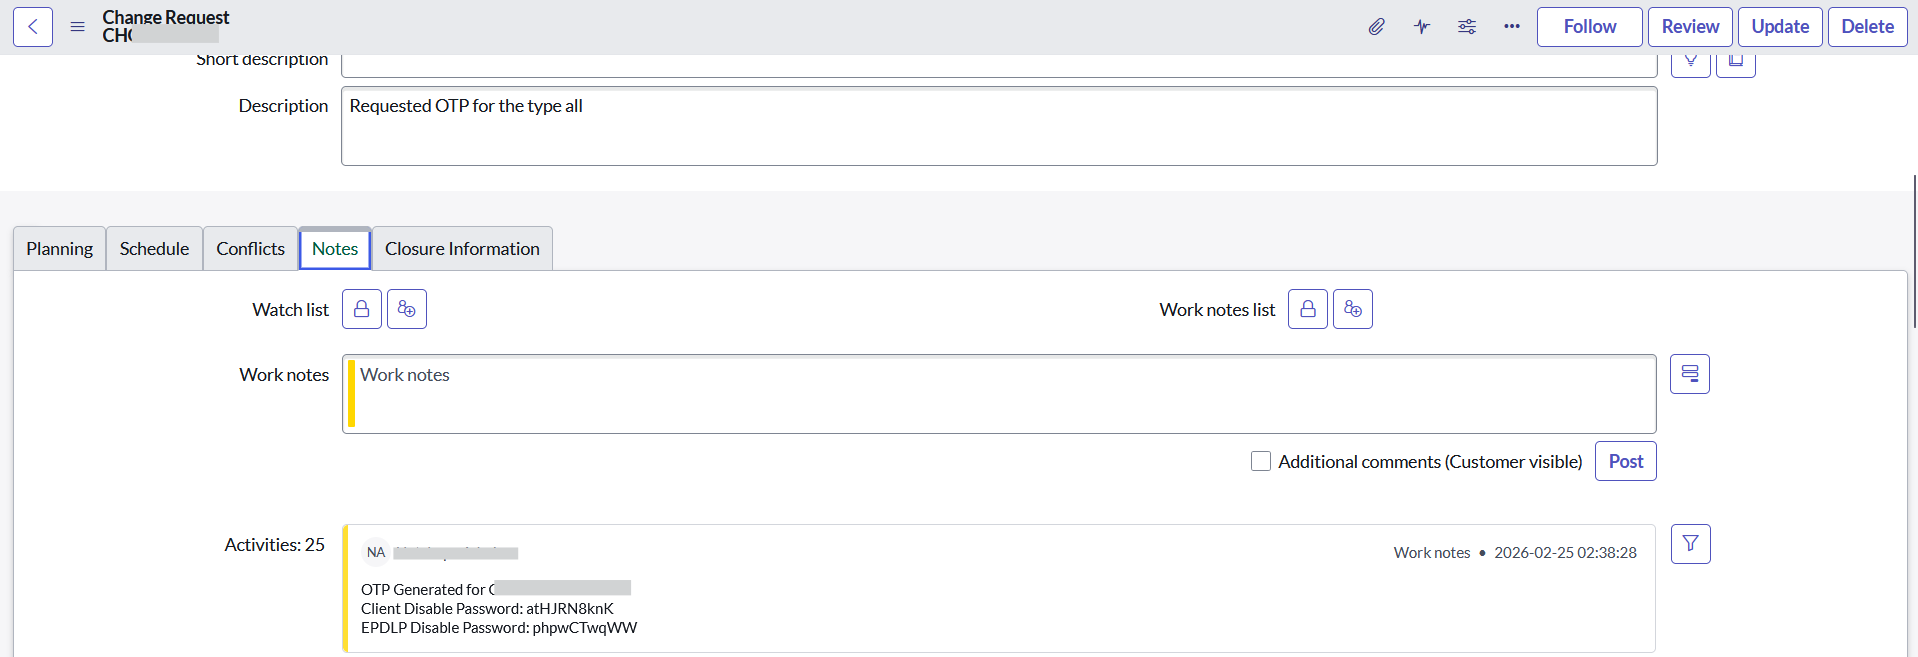
Scheduled Jobs
Scheduled Jobs are used to fetch Device Classifications, Netskope Assets, NPA Policies, Policy Groups, Private Apps, Publishers, Tags, User Groups, and Users, as well as to push Private Apps from ServiceNow to the Netskope platform.
Role Required: admin
Procedure
- In ServiceNow, go to Netskope CMDB Integration > Scheduled Jobs.
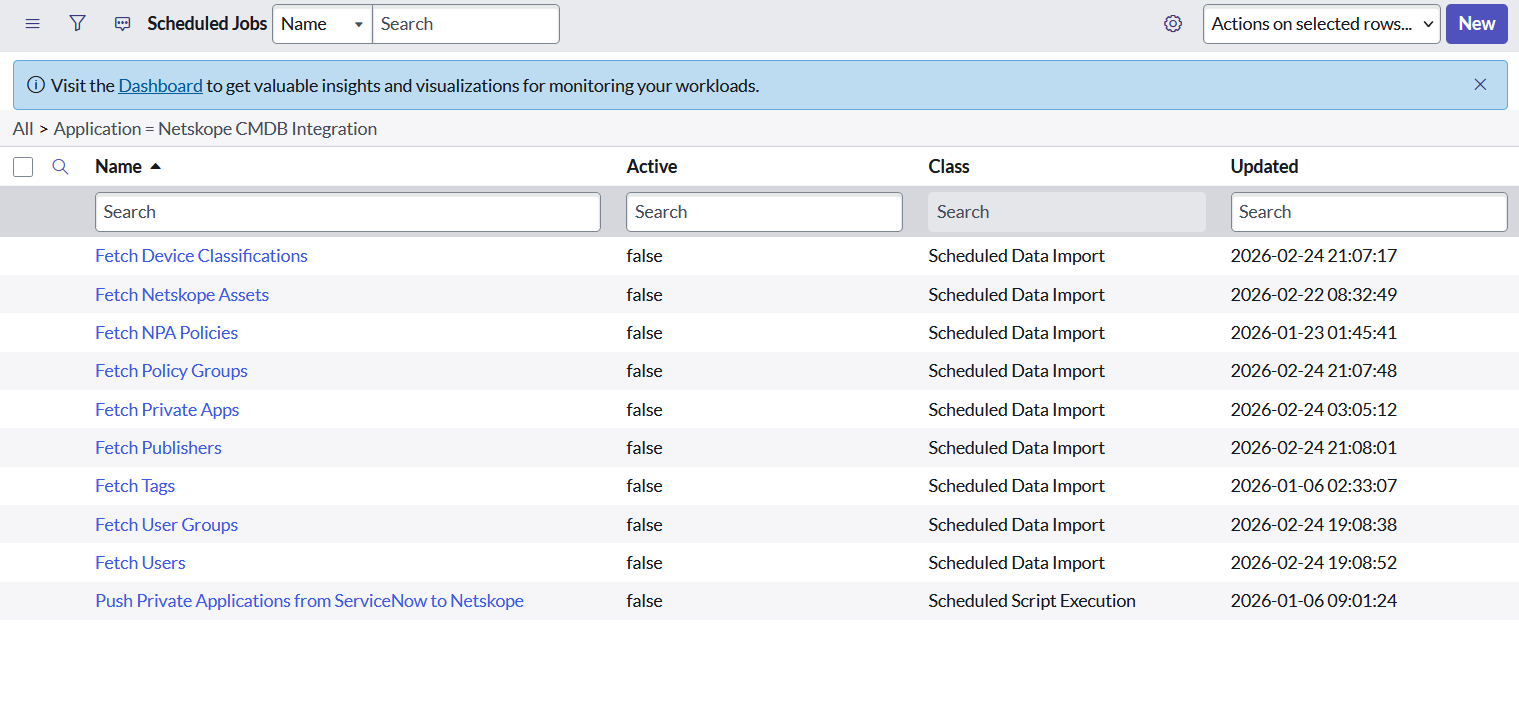
- Run or configure the scheduled job based on the requirement. For example, if data needs to be fetched daily, set the Run field in the Schedule tab to Daily (or Weekly/Monthly as required).
Additionally, ensure that the data ingestion frequency is aligned with the data volume. An incorrect or overly frequent schedule may lead to job conflicts or performance issues. - After a successful run, the data should be fetched into the respective tables.
- Publishers: This module contains the list of publishers fetched from Netskope.
Required roles: x_netsk_cmdb_app.admin or x_netsk_cmdb_app.user - Tags: This module contains the list of tags fetched from Netskope.
Required roles: x_netsk_cmdb_app.admin or x_netsk_cmdb_app.user - Private Applications: This module contains the list of private applications fetched from Netskope.
Required roles: x_netsk_cmdb_app.admin or x_netsk_cmdb_app.user - SN-Netskope Private App Sync Metadatas: This module contains the list of private applications created on Netskope from ServiceNow.
Required roles: x_netsk_cmdb_app.admin, admin - Application Logs: This module contains the application logs generated from this integration.
Required role: System Administrator: admin - Support Contact: This module contains the support contact for Netskope.
Required roles: x_netsk_cmdb_app.admin or x_netsk_cmdb_app.user - Privacy Policy: This module contains the Privacy policy for this integration.
Required roles: x_netsk_cmdb_app.admin or x_netsk_cmdb_app.user
Known limitations
- NPA Policies: Users API response does not return the correct count of users present on the platform.
- NPA Policies: Policy groups are not returned in the API response while fetching NPA policies from the platform.
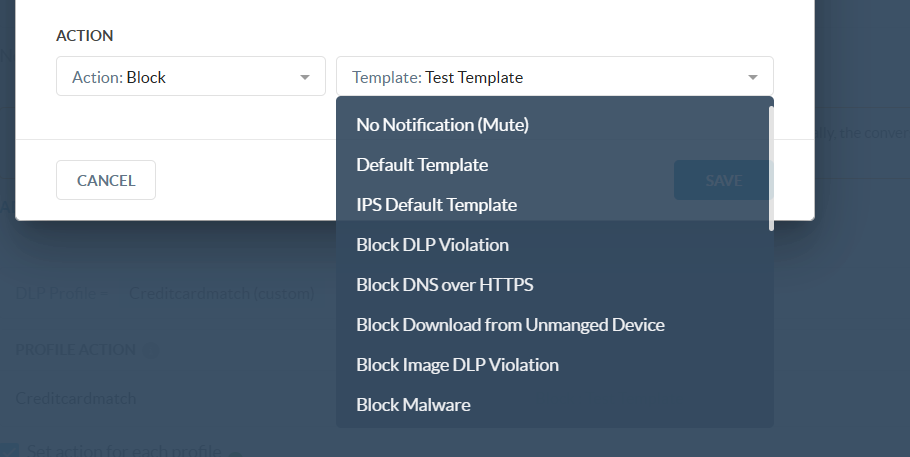
- NPA Policies: Notification Template returned by the API contains the file name example template.html and not the display value. To update the policy provide the actual display value like Template Name, and not the template.html. You can get the template name from Netskope platform. Go to Policy > Profile & Action > Action:Block > Template. This image shows examples of how your template names could be different.
- NPA Policies: The API does not support updating any policy’s device classification and user groups with empty values.
- Browser: Private Applications when pushing different application with same host that exists on platform , throwing {“message”:”Error returned by backend API, status code:422, reason: Validation failed: Host duplicate host and port for clientless service”,”status”:”error”}. Same behavior occurs when performing on platform too