

Cloud Exchange supports these upgrade options:
| Current CE Version | Upgrade Path |
|---|---|
| v5.1.1 | v6.1.0 |
| v5.1.2 | v6.1.0 |
| v6.0.0 | v6.1.0 |
| v6.0.1 | v6.1.0 |
Notes
- Customers using Cloud Exchange version 3.x or 4.x who wants to upgrade to the latest version, refer to this Cloud Exchange KB article.
- Customers using Cloud Exchange version 5.0.1 in a containerized deployment and planning to upgrade to the latest version, refer to this Cloud Exchange KB article .
- Customers using Cloud Exchange version 5.0.1 in a VM deployment and planning to upgrade to the latest version, refer to this Cloud Exchange KB article .
Containerized Deployment
Important
Please contact your SE/AM if you have questions regarding CE installation, deployment, configuration, and upgrade.
Prerequisites
- Before initiating an upgrade, ensure your instance meets the system requirements for Cloud Exchange.
- Disable all Source Plugins in all modules, then wait until in-queue tasks finished before proceeding with the migration. Use these steps to identify in-queue tasks mentioned below.
- After disabling the source plugins in all modules, wait for 20-30 minutes.
- Apply filter on logs:
- Go to the Logging section.
- Click Filter Query.
- In the Filters input, enter the following:
message Like "Ingested " || message Like "Stored " || message Like "task(s)" || message Like "Completed storing" - Click Load.
- Apply the filter to view relevant logs.
- Monitor Logs: Once the logging filter is applied, monitor for new logs. When no new logs appear under this filter, you can proceed to the next step.
- After migrating to the latest CE version by following steps mentioned below as per your current deployment and CE version, please enable all previously disabled source plugins.
- Ensure you have the maintenance password readily available, as it will be needed to complete certain steps in this process.
Important
If the maintenance password is lost, the data could not be retained.
Notes
RabbiMQ data migration is not supported due to the change of queue type from Classic to Quorum queue.
Standalone Deployment
You should update all your Netskope tenants with a V2 token that has access to all the data export endpoints before proceeding with the upgrade.
- Before proceeding, ensure that all prerequisites have been met. Verifying these requirements in advance is essential to avoid potential issues during the process.
- Go to the existing ta_cloud_exchange directory with the docker-compose.yml file. Stop the Cloud Exchange containers.
sudo ./stop
If the output of the ./stop command is ./stop: No such file or directory, execute the following command.
sudo docker compose down -v
- If you have made any local changes to the docker-compose.yml file, reset those using (you might need sudo).
sudo git reset --hard
- Pull the latest changes.
sudo git pull
- Copy and edit the cloudexchange config file
cp cloudexchange.config.example cloudexchange.config
vi cloudexchange.config - Update the cloudexchange configuration file with require field value. Also, Make sure to configure optional fields like proxy configuration, ui port etc if used/customised.
MAINTENANCE_PASSWORD=<old maintenance password> - Execute the setup script.
sudo python3 ./setup
- Launch Cloud Exchange.
sudo ./start
- Close all of your Cloud Exchange browser instances and log in again in Incognito mode, or clear the browser cache before logging in.
The Cloud Exchange UI is now accessible with the system’s IP: http(s)://<ip>.
HA Deployment
To v6.1.0 from v.5.1.1, v5.1.2, v6.0.0, v6.0.1 Standalone Deployment
- Before proceeding, please ensure that all prerequisites have been met. Verifying these requirements in advance is essential to avoid potential issues during the process.
- To transition copied data into the new HA configuration, refer to the HA deployment guide for instructions on adding the necessary HA parameters and initializing the cluster. This process facilitates the migration of MongoDB data into the replica set. Additionally, it involves the importation of RabbitMQ messages into the new HA machine, with subsequent integration of other nodes into the cluster.
- Following the successful completion of the HA migration, it’s important to note that there may be a brief delay during the initial few minutes. This is attributable to MongoDB’s replication process, which involves the distribution of data across all nodes in the system.
- Stop the standalone deployment.
sudo ./stop
- Create a zip file for Mongo data.
cd ta_cloud_exchange/data sudo zip -r ce_backup.zip mongo-data/ repos/ plugins/ - Add custom plugins to the backup zip. This step is applicable only if you’re using custom plugins
sudo zip -r ce_backup.zip custom_plugins
- Use the following command to pull the latest changes on all current nodes from GitHub. Note that when upgrading from a standalone to a high-availability (HA) deployment, the existing standalone node will serve as the primary node in the HA setup.
sudo git pull
If any issues arise during the git pull command, reset the changes using:
sudo git reset --hard
sudo git pull - Copy and edit the cloudexchange config file using below commands:
cp cloudexchange.config.example cloudexchange.config
vi cloudexchange.config - Update the cloudexchange configuration file with value for: Also, Make sure to configure optional fields like proxy and ui_port if used/customised.
MAINTENANCE_PASSWORD=<old cloud exchange maintenance password>
JWT_SECRET=<old cloud exchange JWT secret> (Optional, Setup script will generate new JWT secret if not provided) - Remove .env file using below command:
sudo rm -rf .env
- Execute the setup script using the below command:
sudo python3 ./setup
- Execute the start script using the below command:
sudo ./start
- Next, open the UI of the primary node in your web browser. Log in using your existing Cloud Exchange credentials. You can access the UI using the system’s IP address:
https://<ip> - Go to Settings > General Settings > Node Configurations and enable the
Enable HAtoggle. A Confirm Action pop-up window will appear. Enter the Cloud Exchange IP address or FQDN only if you need to update it; otherwise, leave it unchanged and click the Enable HA button.
Important
During the HA enablement process, Cloud Exchange will be temporarily unavailable and may restart multiple times.
On Secondary Nodes Only
- Navigate to the newly cloned
ta_cloud_exchangedirectory using the following command:cd <ta_cloud_exchange-dir>
-
Copy the existing CA key from primary node located at:
<ta_cloud_exchange-dir>/data/ssl_certs/mongodb_rabbitmq_certs/tls_cert_ca.key
- Create new CA key on secondary nodes using below command:
vi /data/ssl_certs/mongodb_rabbitmq_certs/tls_cert_ca.key
-
Paste the CA key copied from primary node during step no.16 and save the file. This will enable the Management server communications between new node and HA Cluster.
- Copy and edit the cloudexchange config file.
cp cloudexchange.config.example cloudexchange.config
vi cloudexchange.config - Update the cloudexchange configuration file with values for
JWT_SECRET=<JWT_SECRET value provided in primary node>
MAINTENANCE_PASSWORD=<old maintenance password>
Notes
For secondary nodes, the JWT secret and CA key must be the same as the primary node. Using different JWT secrets or CA keys will cause authentication errors when adding the secondary node to the HA cluster from a primary node UI.
If you don’t recall the JWT Secret value of the primary node, generate and apply new JWT token by following the steps here.
- Execute the setup script using the below command.
sudo python3 ./setup
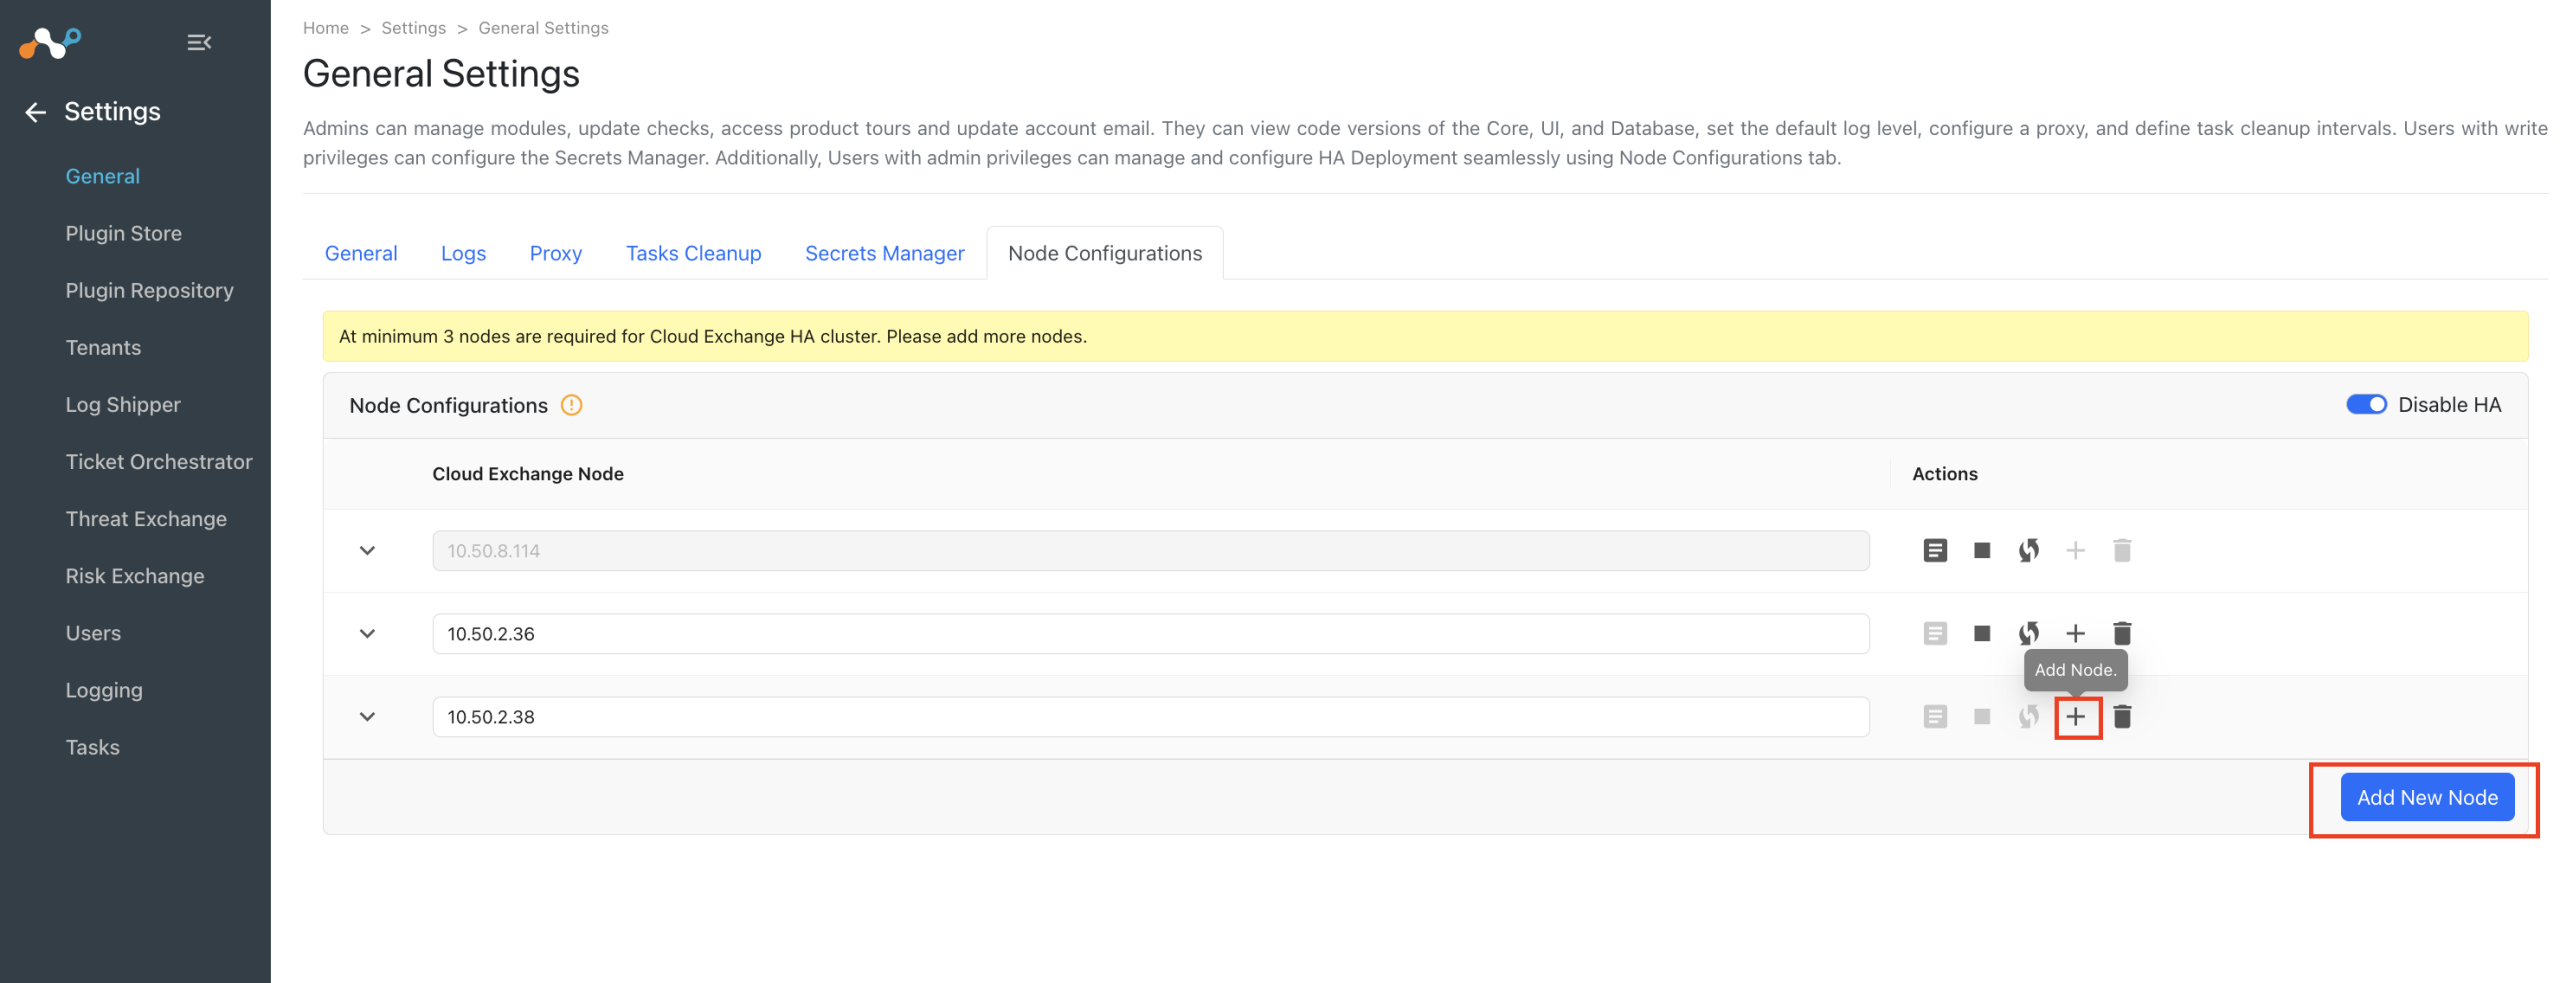
- Add the secondary nodes one by one through the CloudExchange UI of the primary node under the Settings > General Settings > ‘Node Configurations’ section.
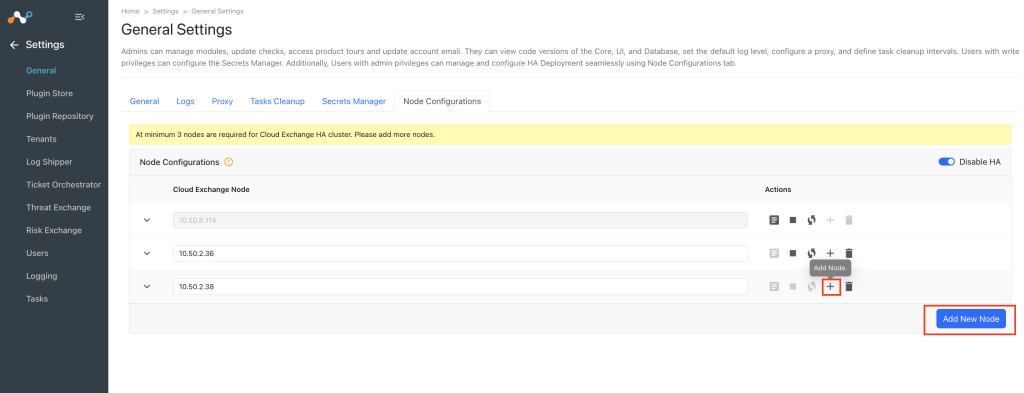
Notes
For secondary nodes, there is no need to manually run the start script—it is automatically executed when adding the secondary nodes through the CloudExchange UI of the primary node during Step 22.

To v6.1.0 from v5.1.1, v5.1.2, v6.0.0, v6.0.1 HA Deployment
Make sure to take a backup before proceeding for upgrade.
- Before proceeding, please ensure that all prerequisites have been met. Verifying these requirements in advance is essential to avoid potential issues during the process.
On All Nodes (Steps: 2,3) - To ensure proper container shutdown, stop both Secondary nodes before stopping the Primary node using this command.
sudo ./stop
- Pull the latest changes in all the nodes from GitHub with this command.
sudo git pull
If any issues arise during the git pull command, reset the changes using:
sudo git reset --hard
sudo git pull
On Primary Node Only (Steps: 4,5,6,7,8) - Copy and edit the cloudexchange config file.
cp cloudexchange.config.example cloudexchange.config
vi cloudexchange.config - Update the cloudexchange configuration file with required values. Also, Make sure to configure optional fields like proxy configurations, ui port, etc if used/customised.
HA_ENABLED=True
HA_CURRENT_NODE=<current node ip>
HA_PRIMARY_NODE_IP=<current node ip>
HA_IP_LIST=<current node ip>
MAINTENANCE_PASSWORD=<old maintenance password>
JWT_SECRET=<old cloud exchange JWT secret> (Optional, Setup script will generate new JWT secret if not provided) - Remove .env file
sudo rm -rf .env
- Execute the setup script using the below command.
sudo python3 ./setup
- Execute the start script using the below command.
sudo ./start
On Secondary Nodes Only (Steps: 9,10,11,12,13,14,15,16) - Navigate to the newly cloned
ta_cloud_exchangedirectory using the following command:cd <ta_cloud_exchange-dir>
- Copy the existing CA key from primary node located at:
<ta_cloud_exchange-dir>/data/ssl_certs/mongodb_rabbitmq_certs/tls_cert_ca.key
- Create new CA key on secondary nodes using below command:
vi /data/ssl_certs/mongodb_rabbitmq_certs/tls_cert_ca.key
-
paste the CA key copied from primary node during step no.10 and save the file. This will enable the Management server communications between new node and HA Cluster.
- Remove .env file
sudo rm -rf .env
- Copy and edit the cloudexchange config file.
cp cloudexchange.config.example cloudexchange.config
vi cloudexchange.config - Update the cloudexchange configuration file with values for
JWT_SECRET=<JWT_SECRET value provided in primary node>
MAINTENANCE_PASSWORD=<old maintenance password> - Execute the setup script using the below command.
sudo python3 ./setup
- Add the secondary nodes one by one through the CloudExchange UI of the primary node under the Settings > General Settings > ‘Node Configurations’ section.
Notes
For secondary nodes, there is no need to manually run the start script—it is automatically executed when adding the secondary nodes through the CloudExchange UI of the primary node during Step 17.
Cloud Exchange as a VM Deployment
Prerequisites
- If you are upgrading from Cloud Exchange Version 5.1.0 or prior to any newer version in CE as a VM deployment, make sure to upgrade the underlying Ubuntu OS version from 20.04 to 22.04, please refer to the Cloud Exchange KB Articles.
- Before initiating an upgrade, ensure your instance meets the system requirements for Cloud Exchange.
- For Cloud Exchange as a VM, connectivity to following URL is required:
https://cloud-exchange-store.s3.us-east-1.amazonaws.com - Disable all Source Plugins in all modules, then wait until in-queue tasks finished before proceeding with the migration. Use these steps to identify in-queue tasks mentioned below.
- After disabling the source plugins in all modules, wait for 20-30 minutes.
- Apply filter on logs:
- Go to the Logging section.
- Click Filter Query.
- In the Filters input, enter the following:
message Like "Ingested " || message Like "Stored " || message Like "task(s)" || message Like "Completed storing" - Click Load.
- Apply the filter to view relevant logs.
- Monitor Logs: Once the logging filter is applied, monitor for new logs. When no new logs appear under this filter, you can proceed to the next step.
- After migrating to the latest CE version by following steps mentioned below as per your current deployment and CE version, please enable all previously disabled source plugins.
- Ensure you have the maintenance password readily available, as it will be needed to complete certain steps in this process.
Important
If the maintenance password is lost, the data could not be retained.
Notes
RabbiMQ data migration is not supported due to the change of queue type from Classic to Quorum queue.
Customers running the CE as a VM (OVA or Hyper-V) on versions earlier than 5.1.1 will require root credentials.
Username: root
Password: M5#w6V+.T^8gv?%,
Azure and AWS CE as VM customers can upgrade to 6.0.0 by themselves by following these steps.
Standalone Deployment
To v6.1.0 from v5.1.1, v5.1.2, v6.0.0, v6.0.1
Make sure to take a backup before proceeding for upgrade.
- Before proceeding, ensure that all prerequisites have been met. Verifying these requirements in advance is essential to avoid potential issues during the process.
- Navigate to cloudexchange directory and stop the standalone deployment.
cd /opt/cloudexchange/cloudexchange
sudo ./stop - Load the Cloud Exchange public key as a trusted GPG key. Note that when upgrading from a standalone to a high-availability (HA) deployment, the existing standalone node will serve as the primary node in the HA setup.
curl -fsSL https://cloud-exchange-store.s3.us-east-1.amazonaws.com/cloudexchange/upgrade-packages/cloud-exchange-public.gpg | sudo gpg --dearmor -o /etc/apt/trusted.gpg.d/cloud-exchange.gpg
- Upgrade python version.
- Remove CE Environment
-
sudo rm -rf .cevenv
-
- If the Cloud Exchange (CE) deployment is running on an Azure cloud VM, execute the following command before proceeding with the Python installation steps:
-
sudo add-apt-repository -y ppa:deadsnakes/ppa
-
- Install Python 3.11 packages.
sudo rm -rf .cevenv
sudo apt-get update
sudo apt-get install -y python3.11 python3.11-venv python3.11-dev python3-pip - Point
python3to 3.11 via alternativesif command -v update-alternatives >/dev/null 2>&1 && [ -x /usr/bin/python3.11 ]; then
sudo update-alternatives --install /usr/bin/python3 python3 /usr/bin/python3.11 11
sudo update-alternatives --set python3 /usr/bin/python3.11
fi - Create dynamic 3.10 -> 3.11 symlinks for dist-packages.
arch="$(uname -m)-linux-gnu"
dist_dir="/usr/lib/python3/dist-packages"
from_suffix=".cpython-310-${arch}.so"
to_suffix=".cpython-311-${arch}.so"

created_or_updated=0
skipped_real=0

while IFS= read -r -d '' src; do
  dst="${src%${from_suffix}}${to_suffix}"
  if [ -e "$dst" ] && [ ! -L "$dst" ]; then
    skipped_real=$((skipped_real+1))
    continue
  fi
  sudo ln -sf "$src" "$dst"
  created_or_updated=$((created_or_updated+1))
done < <(sudo find "$dist_dir" -type f -name "*${from_suffix}" -print0)

missing=$(find "$dist_dir" -type f -name "*${from_suffix}" | while IFS= read -r src; do
  dst="${src%${from_suffix}}${to_suffix}"
  [ -e "$dst" ] || echo "$dst"
done | wc -l)

echo "created_or_updated=$created_or_updated"
echo "skipped_existing_real_files=$skipped_real"
echo "remaining_missing=$missing" - Validate python version.
python3 --version
python3.11 --version
ls -l /usr/bin/python3
update-alternatives --display python3
- Remove CE Environment
- Add an s3 URL as the deb package source.
echo "deb https://cloud-exchange-store.s3.us-east-1.amazonaws.com/cloudexchange/upgrade-packages stable main" | sudo tee /etc/apt/sources.list.d/cloud-exchange.list
- Update the sources.
sudo apt update
- Upgrade the cloud exchange and wait for the process to be completed.
sudo apt install cloud-exchange=6.1.0-1
Notes
Before running Step 7, please ensure all prerequisites are met for the targeted version.
- Execute the setup script using the below command.
sudo python3 ./setup
- Execute the start script using the below command.
sudo ./start
- Close all of your Cloud Exchange browser instances and log in again in Incognito mode, or clear the browser cache before logging in.
The Cloud Exchange UI is now accessible with the system’s IP: http(s)://<ip>.
HA Deployment
To v6.1.0 from v5.1.1, v5.1.2, v6.0.0, v6.0.1 Standalone Deployment
Make sure to take a backup before proceeding for upgrade.
- Before proceeding, please ensure that all prerequisites have been met. Verifying these requirements in advance is essential to avoid potential issues during the process.
- To transition copied data into the new HA configuration, refer to the HA deployment guide for instructions on adding the necessary HA parameters and initializing the cluster. This process facilitates the migration of MongoDB data into the replica set. Additionally, it involves the importation of RabbitMQ messages into the new HA machine, with subsequent integration of other nodes into the cluster.
- Following the successful completion of the HA migration, it’s important to note that there may be a brief delay during the initial few minutes. This is attributable to MongoDB’s replication process, which involves the distribution of data across all nodes in the system.
On Old Standalone Node (New Primary Node) (Steps: 4,5,6,7,8,9,10,11,12,13,14,15,16)
- Navigate to cloudexchange directory and stop the standalone deployment.
cd /opt/cloudexchange/cloudexchange
sudo ./stop - Upgrade python version.
- Remove CE Environment
-
sudo rm -rf .cevenv
-
- If the Cloud Exchange (CE) deployment is running on an Azure cloud VM, execute the following command before proceeding with the Python installation steps:
-
sudo add-apt-repository -y ppa:deadsnakes/ppa
-
- Install Python 3.11 packages.
sudo apt-get update
sudo apt-get install -y python3.11 python3.11-venv python3.11-dev python3-pip - Point
python3to 3.11 via alternativesif command -v update-alternatives >/dev/null 2>&1 && [ -x /usr/bin/python3.11 ]; then
sudo update-alternatives --install /usr/bin/python3 python3 /usr/bin/python3.11 11
sudo update-alternatives --set python3 /usr/bin/python3.11
fi - Create dynamic 3.10 -> 3.11 symlinks for dist-packages.
arch="$(uname -m)-linux-gnu"
dist_dir="/usr/lib/python3/dist-packages"
from_suffix=".cpython-310-${arch}.so"
to_suffix=".cpython-311-${arch}.so"

created_or_updated=0
skipped_real=0

while IFS= read -r -d '' src; do
  dst="${src%${from_suffix}}${to_suffix}"
  if [ -e "$dst" ] && [ ! -L "$dst" ]; then
    skipped_real=$((skipped_real+1))
    continue
  fi
  sudo ln -sf "$src" "$dst"
  created_or_updated=$((created_or_updated+1))
done < <(sudo find "$dist_dir" -type f -name "*${from_suffix}" -print0)

missing=$(find "$dist_dir" -type f -name "*${from_suffix}" | while IFS= read -r src; do
  dst="${src%${from_suffix}}${to_suffix}"
  [ -e "$dst" ] || echo "$dst"
done | wc -l)

echo "created_or_updated=$created_or_updated"
echo "skipped_existing_real_files=$skipped_real"
echo "remaining_missing=$missing" - Validate python version.
python3 --version
python3.11 --version
ls -l /usr/bin/python3
update-alternatives --display python3
- Remove CE Environment
- Load the Cloud Exchange public key as a trusted GPG key. Note that when upgrading from a standalone to a high-availability (HA) deployment, the existing standalone node will serve as the primary node in the HA setup.
curl -fsSL https://cloud-exchange-store.s3.us-east-1.amazonaws.com/cloudexchange/upgrade-packages/cloud-exchange-public.gpg | sudo gpg --dearmor -o /etc/apt/trusted.gpg.d/cloud-exchange.gpg
- Add an s3 URL as the deb package source.
echo "deb https://cloud-exchange-store.s3.us-east-1.amazonaws.com/cloudexchange/upgrade-packages stable main" | sudo tee /etc/apt/sources.list.d/cloud-exchange.list
- Update the sources.
sudo apt update
- Upgrade the cloud exchange and wait for the process to be completed.
sudo apt install cloud-exchange=6.1.0-1
Notes
Before running Step 9, please ensure all prerequisites are met for the targeted version.
- Copy and edit the cloudexchange config file.
cp cloudexchange.config.example cloudexchange.config
vi cloudexchange.config - Update the cloudexchange configuration file with values for required field. Also, Make sure to configure optional fields like proxy configuration, UI port, etc., if used/customized.
MAINTENANCE_PASSWORD=<old cloud exchange maintenance password>
JWT_SECRET=<old cloud exchange JWT secret> (Optional, Setup script will generate new JWT secret if not provided) - Remove the .env file.
sudo rm -rf .env - Execute the setup script using this command.
sudo python3 ./setup
- Execute the start script using this command.
sudo ./start
- Next, open the UI of the primary node in your web browser. Log in using your existing Cloud Exchange credentials. You can access the UI using the system’s IP address:
https://<ip> - Go to Settings > General Settings > Node Configurations and enable the
Enable HAtoggle. A Confirm Action pop-up window will appear. Enter the Cloud Exchange IP address or FQDN only if you need to update it; otherwise, leave it unchanged and click the Enable HA button.
Important
During the HA enablement process, Cloud Exchange will be temporarily unavailable and may restart multiple times.
On Secondary Nodes Only (Steps: 17,18,19,20,21,22,23,24,25)
- Deploy the latest Cloud Exchange as a VM image (OVA/AMI/Azure/Hyper-V/KVM).
- Go to the cloudexchange directory.
cd /opt/cloudexchange/cloudexchange
- Copy the existing CA key from primary node locate at:
/opt/cloudexchange/cloudexchange/data/ssl_certs/mongodb_rabbitmq_certs/tls_cert_ca.key
- Create new CA key on secondary nodes using below command.
sudo vi /opt/cloudexchange/cloudexchange/data/ssl_certs/mongodb_rabbitmq_certs/tls_cert_ca.key
-
paste the CA key copied from primary node during step no.19. and save the file. This will enable the Management server communications between new node and HA Cluster.
- Remove .env file
sudo rm -rf .env - Copy and edit the cloudexchange config file.
cp cloudexchange.config.example cloudexchange.config
vi cloudexchange.config - Update the cloudexchange configuration file with values for
JWT_SECRET=<JWT_SECRET value provided in primary node>
MAINTENANCE_PASSWORD=<old maintenance password> - Execute the setup script using the below command.
sudo python3 ./setup
- Add the secondary nodes one by one through the CloudExchange UI of the primary node in the Settings > General Settings > Node Configurations section.
Notes
For secondary nodes, there is no need to manually run the start script—it is automatically executed when adding the secondary nodes through the CloudExchange UI of the primary node during Step 26.
To v6.1.0 from v5.1.1, v5.1.2, v6.0.0, v6.0.1 HA Deployment
Make sure to take a backup before proceeding for upgrade.
- Before proceeding, please ensure that all prerequisites have been met. Verifying these requirements in advance is essential to avoid potential issues during the process.
On All Nodes (Steps: 2,3,4,5,6,7)
- To ensure proper container shutdown, stop both Secondary nodes before stopping the Primary node using this command.
cd /opt/cloudexchange/cloudexchange
sudo ./stop - Upgrade python version.
- Remove CE Environment
-
sudo rm -rf .cevenv
-
- If the Cloud Exchange (CE) deployment is running on an Azure cloud VM, execute the following command before proceeding with the Python installation steps:
-
sudo add-apt-repository -y ppa:deadsnakes/ppa
-
- Install Python 3.11 packages.
sudo apt-get update
sudo apt-get install -y python3.11 python3.11-venv python3.11-dev python3-pip - Point
python3to 3.11 via alternativesif command -v update-alternatives >/dev/null 2>&1 && [ -x /usr/bin/python3.11 ]; then
sudo update-alternatives --install /usr/bin/python3 python3 /usr/bin/python3.11 11
sudo update-alternatives --set python3 /usr/bin/python3.11
fi - Create dynamic 3.10 -> 3.11 symlinks for dist-packages.
arch="$(uname -m)-linux-gnu"
dist_dir="/usr/lib/python3/dist-packages"
from_suffix=".cpython-310-${arch}.so"
to_suffix=".cpython-311-${arch}.so"

created_or_updated=0
skipped_real=0

while IFS= read -r -d '' src; do
  dst="${src%${from_suffix}}${to_suffix}"
  if [ -e "$dst" ] && [ ! -L "$dst" ]; then
    skipped_real=$((skipped_real+1))
    continue
  fi
  sudo ln -sf "$src" "$dst"
  created_or_updated=$((created_or_updated+1))
done < <(sudo find "$dist_dir" -type f -name "*${from_suffix}" -print0)

missing=$(find "$dist_dir" -type f -name "*${from_suffix}" | while IFS= read -r src; do
  dst="${src%${from_suffix}}${to_suffix}"
  [ -e "$dst" ] || echo "$dst"
done | wc -l)

echo "created_or_updated=$created_or_updated"
echo "skipped_existing_real_files=$skipped_real"
echo "remaining_missing=$missing" - Validate python version.
python3 --version
python3.11 --version
ls -l /usr/bin/python3
update-alternatives --display python3
- Remove CE Environment
- Load the Cloud Exchange public key as a trusted GPG key, starting with the Primary node and then proceeding to the Secondary nodes; an example command for a repository is shown below.
curl -fsSL https://cloud-exchange-store.s3.us-east-1.amazonaws.com/cloudexchange/upgrade-packages/cloud-exchange-public.gpg | sudo gpg --dearmor -o /etc/apt/trusted.gpg.d/cloud-exchange.gpg
- Add an s3 URL as the deb package source.
echo "deb https://cloud-exchange-store.s3.us-east-1.amazonaws.com/cloudexchange/upgrade-packages stable main" | sudo tee /etc/apt/sources.list.d/cloud-exchange.list
- Update the sources.
sudo apt update
- Upgrade the cloud exchange and wait for the process to be completed.
sudo apt install cloud-exchange=6.1.0-1
Notes
Before running Step 7, please ensure all prerequisites are met for the targeted version.
On Primary Node Only (Steps: 8,9,10,11,12)
- Copy and edit the cloudexchange config file.
cp cloudexchange.config.example cloudexchange.config
vi cloudexchange.config - Update the cloudexchange configuration file with values for required fields. Also make sure to update value for optional fields like proxy configuration, ui port, etc if used/customised.
HA_ENABLED=True
HA_CURRENT_NODE=<current node ip>
HA_PRIMARY_NODE_IP=<current node ip>
HA_IP_LIST=<current node ip>
MAINTENANCE_PASSWORD=<old maintenance password>
JWT_SECRET=<old cloud exchange JWT secret> (Optional, Setup script will generate new JWT secret if not provided) - Remove .env file
sudo rm -rf .env - Execute the setup script using the below command.
sudo python3 ./setup
- Execute the start script using the below command.
sudo ./start
On Secondary Nodes Only (Steps: 13,14,15,16,17,18,19) - Copy the existing CA key from primary node located at:
/opt/cloudexchange/cloudexchange/data/ssl_certs/mongodb_rabbitmq_certs/tls_cert_ca.key
- Create new CA key on secondary nodes using below command.
sudo vi /opt/cloudexchange/cloudexchange/data/ssl_certs/mongodb_rabbitmq_certs/tls_cert_ca.key
-
paste the CA key copied from primary node during step no.13. and save the file. This will enable the Management server communications between new node and HA Cluster.
- Remove .env file
sudo rm -rf .env - Copy and edit the cloudexchange config file.
cp cloudexchange.config.example cloudexchange.config
vi cloudexchange.config - Update the cloudexchange configuration file with values for
JWT_SECRET=<JWT_SECRET value provided in primary node>
MAINTENANCE_PASSWORD=<old maintenance password> - Execute the setup script using the below command.
sudo python3 ./setup
- Add the secondary nodes one by one through the CloudExchange UI of the primary node under the Settings > General Settings > ‘Node Configurations’ section.
Notes
For secondary nodes, there is no need to manually run the start script—it is automatically executed when adding the secondary nodes through the CloudExchange UI of the primary node during Step 20.