

The installation instructions describe how to integrate your ServiceNow account with Netskope. To configure ServiceNow for SaaS Security Posture Management, you need to authorize Netskope as a web application client to access your ServiceNow account. To configure ServiceNow for SaaS Security Posture Management, follow the procedure:
Step 1 : Configure ServiceNow API Access
-
Log in to your ServiceNow account as an admin user.
-
Click on All, search and click on “Application Registry”.

-
Click New to create a new application registry.

-
Click Create an OAuth API endpoint for external clients.

-
In the Application Registries New Record, add following details:
-
Enter the Name.
-
The Client ID and Client Secret is auto generated. Note down the Client ID and Client Secret, you will need these to create the ServiceNow instance in Netskope UI.
-
Enter Redirect URL as https://nso.goskope.com/common/oauthorize.
-
Set the refresh token lifespan to a minimum of 31,536,000 seconds (1 year). The default value is 86,400 seconds. If you don’t increase it, the token expires and the app instance loses access to your ServiceNow data.
If the refresh token expires, the app instance shows as Inactive in the Netskope UI. Re-grant access to the ServiceNow app instance to restore it. -
Under Auth Scope, select the useraccount authentication scope to allow access to Rest APIs.
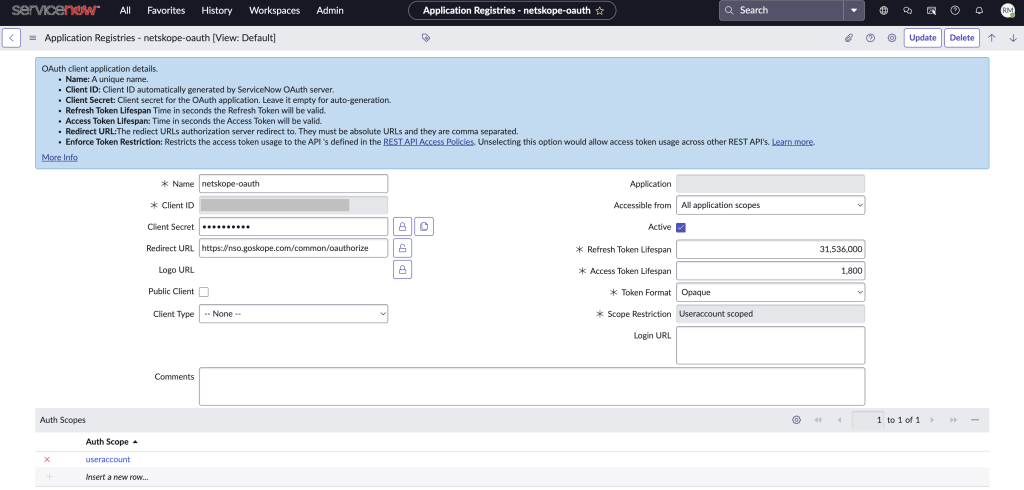
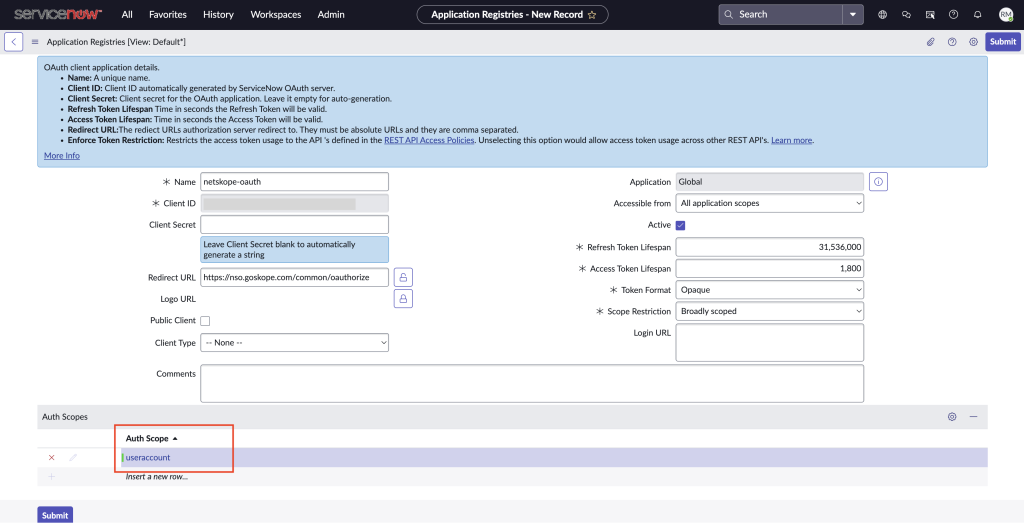 When creating the OAuth application, the Scope Restriction field only lets you select Broadly Scoped or Securely Scoped. To grant the required access to REST/Table APIs, add useraccount as the Auth Scope. After you save the application, ServiceNow automatically changes Scope Restriction to Useraccount scoped, overriding the option you originally selected.
-
-
When finished, click Submit.


To allow the IP addresses:
– Log in to your ServiceNow account.
– Click on All, search and click on “IP Address Access Control”.
– Click on New button.
– Configure with Type as Allow, Direction as Inbound and specify the Range start and Range end.
– Activate and click on Save.
To get a pool of Netskope public IP addresses, Refer Netskope SSPM gateway IP addresses for ServiceNow Allowlisting.
Step 2 : Enable ServiceNow Table Permissions
-
Log in to your ServiceNow account as an admin user.
-
Navigate to All > System Definition > Tables.

-
Search for any table name from Access Required for ServiceNow. For example, search for
sys_properties.
-
Click on the
System Propertylabel. -
Go to Application Access tab and enable Allow access to this table via web services option.

-
Click Update.
-
Follow steps 3 to 5 for all the tables in Access Required for ServiceNow.


Step 3 : Configure a ServiceNow Instance in the Netskope UI
Considerations:
-
You don’t have any ACL/IP ACL, business rules, or data policy constraints before setting up the instance.
-
The ServiceNow administrator is the user account used for instance onboarding; it needs access to the tables listed in Access Required for ServiceNow, and Netskope recommends using a dedicated local integration user with the admin role rather than a personal account, since this account is independent of your Netskope login.
-
The ServiceNow account used for onboarding must not be marked Web service access only. Web-service-only accounts are restricted to API calls and cannot complete the interactive browser login that Grant Access requires, as a result the flow will fail at the ServiceNow login step. Ensure the account has the admin role and Web service access only is unchecked before proceeding. Using a fresh or incognito browser window for the grant avoids stale session issues.
Follow the steps to authorize Netskope to access your ServiceNow instance:
-
Log in to the Netskope tenant UI and go to Settings > Configure App Access > Next Gen > Security Posture.
-
Select the ServiceNow icon, and then click Setup Security Postrure Instance.
-
The Setup Instance window opens. Enter the following details:
-
Client ID – Enter the client ID you noted when you configured the ServiceNow API access.
-
Client Secret – Enter the client secret you noted when you configured the ServiceNow API access.
-
Site Domain – Enter the site domain of the ServiceNow account instance. If your ServiceNow login URL is https://<my_instance>.service-now.com/, then enter my_instance.service-now.com as the domain name.
-
Administrator Email – Enter the email address of the ServiceNow administrator.
To identify the email address of the ServiceNow administrator account,
– Log in to your ServiceNow account
– Navigate to User Administration > Users
– Click the administrator user and note down the email address. -
Select the Security Scan Interval.
-
(Optional) Enter an Instance Name.
-
-
Click Grant Access.
-
You will be prompted to log in to your ServiceNow account with administrator username and password. Enter the user ID of the ServiceNow administrator.
To identify the user ID of the ServiceNow administrator account, log in to your ServiceNow account, navigate to User Administration > Users. Click the administrator user and note down the user ID and enter the password of the ServiceNow administrator. -
Click Sign In and then Allow. When the configuration results page open, click Close.
-
Refresh your browser, and you will see the instance.
