

Netskope provides support for the following Splunk integrations to stream NLS logs.
Stream Logs to Splunk with AWS
Netskope Log Streaming supports sending log files to Splunk Add-on for AWS. This document will help you get the data from the AWS bucket to Splunk. To get the data from AWS to Splunk, there is Splunk Add-on for Amazon Web Services (AWS).
Sizing, performance, and cost considerations for the Splunk Add-on for AWS:
https://splunk.github.io/splunk-add-on-for-amazon-web-services/SizingAndCost
At a high level, the steps required to maintain data continuity and dashboard functionality are:
- Install the Netskope Add-on for Splunk (if not already present).
- Update the Netskope Add-on to the latest version (minimum v4.4.0).
- Configure the AWS Add-on Input using the relevant sourcetype as instructed below.
- Consider updating the sourcetype stanza in case of any other custom sourcetype.
Getting Data in Splunk using Splunk Add-on for Amazon Web Services (AWS)
A direct approach to get data from AWS S3 buckets in Splunk with the help of Splunk Add-on for Amazon Web Services (AWS). In this approach, we can leverage Splunk’s AWS connector and pull the data from S3 buckets.
This approach contains two methods to get the data from S3:
- Getting real-time data using SQS based input (Recommended)
- Getting historical data using Generic S3 input
You must install the legacy Netskope Add-on for Splunk. This is essential to ensure that the sourcetypes and necessary Netskope mappings are present, allowing the logs extracted by the new AWS TA to be properly parsed by the Netskope TA for successful indexing and searches.
Getting Real-time Data using SQS based S3 input (Recommended)
Users must configure SQS-based S3 input from Splunk Add-on for AWS to collect real-time data. For more information on SQS-based S3 input, refer official documentation: https://splunk.github.io/splunk-add-on-for-amazon-web-services/SQS-basedS3/
Prerequisites
AWS users will need the following permissions:
- Permissions are required for SQS access:
- GetQueueUrl
- ReceiveMessage
- SendMessage
- DeleteMessage
- ChangeMessageVisibility
- GetQueueAttributes
- ListQueues
- Required permissions for S3 buckets and objects:
- GetObject (if Bucket Versioning is disabled).
- GetObjectVersion (if Bucket Versioning is enabled).
- Required permissions for KMS:
- Decrypt
For more information, please refer to the official documentation of Splunk Add-on for AWS – Configure AWS permissions for the SQS-based S3 input.
Create a SQS Queue in AWS
- From the search panel, search for SQS (Simple Queue Service).
- Create a standard SQS Queue in the same region as the S3 bucket, set the Visibility Timeout to 5 minutes or more, and enable the Dead-letter queue.
- Dead Letter Queue is to be used for the input for storing invalid messages. For information about SQS Dead Letter Queues and how to configure them, see the Amazon SQS dead-letter queues topic in the AWS documentation.
Create a SNS Topic in AWS
- From the search panel, search for SNS (Simple Notification Service).
- Create a standard SNS Topic in the same region as the S3 bucket.
- Once created, note the SNS Topic ARN.
- Edit the Access Policy for the SNS topic and replace it with below sample policy and save:
Enter your AWS SNS an S3 bucket ARN in the placeholders below. { “Version”: “2008-10-17”, “Id”: “example-ID”, “Statement”: [ { “Sid”: “example-statement-ID”, “Effect”: “Allow”, “Principal”: { “AWS”: “*” }, “Action”: “SNS:Publish”, “Resource”: “”, “Condition”: { “ArnLike”: { “aws:SourceArn”: “” } } } ] } - Click on Create subscription in the SNS Topic and subscribe to the SQS Services, and specifically select the SQS Queue we created in above steps.
Create Event Notification from S3
- From S3 go to your bucket > Properties.
- From the Event notifications section, select “Create event notification”.
- In the Event types section, select All object create events from the Object creation.
- In the Destination, select the SNS Topic.
- Select the created SQS queue from the dropdown.
Splunk Add-on for AWS Setup
- Install Splunk Add-on for Amazon Web Services (AWS) on the splunk instance from Splunkbase or Splunk Web. For more help follow the Installation overview for the Splunk Add-on for AWS.
- After configuring the IAM user, configure the Account in the Splunk Add-on.
- Go to the Configuration Page.

- In the Account tab, click Add.

- Add the required information like Name, Key ID, and Secret Key.
- Click Add.
- Go to the Configuration Page.
- After configuring the account successfully, create a new input to collect the data from the S3 bucket.
- Go to the Inputs page.

- Click Create New Input > Custom Data Type > select SQS-based S3.
- Add the required information in all the required fields. For SQS Queue Name, select the SQS Queue that was created earlier.
- Update relevant sourcetype for example: netskope:web_transaction:nls for Netskope Web Transaction data. Refer Sourcetype Consideration Based on the Input Configuration (Parse all files as CSV) Section
- For ingesting web transaction data via NLS using the sourcetype netskope:web_transaction:nls, it is recommended to keep the “Parse all files as CSV” option disabled (unchecked) in the Advanced Settings during input configuration. Enabling this option for web transaction data is not recommended, as it may lead to increased Splunk license consumption as well as it may introduce field parsing issues.
For log types other than web transaction data, the “Parse all files as CSV” option can be enabled to ingest logs in JSON format.
When this option is disabled, logs are ingested in CSV format. However, additional configuration for CSV field extraction will be required depending on the selected sourcetype. It is recommended to validate the configuration outlined in the section “Updating Field Extraction Configuration for a Sourcetype Using Splunk Web” to ensure proper log parsing. - “CSV field delimiter” is required when the Parse all files as CSV is enabled. Ensure that this field in the Advanced Settings section is configured according to the delimiter used in the source CSV file.
- Keep every other fields as default.
- Click Add.
- Go to the Inputs page.

Sourcetype Consideration Based on the Input Configuration (Parse all files as CSV):
When “Parse all files as CSV” = True, refer below table:
| Data Type | Sourcetype |
|---|---|
| Alerts | netskope:alert |
| Application | netskope:application |
| Connection (Page data) | netskope:connection |
| Endpoint | netskope:endpoint |
| Incident | netskope:incident |
| Network | netskope:network |
Here, data will be in JSON format and hence, auto field extractions will take place.
When “Parse all files as CSV” = False, refer below table:
| Data Type | Sourcetype |
|---|---|
| Web Transaction | netskope:web_transaction:nls |
| Alerts | netskope:alerts:nls |
| Application | netskope:application:nls |
| Connection (Page data) | netskope:connection:nls |
| Endpoint | netskope:endpoint:nls |
| Incident | netskope:incident:nls |
| Network | netskope:network:nls |
Dashboard & Search Updates Required
- Existing queries for any splunk dashboards/reports must be updated to support both legacy and new sourcetypes. For example:
sourcetype IN (“netskope:web_transaction”, “netskope:web_transaction:nls”)
- It is recommended to standardize queries using wildcards where applicable:
sourcetype=”netskope:web_transaction*”
Performance Reference
Getting Historical Data using Generic S3 input
Prerequisites
- A valid AWS account with permissions to configure AWS services and create IAM roles and users. For more help follow the AWS account prerequisites.
- Users must have an IAM role with the s3admin policy. For detailed instructions, refer to the documentation: Manage accounts for the Splunk Add-on for AWS.
Known Issues
- Note that the Generic S3 input lists all the objects in the bucket and examines each file’s modified date every time it runs to pull uncollected data from an S3 bucket. When the number of objects in a bucket is large, this can be a very time-consuming process with low throughput. Hence, Splunk recommends configuring an SQS-Based S3 input to achieve efficiency.
- While using Generic S3 input, it has come to our notice that, for a few set of events the fields-value parsing gets mismatched. This has been identified as the issue with the parser for Generic S3 input (AWS TA – v8.1.0) and Splunk has been informed about this, meanwhile Splunk Add-on team is working to fix this, it is recommended to use SQS-Based S3 input method.
Splunk Add-on for AWS Setup
- Install Splunk Add-on for Amazon Web Services (AWS) on the Splunk instance from Splunkbase or Splunk Web. For more help follow the Installation overview for the Splunk Add-on for AWS.
- Before configuring an account in Splunk, users will need an AWS account and IAM role with the s3admin role. Follow the documentation for more details: Manage accounts for the Splunk Add-on for AWS.
- After configuring the IAM role, configure the Account in the Splunk Add-on.
- Go to the Configuration Page.

- In the Account tab, click Add.

- Add the required information like Name, Key ID and Secret Key.
- Click Add.
- Go to the Configuration Page.
- After configuring the account successfully, create a new input to collect the data from S3 bucket.
- Go to the Inputs page.

- Click Create New Input and select Custom Data Type > Generic S3.
- Add required information in all the required fields. For the ‘S3 Bucket’ field select the bucket that will contain the files from Netskope. For the documentation for more details: Configure Generic S3 inputs for the Splunk Add-on for AWS.
- Update relevant sourcetype for example: netskope:web_transaction:nls for Netskope Webtx data. Refer Sourcetype Consideration Based on the Input Configuration (Parse all files as CSV) Section below.
- For ingesting web transaction data via NLS using the sourcetype netskope:web_transaction:nls, it is recommended to keep the “Parse all files as CSV” option disabled (unchecked) in the Advanced Settings during input configuration. Enabling this option for web transaction data is not recommended, as it may lead to increased Splunk license consumption as well as it may introduce field parsing issues.
For log types other than web transaction data, the “Parse all files as CSV” option can be enabled to ingest logs in JSON format.
When this option is disabled, logs are ingested in CSV format. However, additional configuration for CSV field extraction will be required depending on the selected sourcetype. It is recommended to validate the configuration outlined in the section “Updating Field Extraction Configuration for a Sourcetype Using Splunk Web” to ensure proper log parsing.
- Go to the Inputs page.

Sourcetype Consideration Based on the Input Configuration (Parse all files as CSV):
When “Parse all files as CSV” = True, refer below table:
| Data Type | Sourcetype |
|---|---|
| Alerts | netskope:alert |
| Application | netskope:application |
| Connection (Page data) | netskope:connection |
| Endpoint | netskope:endpoint |
| Incident | netskope:incident |
| Network | netskope:network |
Here, data will be in JSON format and hence, auto field extractions will take place.
When “Parse all files as CSV” = False, refer below table:
| Data Type | Sourcetype |
|---|---|
| Web Transaction | netskope:web_transaction:nls |
| Alerts | netskope:alerts:nls |
| Application | netskope:application:nls |
| Connection (Page data) | netskope:connection:nls |
| Endpoint | netskope:endpoint:nls |
| Incident | netskope:incident:nls |
| Network | netskope:network:nls |
Dashboard & Search Updates Required
- Existing queries for any splunk dashboards/reports must be updated to support both legacy and new sourcetypes. For example:
sourcetype IN (“netskope:web_transaction”, “netskope:web_transaction:nls”)
- It is recommended to standardize queries using wildcards where applicable:
sourcetype=”netskope:web_transaction*”
Stream Logs to Splunk with MSCS
Netskope Log Streaming supports sending log files to Splunk Add-on for Microsoft Cloud Services (MSCS). This document will help you get the data from the Azure Storage Blob to Splunk. To get the data from Azure to Splunk, there is Splunk Add-on for Microsoft Cloud Services (MSCS).
At a high level, the steps required to maintain data continuity and dashboard functionality are:
- Install the Netskope Add-on for Splunk (if not already present). Learn more here.
- Update the Netskope Add-on to the latest version (minimum v4.4.0).
- Configure the MSCS Add-on Input using the standard netskope:web_transaction:nls sourcetype.
- Consider updating the sourcetype stanza in case of any other custom sourcetype.
Getting Data in Splunk using Splunk Add-on for Microsoft Cloud Services (MSCS)
This approach enables direct data ingestion from Azure Storage Blobs into Splunk using the Splunk Add-on for Microsoft Cloud Services (MSCS) by leveraging Splunk’s Azure connector, data can be securely retrieved from Azure Storage Blobs and made available for analysis in Splunk.
Mandatory Requirement: You must update the legacy Netskope Add-on for Splunk to the latest version. This is essential to ensure that the sourcetypes and necessary Netskope mappings are present, allowing the logs extracted by the new MSCS TA to be properly parsed by the Netskope TA for successful indexing and searches.
Getting Data using Azure Storage Blob Input
Prerequisites
- Azure Storage Account. Please follow Configure a Storage Account in Microsoft Cloud Services for more information.
- Data can be collected from Storage Blob using the Access Key, Account Token or without using the Access Key or Token.
Splunk Add-on for MSCS Setup
- Install Splunk Add-on for Microsoft Cloud Services on the splunk instance from Splunkbase or Splunk Web. For more help follow the Install the Splunk Add-on for Microsoft Cloud Services.
- Create Storage Account
- Go to the Configuration Page > Azure Storage Account tab.

- In the Azure Storage Account tab, click on Add.

- Add the required information like Name, Account Name, Account Secret, Account Secret Type and Account Class Type.
- Click on Add.
- For more information follow Connect to your Azure Storage Account with the Splunk Add-on for Microsoft Cloud Services.
- Go to the Configuration Page > Azure Storage Account tab.
- After configuring the storage account successfully, create a new input to collect the data from the Storage Blob.
- Go to the Inputs page.

- Click on Create New Input > select Azure Storage Blob.
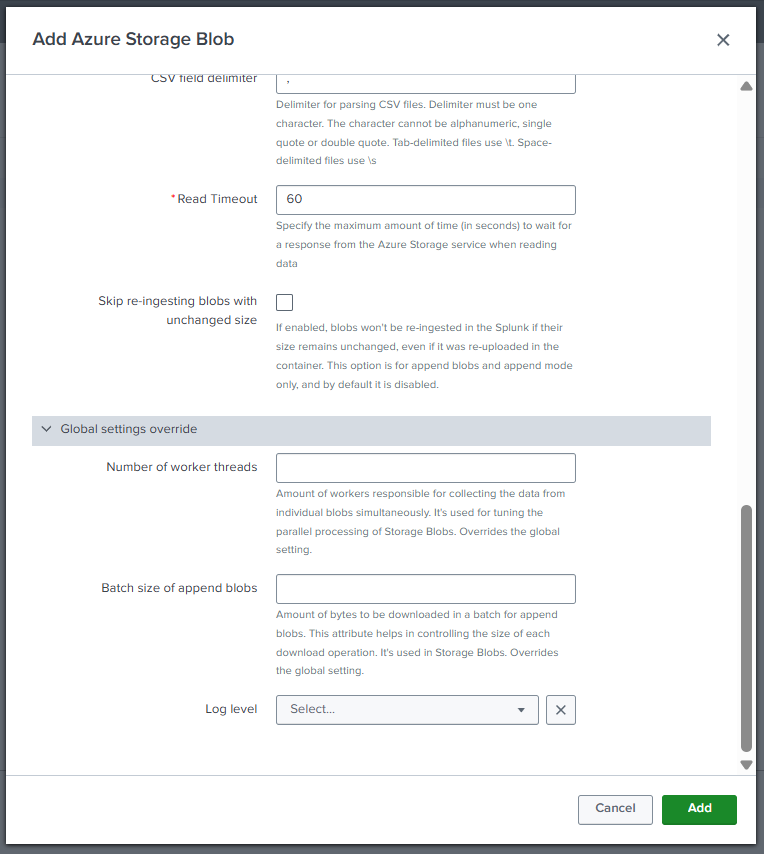
- Add required information in all the required fields.
- In the Container Name field, enter the name of the container that stores the blobs containing Netskope files.
- In the Blob List field, enter a comma-separated list of blob names that contain the Netskope files.
- Update relevant sourcetype for example: netskope:web_transaction:nls for Netskope Webtx data. Refer Sourcetype Consideration Based on the Input Configuration (Parse all files as CSV) Section below.
- For ingesting web transaction data via NLS using the sourcetype netskope:web_transaction:nls, it is recommended to keep the “Parse all files as CSV” option disabled (unchecked) in the Advanced Settings during input configuration. Enabling this option for web transaction data is not recommended, as it may lead to increased Splunk license consumption as well as it may introduce field parsing issues.
For log types other than web transaction data, the “Parse all files as CSV” option can be enabled to ingest logs in JSON format.
When this option is disabled, logs are ingested in CSV format. However, additional configuration for CSV field extraction will be required depending on the selected sourcetype. It is recommended to validate the configuration outlined in the section “Updating Field Extraction Configuration for a Sourcetype Using Splunk Web” to ensure proper log parsing. - For the CSV field delimiter parameter, specify the delimiter used in the Netskope data files.
- Refer the documentation for more details: Configure Azure Storage Blob modular inputs for the Splunk Add-on for Microsoft Cloud Services.
- Click Add.
- Go to the Inputs page.

Sourcetype Consideration Based on the Input Configuration (Parse all files as CSV):
When “Parse all files as CSV” = True, refer below table:
| Data Type | Sourcetype |
|---|---|
| Alerts | netskope:alert |
| Application | netskope:application |
| Connection (Page data) | netskope:connection |
| Endpoint | netskope:endpoint |
| Incident | netskope:incident |
| Network | netskope:network |
Here, data will be in JSON format and hence, auto field extractions will take place.
When “Parse all files as CSV” = False, refer below table:
| Data Type | Sourcetype |
|---|---|
| Web Transaction | netskope:web_transaction:nls |
| Alerts | netskope:alerts:nls |
| Application | netskope:application:nls |
| Connection (Page data) | netskope:connection:nls |
| Endpoint | netskope:endpoint:nls |
| Incident | netskope:incident:nls |
| Network | netskope:network:nls |
Dashboard & Search Updates Required
- Existing queries for any splunk dashboards/reports must be updated to support both legacy and new sourcetypes. For example:
sourcetype IN (“netskope:web_transaction”, “netskope:web_transaction:nls”)
- It is recommended to standardize queries using wildcards where applicable:
sourcetype=”netskope:web_transaction*”