

A steering configuration steers traffic to the Netskope cloud. By specifying exceptions in a steering configuration you can send traffic from a selected source (e.g., apps, domains, etc.) directly to their respective destination and bypass the Netskope cloud. For example, in an environment that uses a full tunnel VPN setup, you might want to send specific traffic to the respective VPN gateway directly instead of the Netskope cloud. This article provides insight on adding various exceptions to a steering configuration.
To better understand exceptions, Netskope recommends seeing the following articles:
Steering Exception Guidelines
When creating exceptions, consider the following:
-
Ensure you have administrator privileges to your Netskope account.
-
OU and User Group based exceptions cannot be applied when the Netskope Secure Web Gateway uses the cookie-surrogate feature to get user identity.
-
In the case of GRE and IPSec deployments, the Netskope Secure Web Gateway gets the user identity with the help of the Netskope Client (if installed and enabled), or through SAML authentication. If by chance the traffic arrives before the user identity is known to the Netskope Secure Web Gateway, OU and User Group based exceptions cannot be applied.
-
If the user identity is not known to the Netskope Secure Web Gateway, the default exception configuration will be applied.
Exception Traffic Logs
If you bypassed traffic locally on the device, then the traffic won’t be sent to Netskope and logged in Skope IT events. You can only see logs for traffic bypassed on Netskope.
Supported Exceptions
The following are the supported exceptions:
| Exception Type | Cloud Traffic | Web Traffic | All Traffic | All DNS Traffic | |
|---|---|---|---|---|---|
| Web | Web | Web | Non-Web | DNS(TCP/UDP 53, UDP 5353) | |
| Application | Yes | No | No | Yes | No |
| Category | No | Yes | Yes | Yes* | No |
| Certificate-Pinned Application | Yes | Yes | Yes | Yes | No |
| Domains | Yes | Yes | Yes | Yes | No |
| DNS | No | No | No | No | Yes |
| Destination Location | Yes | Yes | Yes | Yes | Yes |
| Source Location | Yes | Yes | Yes | No | No |
| Source Countries | Yes | Yes | Yes | No | No |
*Contact Netskope Support if you do not want to apply Category exceptions for non-web traffic in the All Traffic mode.
Exceptions Behavior In Flexible Dynamic Steering
In the flexible dynamic steering options, the exception behavior changes whenever the administrator changes the dynamic steering mode from one mode to another.

Refer to the following scenarios and the exception behavior while editing the steering mode:
Scenario 1: Administrator changes the Dynamic Steering mode from Enabled to Disabled. The values in the Existing On-Prem and Existing Off-Prem columns represent the traffic modes selected on the UI when Dynamic Steering is enabled. The New Traffic Mode column represents the traffic mode the admin selects after disabling the Enable Dynamic Steering option on the UI.
| Existing On-Prem | Existing Off-Prem | New Traffic Mode | Exception Behavior |
|---|---|---|---|
| Cloud Apps Only | Web Traffic | Cloud Apps Only | - Copy exceptions from Off-Prem - Remove Category and DNS exceptions |
| Cloud Apps Only | Cloud Apps Only | Cloud Apps Only | Copy exceptions from Off-Prem |
| None | Cloud Apps Only | Cloud Apps Only | Copy exceptions from Off-Prem |
| Web Traffic | Cloud Apps Only | Web Traffic | - Copy exceptions from Off-Prem - Remove cloud association - Generate default Category exceptions |
| Web Traffic | None | Web Traffic | - Copy exceptions from Off-Prem - Remove cloud association - Generate Destination Location, Domains, Category, and Certificate Pinned App exceptions |
| All Traffic | Web Traffic | All Traffic | - Copy exceptions from Off-prem - Remove cloud association |
| Web Traffic | All Traffic | Web Traffic | - Copy exceptions from off-prem - Remove cloud association - Remove firewall application exceptions |
| Cloud Apps Only | All Traffic | Web Traffic | - Copy exceptions from off-prem - Remove cloud association - Remove firewall application exceptions |
| Cloud Apps Only | Web Traffic | None | - Copy exceptions from off-prem - Remove cloud association - Remove all exceptions |
Scenario 2: Administrator changes the Dynamic Steering mode from Disabled to Enabled. The Existing Traffic Mode column represents the traffic mode selected on the webUI when the Enable Dynamic Steering option on the UI is disabled. The values in the New On-Prem and New Off-Prem columns represent the traffic modes the admin selects after enabling the Enable Dynamic Steering option in the UI.
When you clone a steering configuration with Dynamic Steering disabled and enable it during the cloning process, the system populates exceptions only in either the On-Premises or Off-Premises section, rather than both. To apply exceptions to both environments, first clone the profile with Dynamic Steering disabled, save it, and then enable Dynamic Steering as a subsequent modification.
| Existing Traffic Mode | New On-Prem | New Off-Prem | Expected Behavior |
|---|---|---|---|
| Cloud Apps Only | Cloud Apps Only | Cloud Apps Only | - Copy all exceptions to On-Prem and Off-Prem - Since On-Prem and Off-Prem are Cloud Apps Only, keep Cloud App association |
| Web Traffic | Web Traffic | Web Traffic | Copy all exceptions to On-Prem and Off-Prem |
| All Traffic | All Traffic | All Traffic | Copy all exceptions to On-Prem and Off-Prem |
| Cloud Apps Only | Cloud Apps Only | Web Traffic | - Copy all exceptions to On-Prem and Off-Prem - Since On-Prem is Cloud Apps Only, keep Cloud App association - Generate Category exceptions in Off-Prem |
| Cloud Apps Only | Web Traffic | Cloud Apps Only | - Copy all exceptions to On-Prem and Off-Prem - Since off-prem is Cloud Apps Only, keep Cloud App association - Generate Category exceptions in On-Prem |
| Web Traffic | All Traffic | Cloud Apps Only | - Copy all exceptions to On-Prem and Off-Prem - Since Off-prem is Cloud Apps Only, keep Cloud App association - Remove Category & DNS exceptions in Off-Prem |
| None | Cloud Apps Only | Cloud Apps Only | - Generate Destination Location, Domains, and SSL Pinned App exceptions - Since On-Prem and Off-Prem are Cloud Apps Only, keep Cloud App association |
| None | All Traffic | Web Traffic | Generate Destination Location, Domains, Category, and SSL Pinned App exceptions |
| All Traffic | None | Web Traffic | - Copy all exceptions to On-Prem and Off-Prem - Remove all exceptions in On-Prem - Remove firewall application exception in Off-Prem |
Application
Organizations that use home grown applications can use the Application exception to bypass traffic from their custom app definitions. App definitions allows you to add custom apps, connectors or private apps. To learn more about creating App Definitions, see App Definition.
Adding an Application Exception
To add an application exception:
-
Go to Settings > Security Cloud Platform > Steering Configuration.
-
On the Steering Configuration page, click
 for the steering configuration you want to add exceptions to.
 -
Click View Exceptions.
-
In the Exceptions tab, click New Exception and then Application.
-
In the New Exception window:
-
Exception Type: Choose Application and select applications from the dropdown list. You can also search for applications.
-
Action: Choose one of the following actions.
-
Bypass: Choose to bypass the selected apps, sending all traffic straight to the destination. This is the default action.
-
Bypass, except for DNS traffic: If you enabled the Steer DNS traffic option and selected an application that includes port 53 (the standard port for DNS), choose to bypass the selected apps, sending all traffic except DNS traffic to the destination.
-
-
Notes: Optionally, enter comments or notes for the exception.

-
-
Click Add.
Category
A category defines a collection of destinations (websites) that serve similar types of content. For example, the Art category is a collection of websites that contain creative art judged solely for its intellectual or aesthetic components. When you select the Art category as an exception, traffic to all destinations (websites) in this category bypasses the Netskope cloud and goes directly to their respective destinations.
To identify whether a session belongs to a bypass category, the Netskope Client sends a few initial packets to the Netskope cloud. Hence, you might observe a few packets being forwarded to the Netskope cloud. After confirming the category, the Netskope Client bypasses the traffic locally on the user’s device.
Adding a Category Exception
To add a category exception:
-
Go to Settings > Security Cloud Platform > Steering Configuration.
-
On the Steering Configuration page, click … for the steering configuration you want to add exceptions to.
-
Click View Exceptions.
-
In the Exceptions tab, click New Exception and then Category.
-
In the New Exception window:
-
Exception Type: Choose Category and select any default or custom categories you want to create exceptions for.
-
Action: DNS traffic for the specified domain/ IP address bypass Netskope Cloud and goes directly to its destination. You cannot modify this field.
-
Notes: Optionally, enter comments or notes for the category exception.

-
-
Click Add.
Certificate Pinned Applications
By adding applications as a certificate pinned application exception, the traffic from such applications is bypassed by Netskope cloud. A pinned app stores the public certificate or key of its destination website and presents it to Netskope cloud. When contacting the destination website/server, Netskope cloud verifies the pinned certificate with the server certificate. If they are validated, Netskope cloud bypasses traffic from the pinned application.
Adding a Certificate Pinned Application Exception
Follow these steps to configure a certificate pinned application exception:
-
Go to Settings > Security Cloud Platform > Steering Configuration.
-
On the Steering Configuration page, locate the configuration you want to update and click.
-
Click the Exceptions tab.
-
In the Exceptions tab, click New Exception > Certificate Pinned Application.
-
In the New Exception window, configure the following:
-
Exception Type: Select Certificate Pinned Application. Choose a predefined or custom app. Click
 to view the predefined and custom certificate pinned apps on the Certificate Pinned Apps page. To create a new one, click the + icon to create a new certificate pinned app.
 -
Custom App Domains: The application uses these domains to send traffic from the managed device.
To add custom app domains, enter the application domains, and separated by commas.
-
Netskope does not support wildcard domains (for example, *.example.com) for certificate pinned applications, however, automatically bypass subdomains of specified domains. You must enter specific domain names, such as example.com, drive.example.com, mail.example.com, or *. Each domain is matched against the destination hostname using suffix matching. For example, the domain name “example.com” matches the hostname “mail.example.com” but not “mail.1example.com”. * matches any hostname.
-
If the destination hostname of the certificate pinned app traffic matches the Custom App Domains definition, the traffic is bypassed. If you unselect Tunnel Mode, the traffic is bypassed locally; whereas, if you select Tunnel Mode and the hostname matches domains via suffix matching (* matches all), the traffic is tunneled and bypassed on the Netskope proxy.
Contact your Netskope Sales Representative to enable this field. After it is enabled, you must enter domains for all custom certificate-pinned apps. If domains are not configured, the apps will stop working.
-
-
Actions: Defines how Netskope handles the selected application traffic per platform. This section enables administrators to choose one of the following actions for the incoming traffic from the endpoint:
-
Bypass: Sends traffic directly to the destination without Netskope proxy inspection.
-
Block: Netskope Client blocks the traffic originating from the Certificate Pinned Application.
Tunnel Mode is visible only when you click Advanced Options.
You can choose to bypass or block traffic per platform. There are separate platform options to add a new application for Android and Chrome OS. When adding a certificate pinned application, use:
-
Domain-based configuration for Android 9 or lower.
-
Process-based configuration for Android 10 or higher.
-
-
Advanced Options: Enabling this option provides a granular control on the traffic from the end-user device. With Advanced Options, you can further drill down the bypass actions using the following options for each operating system:
When this option is disabled (By default). Disabling this option provides control on the traffic from the end-user device. You can either bypass or block the traffic.Supported platforms: Windows, macOS, Linux, iOS and Android. ChromeOS supports only Bypass and Block.
-
Devices matching specific Device Classification: The webUI displays Device Classification rules for multiple devices, including the Managed profile. Select a device classification profile for the respective operating systems.
If you select Managed, it implies that the Certificate Pinned Application exception is applied to ALL devices matching a Device Classification profile and is categorised as a managed device. After you select Managed, all labels gray out and are selected automatically. In the drop-down list, if the administrator configured additional Device Classification profiles, those profiles also appear and the admin can select them as needed. You can apply this exception on Netskope Client with version 110.0.0 or earlier.
-
Tunnel Mode: Sends traffic through Netskope. This option is required for single sign-on (SSO) services that use Netskope’s public IP address for source validation. In Domains, enter the tunnel domains you want to bypass.
Ensure to set Bypass exception traffic to Netskope Client in the Steering configuration for the Tunnel Mode to be enabled.
You can use multiple actions as required:
-
Bypass + Managed Devices: The Netskope Client applies bypass rules only to managed devices, and the Custom App Domains setting in the WebUI is not used when Managed Devices mode is enabled.
-
Bypass + Tunnel Mode: The Netskope Client tunnels traffic through Netskope but bypasses SSL inspection. This is usually required for SSO.
-
Bypass + Managed Devices + Tunnel Mode: The Netskope Client applies bypass rules only to managed devices, and the Custom App Domains setting in the WebUI is not used when Managed Devices mode is enabled. After the bypass action occurs, if the Tunnel Mode is selected, the Netskope Client will tunnel traffic based on the Domains configured in the WebUI.
Use Advanced Options when you want exceptions to apply only to managed devices. This ensures that only managed devices bypass Netskope Cloud for a pinned app, or to tunnel specific domains through Netskope Cloud. -
-
-
Click Add to save and apply the exception to the configuration.
You can view the newly created Certificate Pinned Application exception in the Exceptions list along with the Action, Type, Notes, and Last Modified details. This confirms that the configuration is applied successfully.
Viewing Domain Exceptions for Predefined Certificate Pinned Applications
On the Exceptions page, you can see the predefined and custom certificate pinned applications that are bypassed from the Netskope cloud for your steering configuration. To see a list of all predefined certificate pinned application exceptions: Certificate Pinned Applications.
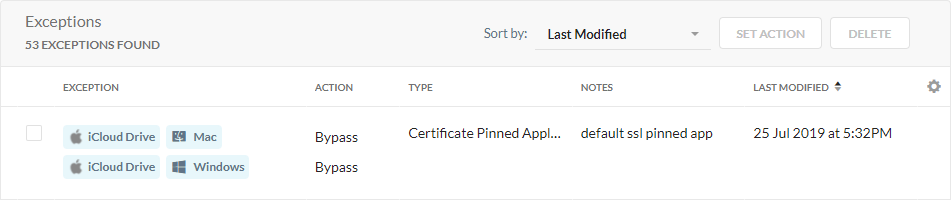
You can click the certificate pinned application exception to edit the bypass settings and view a list of the default App Domains bypassing Netskope.
Domains
Domain exception is used to bypass traffic to and from domains as configured in the exception. A common reason to add domain exceptions is to bypass traffic from domains that are used for software updates, such as adding domains used to upgrade Macbooks with macOS updates.
Note
The default exception list includes common domains (as wildcard entries) that are used for software updates. If a software / app update is interrupted ensure that the domain used for update is added to the exception list.
Adding a Domain Exception
To add a domain exception:
- Go to Settings > Security Cloud Platform > Steering Configuration.
- On the Steering Configuration page, click the ellipsis (…) for the steering configuration you want to add exceptions to.
- Click View Exceptions.
- In the Exceptions tab, click New Exception and then Domains.
- In the New Exception window:
- Exception Type: Choose Domains and enter the domains you want to create exceptions for. You can enter multiple domains separated by comma. You can enter them either as Fully Qualified Domain Name (FQDN) or wildcard names. When you trust a domain and want to bypass all its traffic, you can add the specific domain as a wildcard entry. Wildcard domains (e.g., *.example.com) include the root domain and all subdomains.
Wildcard Pattern Matches Does Not Match *.netskope.com netskope.com www.netskope.com
docs.netskope.com
netskope.com netskope.com www.netskope.com - Action: All traffic bypasses the Netskope cloud and goes straight to its destination. You can’t modify this field.
- Notes: Optionally, enter comments or notes for the domain exception.

- Exception Type: Choose Domains and enter the domains you want to create exceptions for. You can enter multiple domains separated by comma. You can enter them either as Fully Qualified Domain Name (FQDN) or wildcard names. When you trust a domain and want to bypass all its traffic, you can add the specific domain as a wildcard entry. Wildcard domains (e.g., *.example.com) include the root domain and all subdomains.
- Click Add.
Default Domain List
Refer to the following list of default domains that you can add in the domain-based exceptions:
*.apple.com
*.bitdefender.com
*.cdn-apple.com
*.cdn.office.net
*.data.microsoft.com
*.emsisoft.com
*.itunes.apple.com
*.kaspersky.com
*.mcafee.com
*.mp.microsoft.com
*.mzstatic.com
*.nai.com
*.oracle.com
*.paloaltonetworks.com
*.relay.teams.microsoft.com
*.sls.microsoft.com
*.smartscreen-prod.microsoft.com
*.symantec.com
*.symantecliveupdate.com
*.tr.teams.microsoft.com
*.turn.teams.microsoft.com
*.update.microsoft.com
*.webex.com
*.windows.com
*.windowsupdate.com
*.windowsupdate.microsoft.com
aru-akam.oracle.com
bitdefender.com
cdn-apple.com
data.microsoft.com
emsisoft.com
ftp.nai.com
gateway.icloud.com
heartbeat.s2.spn.com
kaspersky.com
liveupdate.symantec.com
liveupdate.symantecliveupdate.com
macromedia.com
mcafee.com
message.s2.spn.com
metrics.icloud.com
mobile.twitter.com
mp.microsoft.com
mzstatic.com
officecdn.microsoft.com
p37-caldav.icloud.com
paloaltonetworks.com
setup.icloud.com
smartscreen-prod.microsoft.com
sophos.com
sophosupd.com
sophosxl.net
staticupdates.paloaltonetworks.com
support.oracle.com
update.avg.com
update.fortiguard.net
update.grisoft.com
update.nai.com
update.symantec.com
updates.oracle.com
updates.paloaltonetworks.com
upgrade.bitdefender.com
vimeo.com
webex.com
windowsupdate.microsoft.com
wns.windows.com
ws-ee-maidsvc.icloud.com
DNS
The DNS exception allows you to bypass DNS traffic.
Adding a DNS Exception
To add a DNS exception:
- Go to Settings > Security Cloud Platform > Steering Configuration.
- On the Steering Configuration page, click for the steering configuration you want to add exceptions to.
- Click View Exceptions.
- In the Exceptions tab, click New Exception and then DNS.
- In the New Exception window:
- Exception Type: Choose DNS and enter the domains you want to create exceptions for.
For each domain, you must specify the Record Type or choose All Record Types. You can click + Add to add more domains or click Import From CSV to upload a CSV file (the maximum upload is 8 MB).
Note
If the Record Type is PTR, you must enter IP addresses or IP ranges.
- Action: All traffic bypasses the Netskope cloud and goes straight to its destination. You can’t modify this field.
- Notes: Optionally, enter comments or notes for the DNS exception.

- Exception Type: Choose DNS and enter the domains you want to create exceptions for.
- Click Add.
Destination Location
Destination Location exception bypasses traffic sent to specific destinations as defined in the network location profile. When installing Netskope Client along with 3rd party apps, like a VPN application, you will need to add exceptions to bypass VPN traffic and send it directly to the respective VPN gateway. The Destination Location exception allows you to add target destinations as IP address, IP address range or CIDR netmask.
Adding a Network Location Exception
Before adding destination location exceptions, you must add network location objects. A Network Location is a profile with a list of public IP addresses.
- Go to Policies > Network Location.
- On the Network Location page, click New Network Location and select Single Object or Multiple Objects.
- Select Single Object, if you are adding a small set of destinations manually.
- In the Add Network Location pop-up window, enter the destination address (IP address/range or CIDR network). Click the + icon to add additional addresses. Click Next to continue.
- Give a name for this network location. You will need this when adding the exception in steering configuration.
- Select Multiple Objects, if you are adding a large set of destinations via a CSV file.
- In the Upload Network Locations pop-up window, select the CSV file (max size 8 MB) with the list of destination addresses. The CSV file must have entries in the following format:
[Net Location Name], [IP Address 1], [IP Address 2], , ,For example: Location1, 11.2.3.4, 12.3.5.125/16
- In the Upload Network Locations pop-up window, select the CSV file (max size 8 MB) with the list of destination addresses. The CSV file must have entries in the following format:
- Click Upload.
Adding a Destination Location Exception
To add a destination location exception:
- Go to Settings > Security Cloud Platform > Steering Configurat.
- On the Steering Configuration page, click for the steering configuration you want to add exceptions to.
- Click View Exceptions.
- In the Exceptions tab, click New Exception and then Destination Locations.
- In the New Exception window:
- Exception Type: Choose Destination Locations and enter the destinations you want to create exceptions for.
- Bypass: Bypass all the traffic for the destination location.
- Bypass, except for DNS traffic: Netskope Client bypasses non-DNS traffic and only tunnels DNS traffic to the Cloud Firewall.
Note
You can only see this option if you have the Cloud Firewall license.
- Treat like local IP address: Select if you want Netskope Client to consider this traffic local so it never sends the traffic within the tunnel, like a private IP address in RFC 1918.
- Notes: (Optional) Enter comments or notes for the Destination Location exception.

- Click Add.
Source Location
Source location exception bypasses traffic from a specific set of address (treated as source of traffic) as defined in the network location profile.
- To learn about creating source network location, see Adding a Network Location Exception.
- To learn about a network location as the exception, follow the steps described for Adding a Destination Location Exception
– Source Countries and Source Locations are no longer available in the New Exception dropdown list. This means you cannot create new steering exceptions using Source Locations and Source Countries.

– For existing steering exceptions containing Source Locations, the webUI displays a warning message to reconfigure with SSL Do Not Decrypt rules.
– You can still use the +Add Filter option to display the existing Source Locations and Source Countries exceptions.
Source Countries
The Source Countries exception allows you to bypass traffic from specific geo-locations.
Adding a Source Country Exception
To add a source country exception:
- Go to Settings > Security Cloud Platform > Steering Configuration.
- On the Steering Configuration page, click for the steering configuration you want to add exceptions to.
- Click View Exceptions.
- In the Exceptions tab, click New Exception and then Source Countries.
- In the New Exception window, for Source Countries, select the source countries you want to bypass.

- Click Add.