Cloud Exchange supports the AWS, Azure, and GCP platforms.
AWS
Prerequisites
An AWS account.
Configure the EC2 Instance
Log in to your AWS account.
Open the EC2 service in your preferred region.
Click Launch Instance.
Enter name for this new instance and click Browse more AMIs.
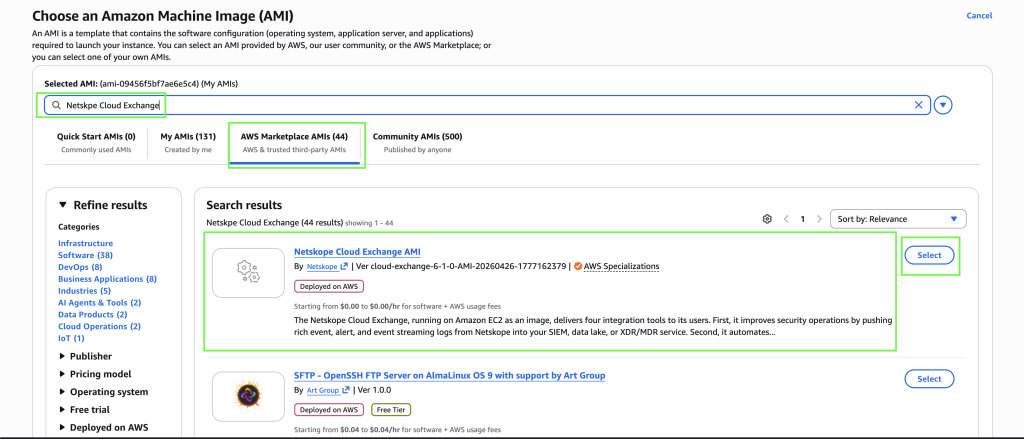
Search for Netskope Cloud Exchange and click AWS Marketplace AMIs, and then select Netskope Cloud Exchange AMI.
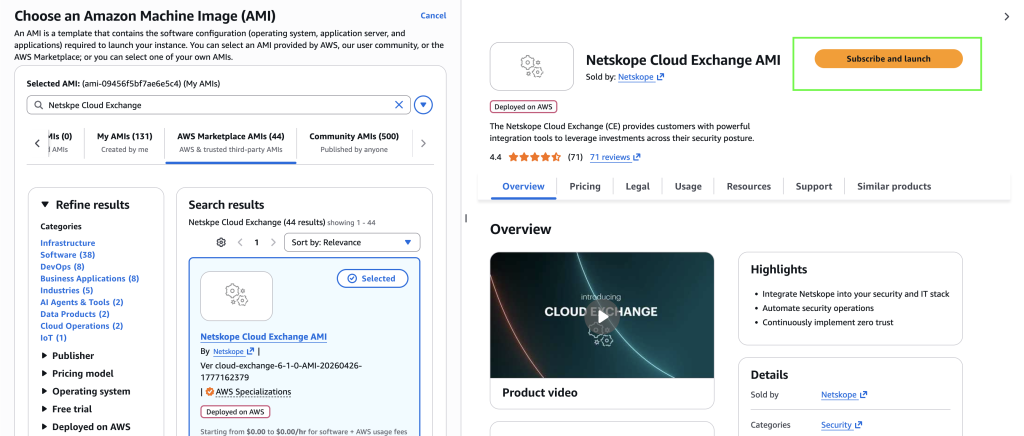
Click Subscribe and launch.
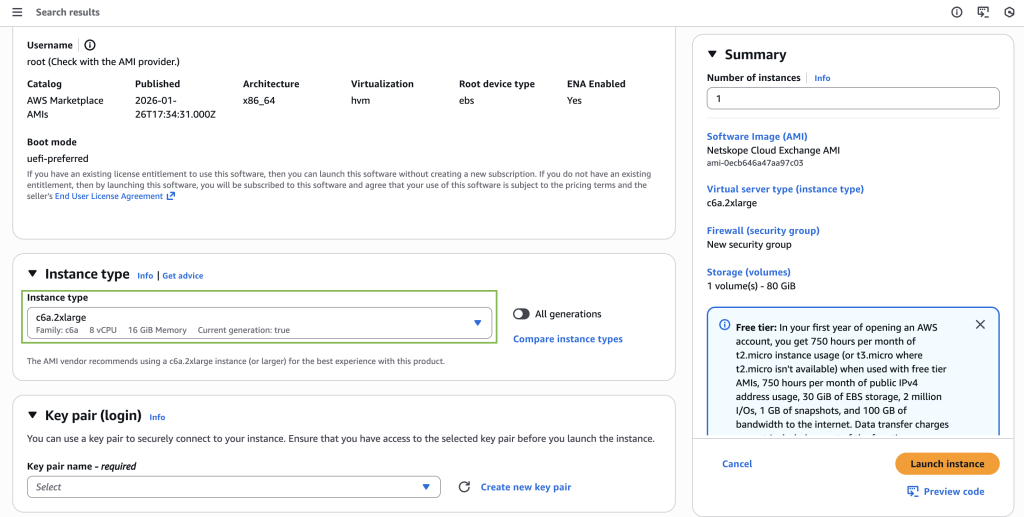
Select the Instance Type according to your requirements.
Click Create new key pair and save the private key securely. This key will be required to access the machine.
Change the Network Settings and allow SSH traffic according to your organization policy. We recommend you change it to allow from your IP only. This applies the same for the HTTPS port as well.
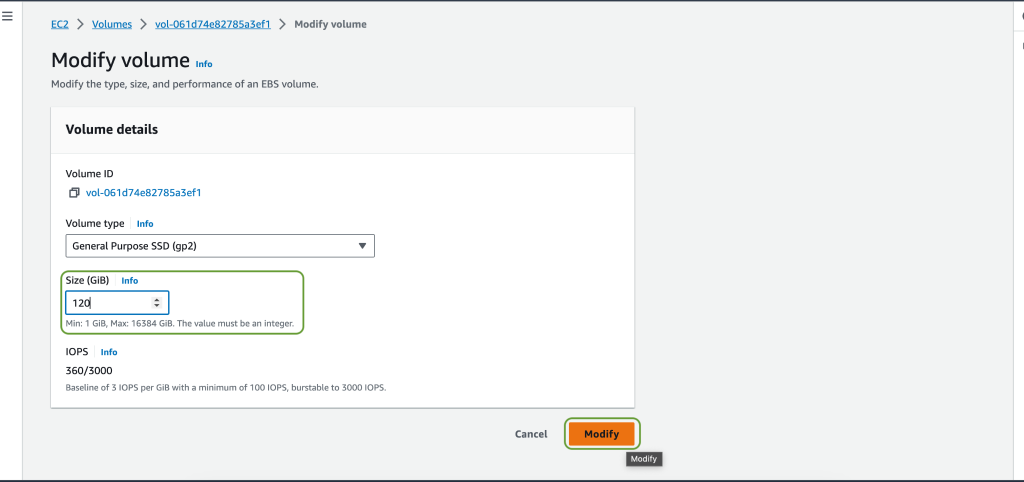
Configure the storage per your requirements.
Click Launch Instance.
After the machine is started, follow these steps to configure CE.
Copy the Public IPv4 DNS and run the ssh command as follows. If you’re using Mac or Linux based operating system, you will need to change the pem file permissions to readonly.
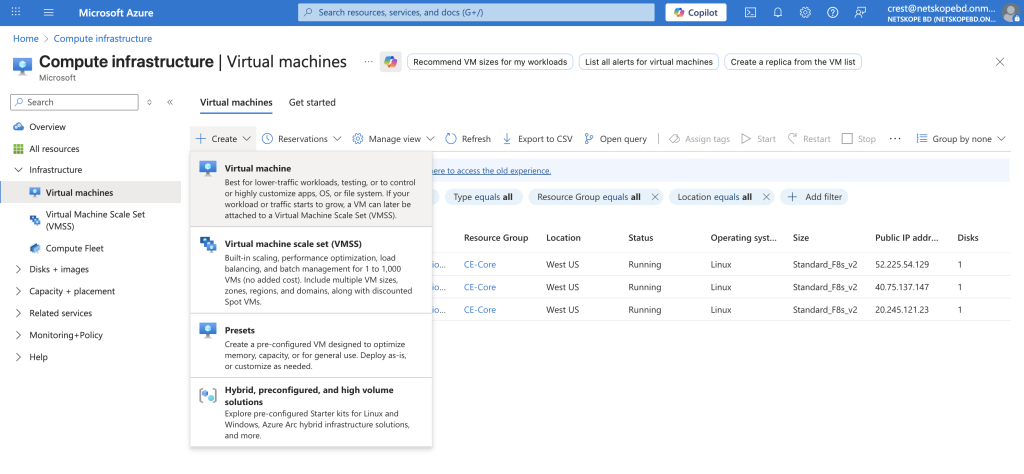
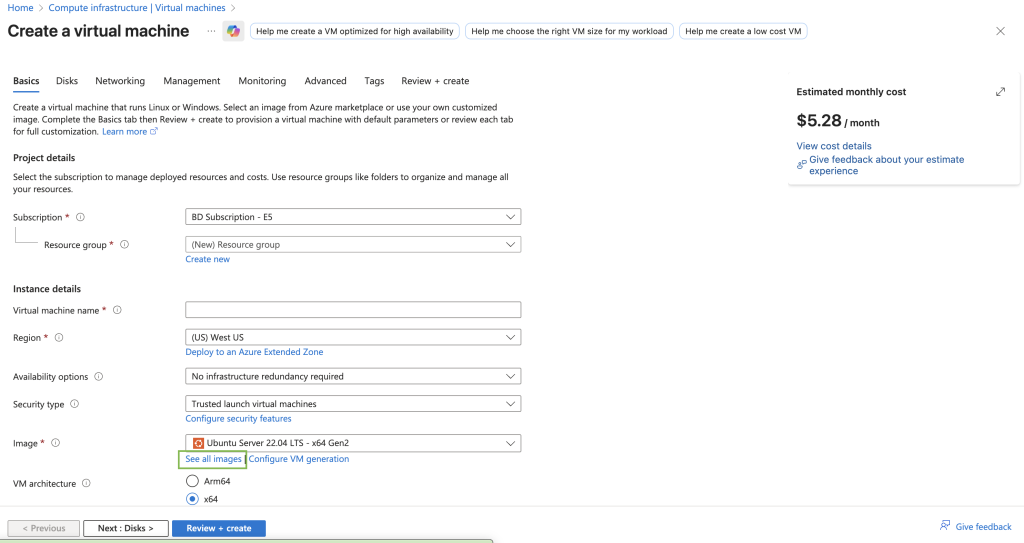
Create a virtual machine. Select your Subscription and Resource group where you want to create the virtual machine.
Select the Size of the machine according to your requirements (medium or large).
Click See all images.
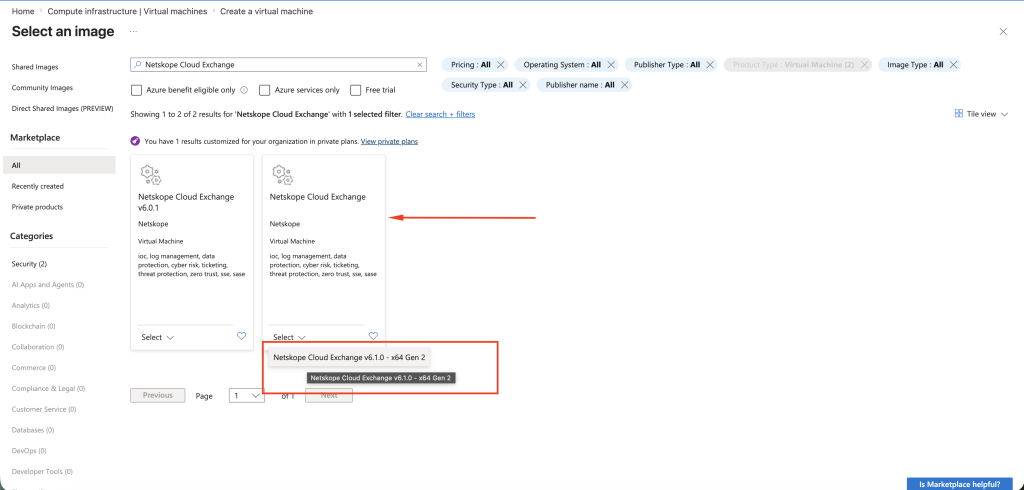
Search for and select Netskope Cloud Exchange in Marketplace, and click on Select then click on the Netskope Cloud Exchange v6.1.0 – x64 Gen 2 image published by Netskope.
Change the Size of the machine according to your requirement.
Configure an Administrator account. Select SSH public key as Authentication type.
Configure the following username and select Generate new key pair. Username: cteadmin.
Configure Inbound port rules with Allow selected ports, and allow HTTPS and SSH.
For Licensing, select License Type as Other.
Click Next > Disks and change the OS disk size per your requirements.
(Optional) Configure the Network per the remaining steps according to your organization policy.
Click Review + create.
Once validation is successful, click Create.
Wait for the Virtual Machine to be created (it will take around 2-5 minutes).
Once the Virtual Machine is started, SSH into machine with cteadmin username with private key.ssh -i <private-key-path> cteadmin@ip-address-of-vm
Go to the Cloud Exchange directory:
cd /opt/cloudexchange/cloudexchange/
Copy and edit the cloudexchange config file.
cp cloudexchange.config.example cloudexchange.config
vi cloudexchange.config
Configure the CloudExchange configuration file by setting the parameters according to your requirements.
Notes for the Maintenance Password
This password is required only once during the initial setup and cannot be changed later. It is strongly recommended to set a secure password.
If no password is specified, a random 32-character password will be automatically generated.
Non‑ASCII characters (like accented letters, other scripts, emoji) are not supported for the maintenance password in Cloud Exchange and can cause failures.
Please record and securely store the generated maintenance password, as it will be required when migrating Cloud Exchange to another machine.
Notes for JWT SECRET
If not specified, a random 32-character key will be automatically generated.
Non‑ASCII characters (like accented letters, other scripts, emoji) are not supported for the JWT SECRET in Cloud Exchange and can cause failures.
Record and securely store the generated JWT SECRET, as it will be required for the Cloud Exchange HA configuration.
Execute the setup script.
sudo python3 ./setup
Launch Cloud Exchange.
sudo ./start
Wait for 5-10 minutes and then access the Cloud Exchange using the IP address of VM.
Default User Login
By default, a single user is created with administrative capabilities with these credentials:
Username: admin
Password: admin
This user will have Administrator level access to the application. This user will have write access, and will be able to create new users as well.
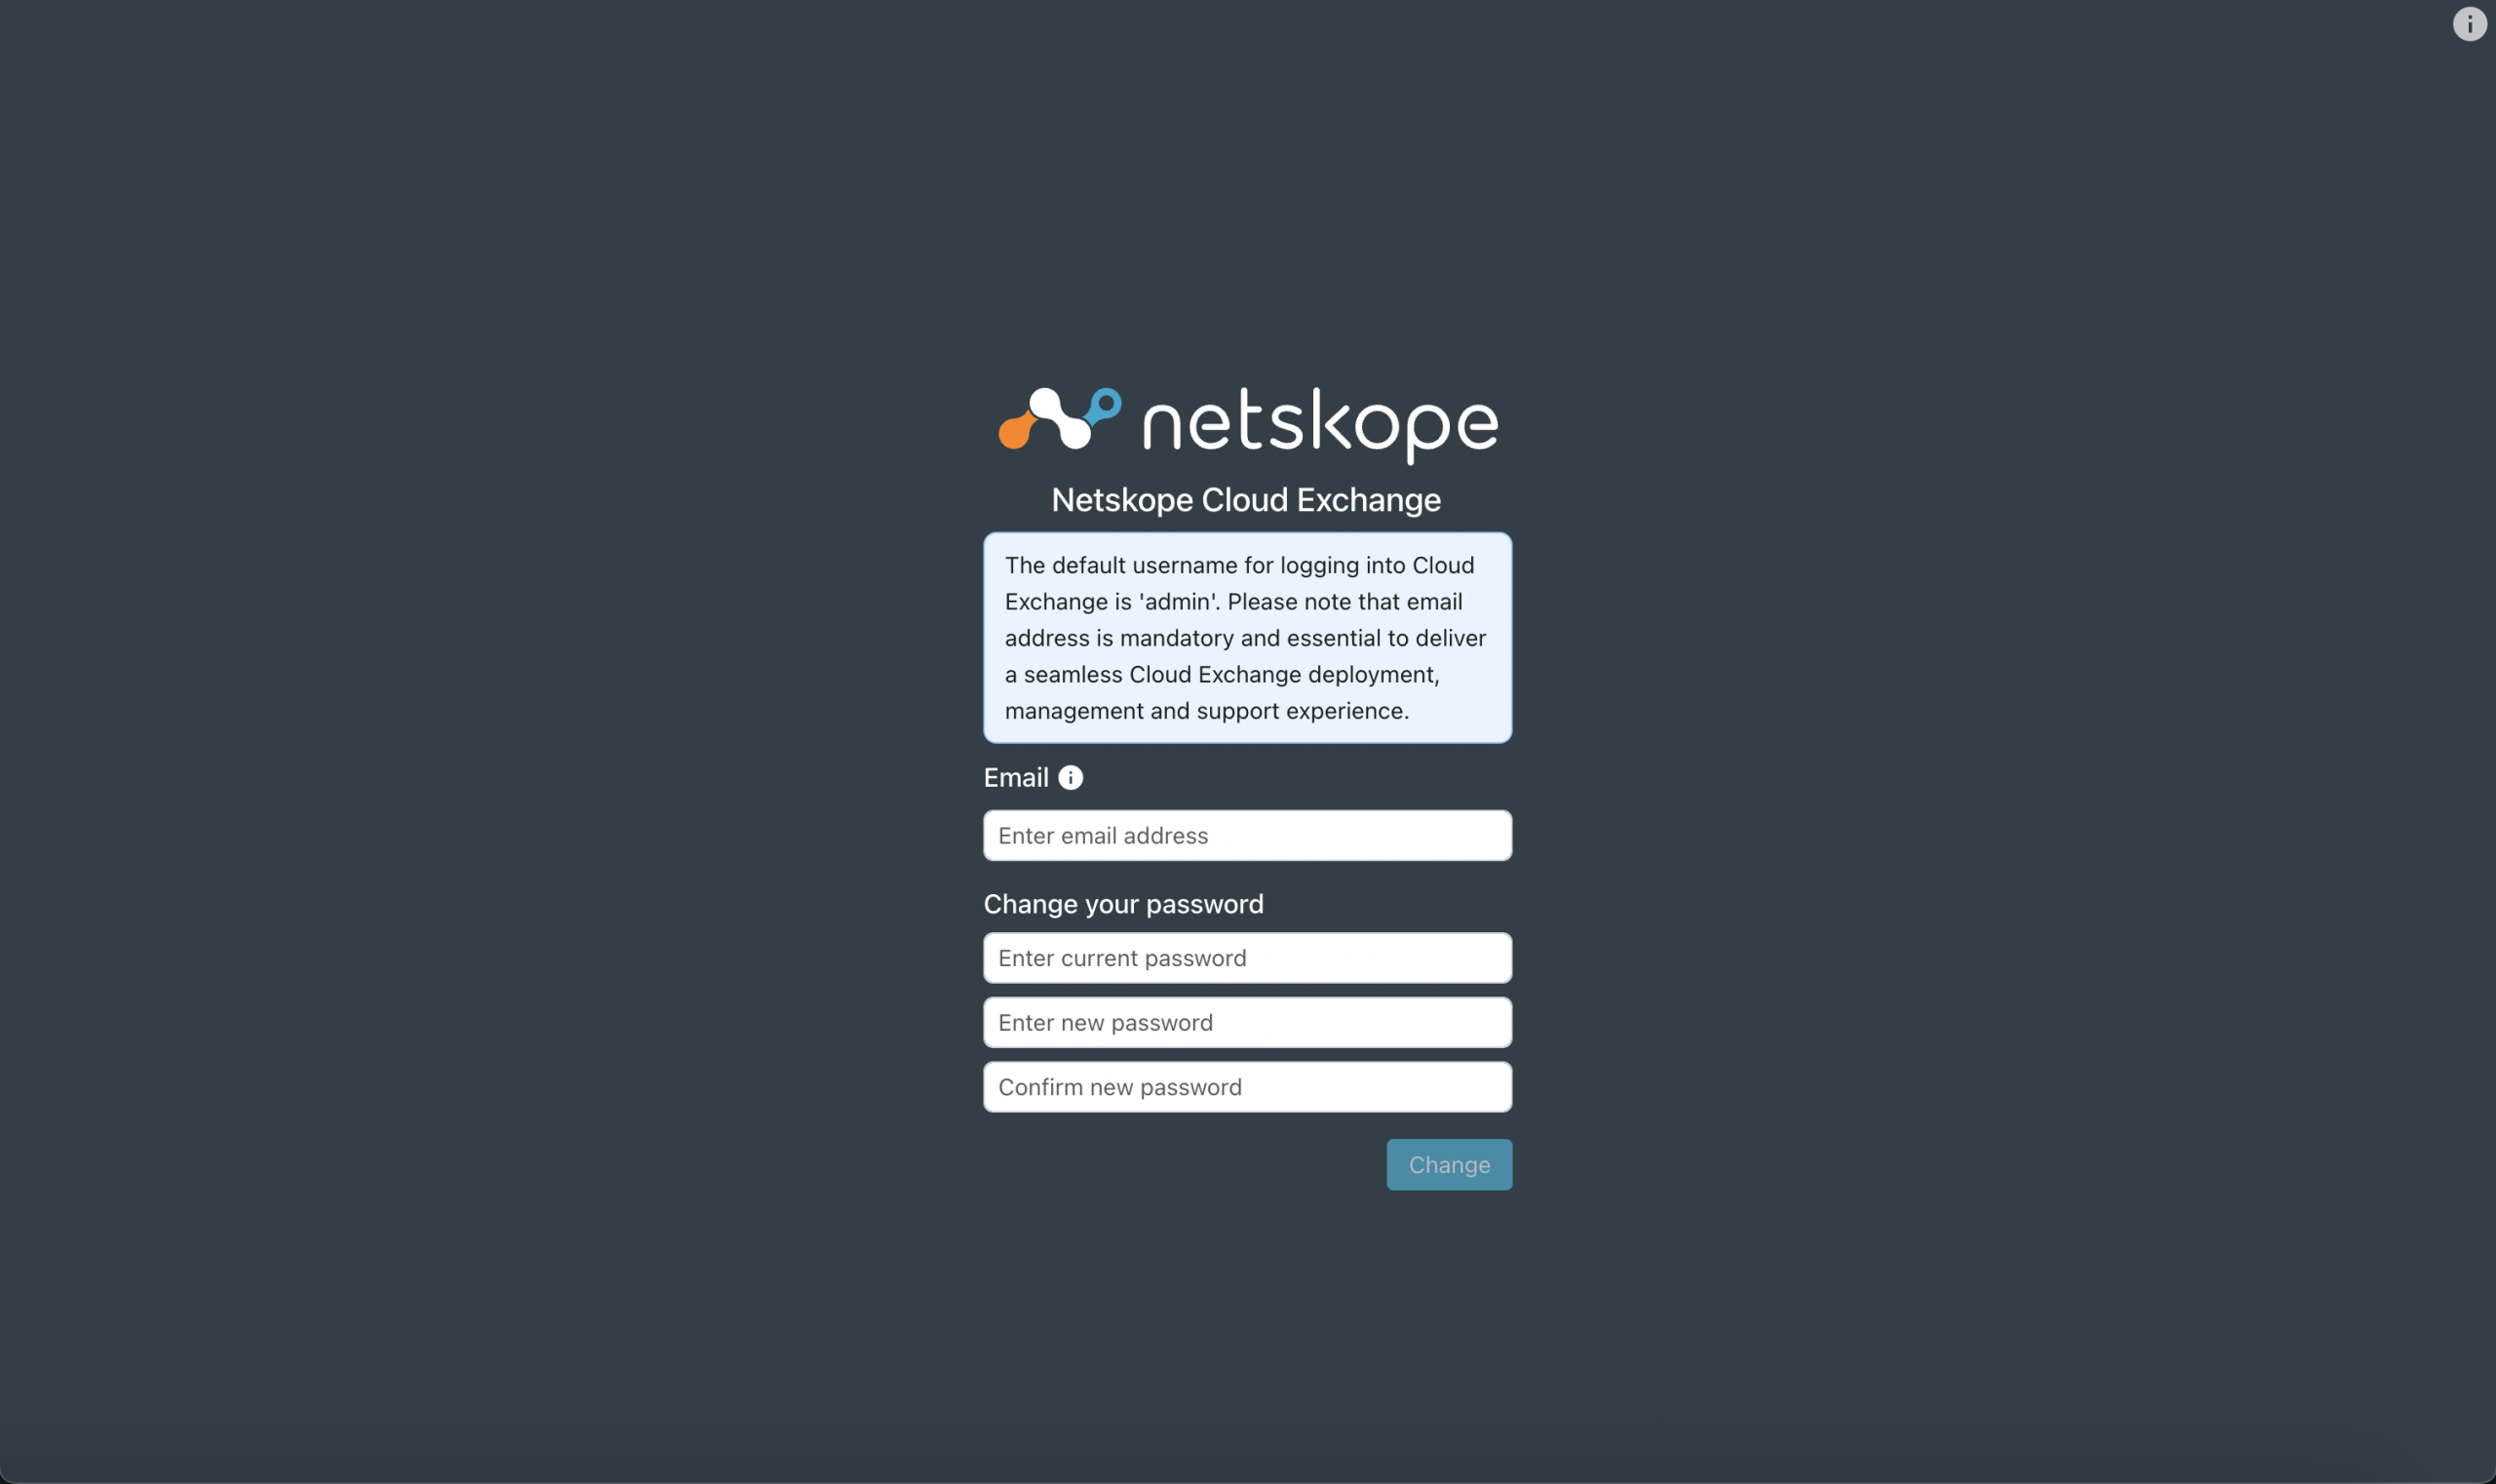
On the first login, you will be required to change these credentials. After that, log in using your new credentials.
Security Guidelines
Restrict ssh access to specific IP addresses from the Networking tab of the Virtual Machine.
We recommend using SSH public key as the machine Authentication type.
Increase Disk Size (Optional)
If you’re using Mac or Linux-based operating system, you will need to change pem file permissions to readonly.
chmod 400 <private-key-path>
Log in to Azure portal and open the Virtual Machine.
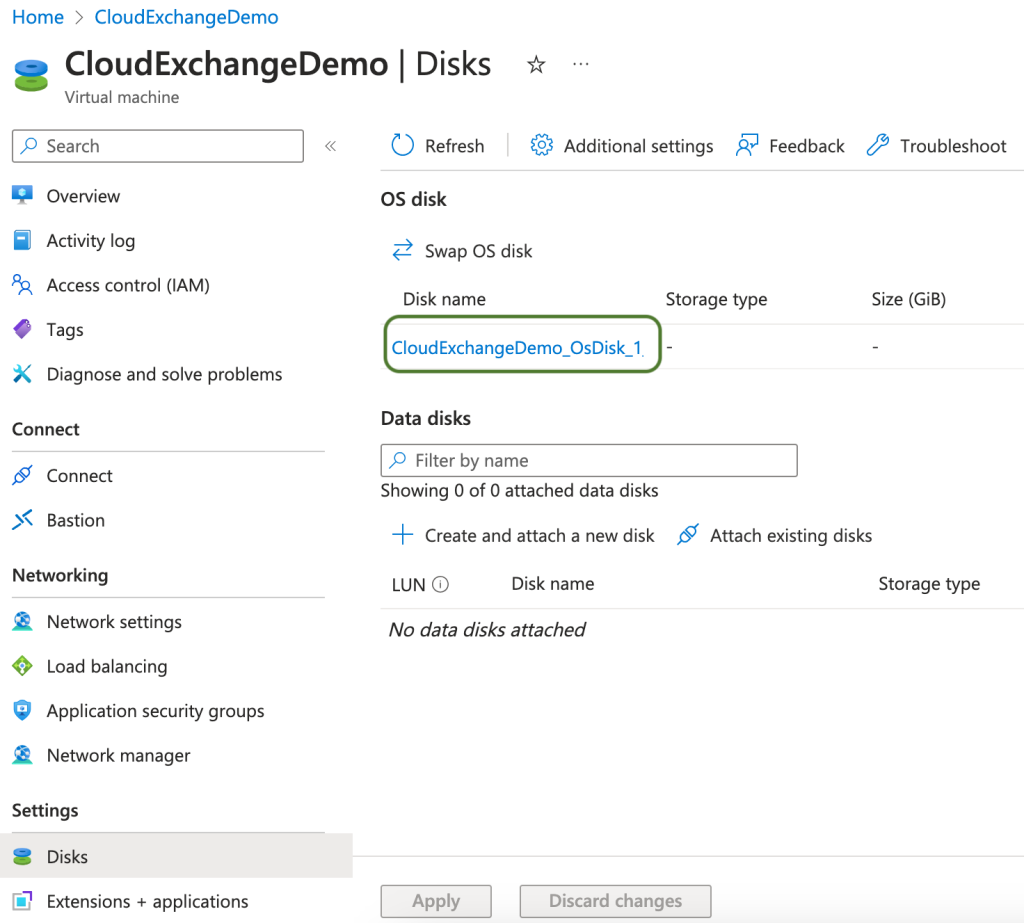
Stop the virtual machine if it’s running, and wait until the status becomes Stopped (deallocated), and then click Disk on the left navigation menu.
Open OS disk.
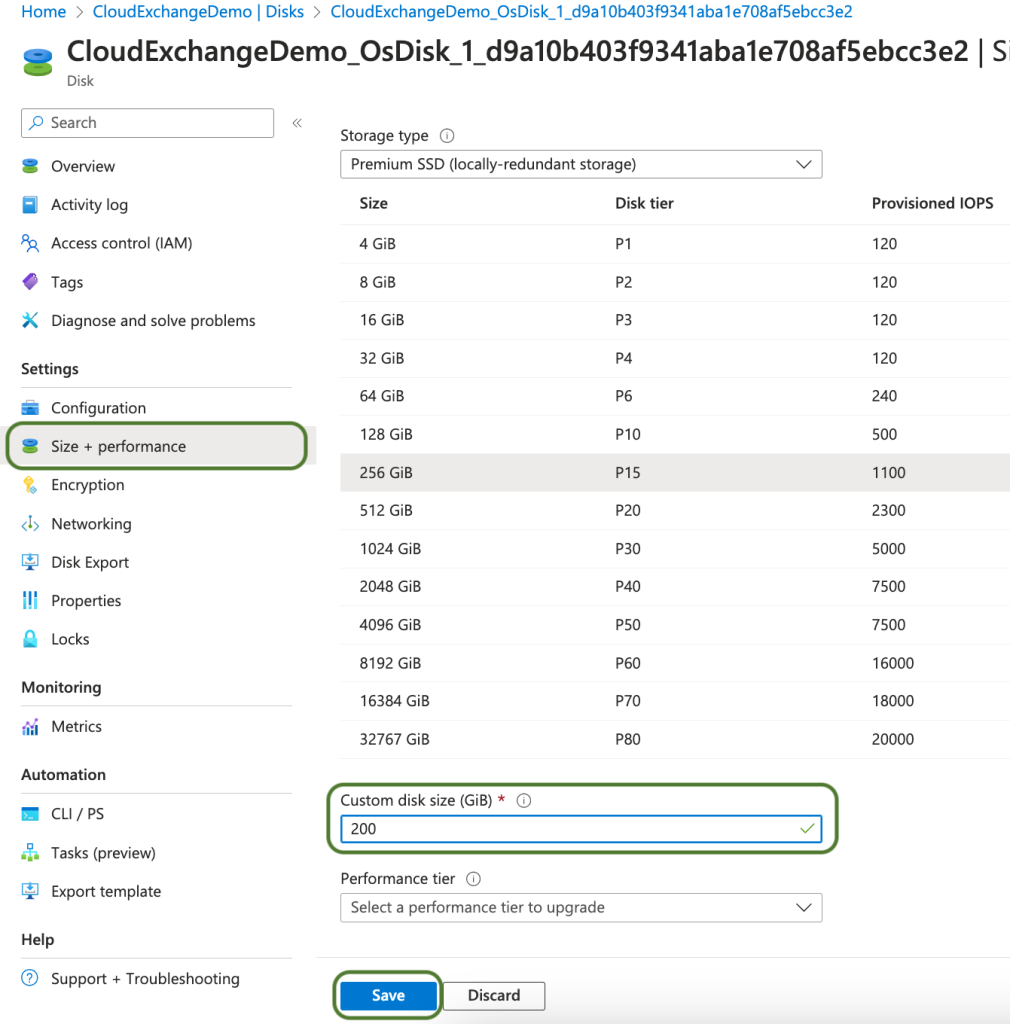
Click Size + performance and enter Custom disk size (GB) with the new disk size, and then click Save. You cannot decrease the size of the disk once it’s increased.
Start the virtual machine.
To verify the disk change, run this command to verify the disk size change after doing SSH into the instance.
df -h /
GCP
Cloud Exchange can be deployed on GCP in two ways:
Configure Cloud Exchange in GCP compute instance.
Create a GCP Image from an OVA file. Note that creating a GCP Image from an OVA file has limited support.
Configure Cloud Exchange in a GCP Compute Instance
Log in to your GCP account and go to Compute Engine. If you don’t see it on your main GCP dashboard, search for it.
Click on Create Instance.
Enter a new instance Name, and select a Region, Zone, and Machine configuration per your requirements.
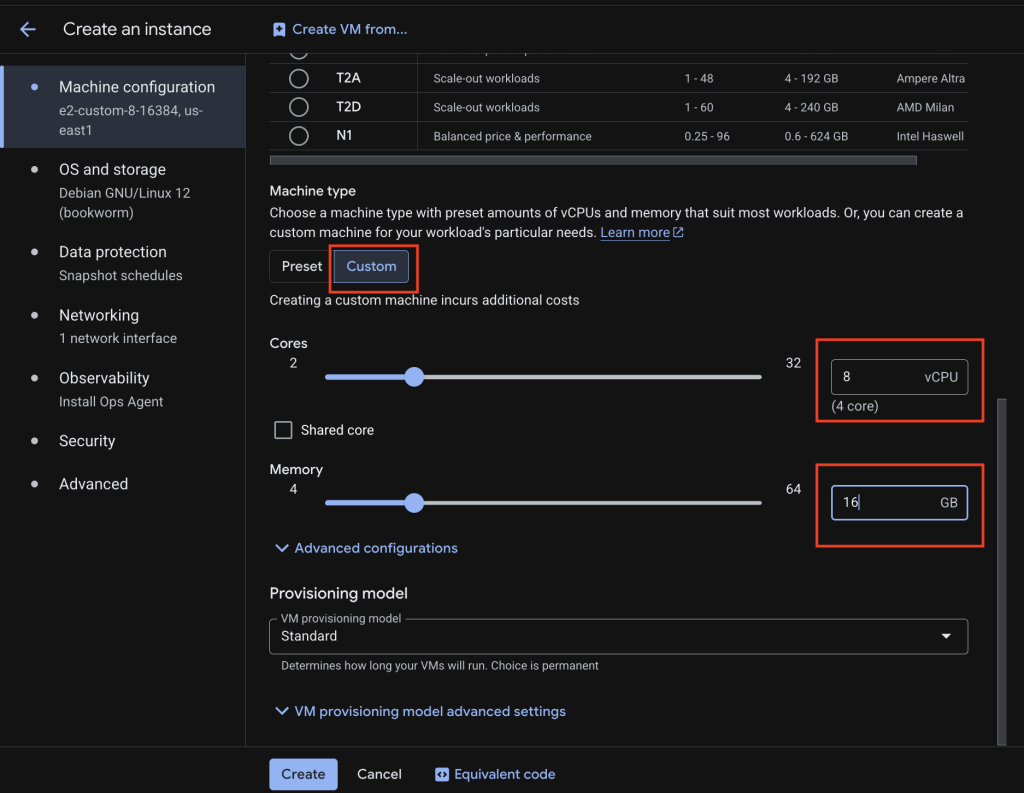
Select a Machine type as per your profile requirements by clicking Custom (like 8 CPU and 16GB RAM for a medium profile). Follow the sizing profiles strictly. Provisioning above or below a profile is not supported To help you decide on size, check out our Sizing the System section here.
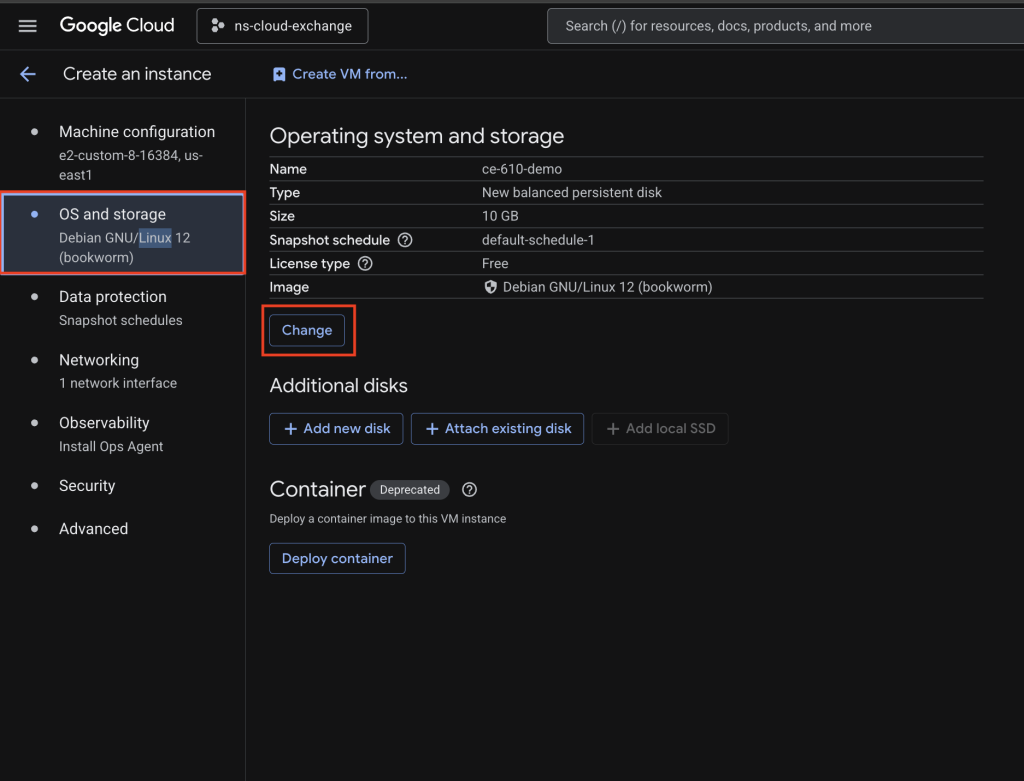
From the left panel, select the OS and Storage section, then click Change.
In the Public Images section, choose Ubuntu as the Operating system and select Ubuntu 24.04 LTS Minimal as the Version. Specify the Boot disk type and Size (for example, 80 GB of free disk space for a medium profile) based on your requirements, then click Select. To help you decide on size, check out our Sizing the System section here.
From the left panel, navigate to the Networking section. Under Firewall, select Allow HTTPS traffic.
Scroll down to Network interfaces and click on the expand icon, then select a Network and Subnetwork based on your requirements.
Click Create.
SSH into your Instance. Click SSH. Now set up Cloud Exchange on your new GCP instance by following these instructions: Install CloudExchange on Ubuntu.
Default User Login
By default, a single user is created with administrative capabilities with these credentials:
Username: admin
Password: admin
This user will have Administrator level access to the application. This user will have write access, and will be able to create new users as well.
On the first login, you will be required to change these credentials. After that, log in using your new credentials.
Security Guidelines
Restrict ssh access to specific IP addresses from Networking tab of Virtual Machine
Create a GCP Image from a VHDX File
Prerequisites
Download the Latest VHDX file from here and unzip it.
VM Migration API allowed.
Storage read on the bucket.
Upload File to the Bucket
Log in to your Google Cloud Console.
Go to Cloud Storage > Buckets. Select an existing bucket to upload the Cloud Exchange VHDX file, or create a new bucket.
Upload the unzipped .vhdx file inside the bucket. Make sure the bucket is in the region where you need to deploy Cloud Exchange. The upload might take several minutes. Wait for the upload to complete before moving forward.
On the Permissions tab click Grant Access.
In the new principal, enter the principal for VM Migration. Replace the project number with your current project number. You can find the project number under IAM & Admin > Settings.
Select Storage Object Viewer for the Role and click Save.
Import the VHDX as a UEFI image (skip OS adaptation)
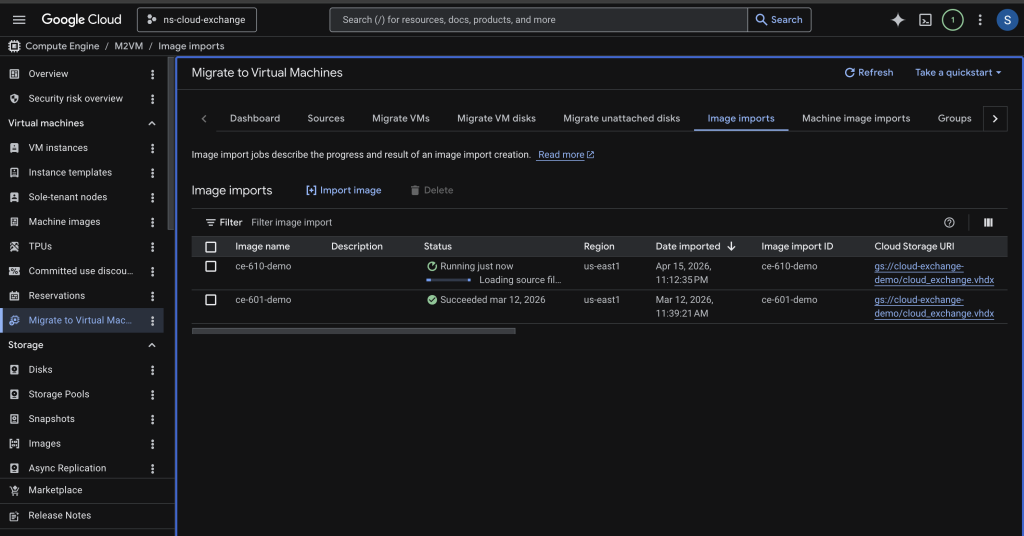
Search for and select Compute Engine. Select Migrate to Virtual Machine on the left panel and click Image Imports.
Provide a name for the image.
For Source Cloud Storage File, select the .vhdx file that you uploaded. Select the same region in which you have uploaded the file.
Enable Skip OS adaptation. Keep Convert BIOS > UEFI disabled.
Click Import. The OS Adaption skip check will ask for confirmation, so confirm and wait for the import status to be succeeded.
Create a UEFI-compatible Image
This VHDX image is built for UEFI boot. Mark the custom image as UEFI-compatible before creating the VM; otherwise, Google Cloud may attempt legacy BIOS boot and the instance may fail to start.
Activate the Cloud Shell from the top right corner, and then authorize and run the following command. Replace <IMAGE_NAME> with the image name created in the previous step. You can also replace the UEFI image name (ce-610-uefi) with a custom name, and the region with your desired region (same as the region for the image import).
Go to VPC network > Firewall and click Create Firewall Rule.
Create a rule (allow-ssh) for allowing ssh access.
Network: Default (or the network used by the VM)
Direction of traffic: Ingress
Action on match: Allow
Targets: Specified target tags
Target tags: ce-ssh
Source filter: IPv4 ranges
Source IPv4 ranges: 35.235.240.0/20
Protocols and ports: Select Specified protocols and ports, then enter tcp:22
Create a Cloud Exchange VM
Go to Compute Engine > VM instances and click Create instance.
Enter a new instance Name, and select a Region, Zone, and Machine configuration per your requirements.
Select a Machine type as per your profile requirements by clicking Custom (like 8 CPU and 16GB RAM for a medium profile). Follow the sizing profiles strictly. Provisioning above or below a profile is not supported. To help you decide on size, check out our Sizing the System section here.
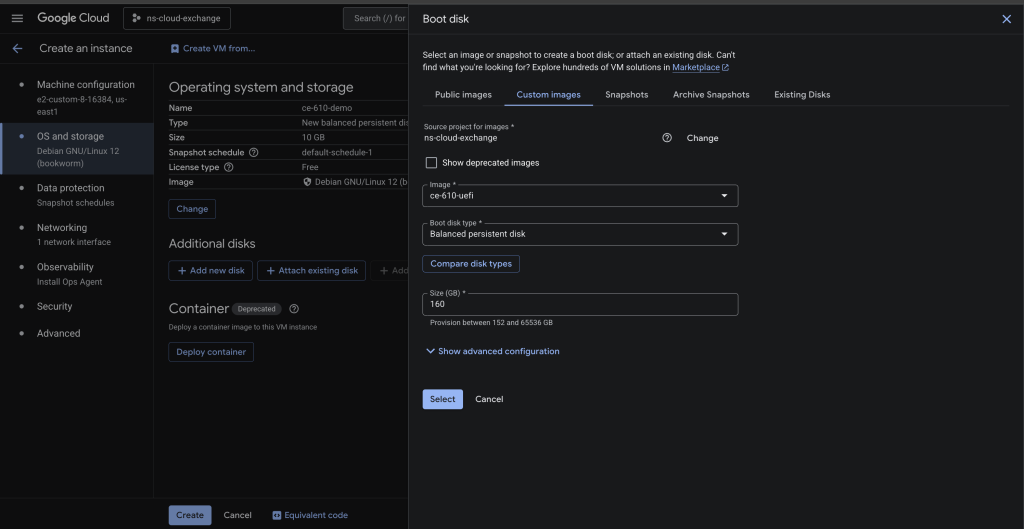
On the left panel, select the OS and Storage section, and then click Change.
Select the Custom images tab. Source your project. In the Image field, select the image created in the previous steps using the CLI commands (ce-601-uefi).
Select Balanced persistent disk in the Boot Disk Type dropdown. Make sure to provide the size greater than 150 GB and click Select.
On the left panel, go to the Networking section. Under Firewall, select Allow HTTPS traffic. To allow SSH traffic, add the tag created in the firewall rule.
Scroll down to Network interfaces and click on the expand icon, and then select a Network and Subnetwork based on your requirements.
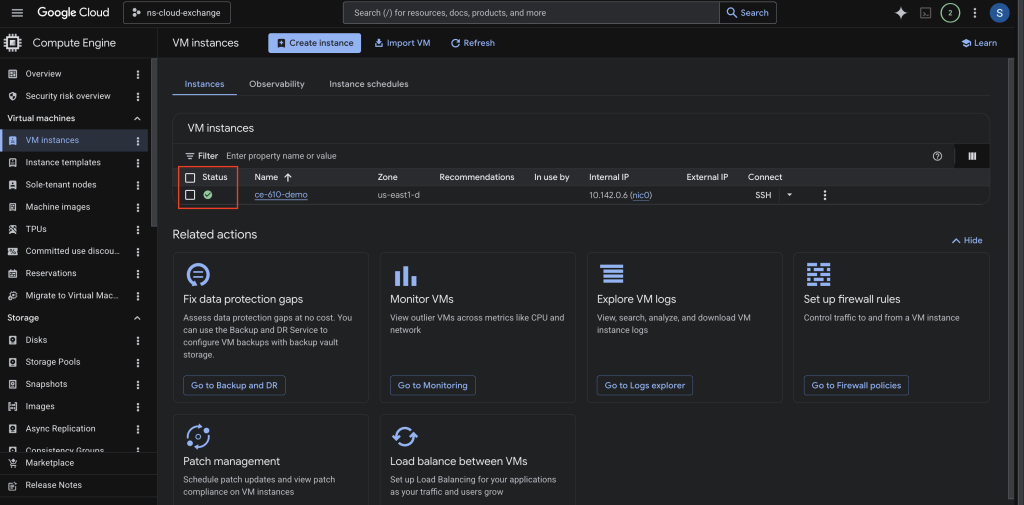
Click Create. Wait until the VM Instance status to be ready.
After the VM is ready, you can SSH into it using Google Cloud Shell.
Copy the command to ssh using a terminal, or run in the shell. Use this username and password. Be sure to change the password with a more secure string. Username: cteadmin Password : Cl0ud3xc4ang3!
sudo cp cloudexchange.config.example cloudexchange.config
sudo vi cloudexchange.config
Configure the Cloud Exchange configuration file by setting the parameters according to your requirements.
Notes for the Maintenance Password
This password is required only once during the initial setup and cannot be changed later.It is strongly recommended to set a secure password.
If no password is specified, a random 32-character password will be automatically generated.
Non‑ASCII characters (e.g., accented letters, other scripts, emoji) are not supported for the maintenance password in Cloud Exchange and can cause failures.
Please record and securely store the generated maintenance password, as it will be required when migrating Cloud Exchange to another machine.
Notes for JWT SECRET
If not specified, a random 32-character key will be automatically generated.
Non‑ASCII characters (e.g., accented letters, other scripts, emoji) are not supported for the JWT SECRET in Cloud Exchange and can cause failures.
Record and securely store the generated JWT SECRET, as it will be required for the Cloud Exchange HA configuration.
Execute the setup script.
sudo python3 ./setup
Launch Cloud Exchange.
sudo ./start
Wait for 5-10 minutes and then access the Cloud Exchange using the IP address of VM. (https://<ip>).
For an HA installation of Cloud Exchange, follow the HA installation instructions.
Default User Login
By default, a single user is created with administrative capabilities with these credentials:
Username: admin
Password: admin
This user will have Administrator level access to the application. This user will have write access, and will be able to create new users as well.
On the first login, you will be required to change these credentials. After that, log in using your new credentials.