

With Real-time Protection (RTP), you can define policies with a wide range of variables to enforce access control or inspect traffic with DLP or Threat Protection. When creating an RTP policy, you can configure the traffic criteria (i.e., source and destination), the profile applied to the policy, and the action performed when the traffic criteria and policy are matched.
To create an RTP policy:
- Go to Policies > Real-time Protection.
- Click New Policy and then select the template that most resembles your goal for the policy. You can choose DLP, Threat Protection, or an access-control type policy template like Cloud App Access, Web Access, or Private App Segment Access.
The system will show the most appropriate criteria based on your policy template selection and some fields are auto-populated. However, you can edit any field as you work through the policy creation workflow, no matter the choice of template.
Note that many criteria are set as Any by default. This means the policy engine will not match against the criteria. When you see a text box during the policy workflow, click in the text box to view your additional options or to edit your selections. These options dynamically display based on your initial template choice.
Source
- For Source, click User, User Group, or Organizational Unit to select the sources to include in the policy. Optionally, click Unknown to select unauthenticated users.
Tip
For users that are unknown or were not authenticated for any reason, create a policy specifically for “unknown” users and extend threat and DLP protection to unauthenticated users.
This applies to:
- all GRE/IPSEC and CEP access methods
- when SAML auth is not configured
- unknown cookie surrogates traffic
For cookie surrogate traffic, Netskope can ingest and apply policies to unknown user traffic. Previously, unknown traffic was bypassed.
In addition, the SkopeIT Events user field displays “unknown” to reflect unknown traffic. If this feature is not enabled, the user field displays “IP Address”.
Contact Support to enable this feature in your account.
- (Optional) Click Exclusions to select the sources to exclude from the policy. Keep in mind that if you choose to include a user in the policy, but exclude a user group that the user belongs to, then the user is excluded from the policy.

- Click Add Criteria to add match criteria for the sources, including:
- Source IP: The IP address for the source.
- Source IP (Egress): The egress IP address for the source.
- Source Country: The country from where queries originate.
- OS: The operating system type (e.g., Linux).
Note
The OS criterion will be deprecated and replaced with the OS Family Criteria. You must update any policies that use OS to use OS Family instead. To learn more: OS Family Criteria.
- Browser: The browser type (e.g., Chrome).
- Access Method: The access method type (e.g., Client).
Tip
When you create a Real-time Protection policy with Access Method defined for a domain that’s also part of an SSL Do Not Decrypt policy, Real-time Protection policy evaluation still takes place. If this Real-time Protection policy’s action is Block, then the domain will be blocked. As a workaround, Netskope recommends that you create a custom category for the domains in the SSL policy, and then create a Real-time Protection policy with Allow as the action for this custom category. Ensure to place this policy above the policy that blocks domains.
- Device Classification: The managed or unmanaged devices based on classifications created in Device Classification. This option is only applicable to the following access methods: Client, Enterprise Browser, Mobile Profile, Reverse Proxy.
- HTTP Header: The HTTP header profile.
- Custom Attribute: The custom user attributes from the Active Directory (AD) if user information was synced.
Note
The Custom Attribute option is a Beta feature. Contact Netskope Support or your sales representative to enable this feature.

Destination
- For Destination, select one of the following traffic types for the policy:
- Cloud App: If selected, you can choose individual cloud apps (e.g., Dropbox) or cloud app suites (e.g., AWS).
- Category: If selected, you can choose between predefined or custom categories.
- App Instance: If selected, you can choose app instances. Multiple SaaS app instances can exist at the same time (e.g., a corporate app instance versus a personal app instance). Existing app instance labels appear in this list. To learn more: App Instance Profile.
- Service: If selected, you can choose service profiles.
- Destination Profile: If selected, you can choose destination profiles.
- Private App Segment: If selected, you can choose private app segments.
- Email Outbound App: For matching against MPIP Sensitivity Labels, an Email Outbound instance and the Associated Activity, Send, must be selected.
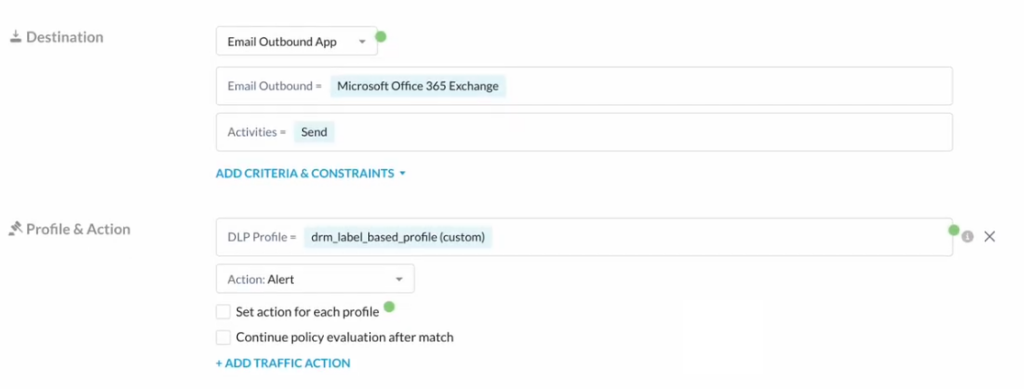
- Any Web Traffic: If selected, the policy is applied to all web traffic. You can create “Any Web Traffic” policies without source criteria. If you create an “Any Web Traffic” policy without a profile, selecting an Activity is not required.
Note
When creating an “Any Web Traffic” policy for Threat Protection, you must choose at least one Activity for the policy. Additionally, only the Upload and Download activities are supported for Threat Protection.

- (Optional) Select activities and constraints. After selecting an app, you can further narrow your policy by selecting specific activities and constraints. The Activities list is the union of activities supported by the app or categories you select. It’s possible not all activities are supported by all of your selected apps, categories, and object types.
Note
As part of file activity, a user can add a comment to a file in Microsoft Office 365 OneDrive. In OneDrive account, hover over a file and click See details > Activity. In Netskope, this activity translates to a post. Microsoft allows commenting for non-Microsoft Office file types only like .zip, .pdf, .txt, .png, .pem, and more. Netskope reports post activity for such file types. However, Microsoft does not allow commenting for .docx, xlsx, and .pptx file types. Due to this limitation from Microsoft, Netskope does not report post activity for such file types.

Click the  Activities icon > View activity support link to open the Activity Support dialog.

This dialog shows the app or category you’ve selected and the available activities. This is informational only.

Tip
Admins can configure a policy with a combination of different Activity Constraints. Contact Support to enable this feature in your account. To learn more: File Type Detection
- Click Add Criteria & Constraints to add more match criteria for the destinations. The criteria and constraints you can configure depends on the traffic type you selected.
- Activity Constraints: What users are allowed to do for a specified activity (e.g., allowing sharing only within the organization). Constraints are shown only for the activities that support each constraint. You can define constraint profiles in Policies > Constraint. To learn more: Constraint Profile.
- File Constraints: Specify the File Name or Extension, File Type, and File Size.
- CCI App Tag: This option is only applicable if Any Web Traffic or Category is selected.
- App Instance Tag: This option is only applicable if Any Web Traffic, Category, or Cloud App is selected. There are two predefined app instance tags: Sanctioned and Unsanctioned. The Untagged option matches app instances that Netskope identified but are not yet tagged.
- Service: For matching against specific TCP ports or ranges. To learn more: Service Profile.
- Destination Profile: Specify the destination profile.
- CCL: This option is only applicable when Category is selected. A CCI Level can be applied when certain app categories, like Application Suite, are chosen. CCI measures the enterprise readiness of the cloud apps taking into consideration their security, auditability, and business continuity. Each app is assigned a score of 0-100, and based on the score, placed into one of five cloud confidence levels: Excellent, High, Medium, Low, or Poor. CCI can be used as a matching criteria in the policy. For example, you can choose to not let users share content in cloud storage apps rated Medium or below.
- Destination Country: The country where queries are sent.

Profile & Action
To perform additional content inspection on the traffic, add a profile. The action you specify in this step is performed when the traffic criteria and profile are both matched.
- For Profile & Action, select the Action taken when a violation is detected. Select the action you would like to take such as Alert, Block, Quarantine, Forward to Proxy, and so on. Some actions allow you to choose a default template for the notification sent to the user when the policy detects a violation.
Note
Netskope matches a Real-time Protection policy with an SSL Do Not Decrypt policy when the Real-time Protection policy’s Action is Block, User Alert, Allow, or Alert.
Contact your sales team to enable policy matching when the Real-time Protection policy’s Action is Alert.
- Alert: Inspects the session and performs deep analytics but no action is taken. It will generate an alert under the Alert tab. The alert action allows the traffic.
Tip
Alert events are not generated for Real-time Protection Policies with the “Alert” action selected for “Browse” activity.
- Allow: All activities will be permitted on managed devices.
- Block: Blocks the specified app session if all criteria are matched. For example, if the policy is configured to block only a download activity for cloud storage, only the download will be blocked. All other activities will be permitted. You can specify a default block page or a custom block page to be displayed when a block action is taken. Block Template options include the following but you may see other templates in your set up that are unique to your account:
- Default Template: Default template for Block and User Alert which is available when the account is set up.
- No Notification (Mute): No notifications are displayed when this option is selected. Additionally, this option is available for all categories, apps, and instances.
- Block Template with URL: URL the user is redirected to automatically or after clicking the Stop Button. Admins can add this URL while designing the template. In addition, admins can add variable tags for the redirect URL(s).
- Block with Justification Box: Justification box option provides a text box within the notification window where the user can enter a justification message.
- Block with UA Action: User Alert action is configured with an option the user selects to “Proceed” or “Block” the activity.
Tip
Except the Default Template and No Notification (Mute) options noted above, all other other templates are created and maintained by account admins.
- Idle Timeout: Enter the amount of minutes to trigger a session timeout.
- Bypass: Bypasses the detection when the criteria are matched. For example, if you want to bypass all activities from being detected except for login and logout, then choose all the activities except Login Successful and Logout, and then set the action as Bypass.
- Redirect: Automatically redirect users to a specific URL using HTTP 307 headers. Note that this action is only applicable to native HTTP or decrypted HTTPS traffic. Non-decrypted traffic will skip the redirect and move to the next policy. In addition, Redirect is unavailable for DLP Content Inspection, Threat Protection, File Type Detection, and Activity Constraints. You can enter an exact URL (e.g.,
https://xyz.com) or a URL with variables from the Insert Variable menu (e.g.,https://xyz.com/{{x-cs-uri-path}}/{{cs-uri-query}}). URLs entered with a scheme (http://orhttps://) are treated as absolute URLs and redirect externally to that destination. URLs entered without a scheme (e.g.,xyz.comor/some/path) are treated as relative paths and are appended to the source (current) host instead of redirecting externally. To ensure an external redirect, always include the scheme in the URL. A maximum of 1,024 characters, including variables, is supported before variable substitution. After substitution, the URL is truncated at 8,192 characters. - User Alert: When a user alert action is chosen, you can specify a default user alert page or custom page to be displayed to the user as defined in the policy. The user justification page for a user alert action will have Proceed and Stop Action buttons. The Proceed button will allow the activity and generates an activity event with the user’s justification reason, whereas the Stop Action just blocks the activity. The user’s justification reason for the activity is cached for 30 minutes.
- Quarantine: If a user uploads a document that has a DLP violation, you can quarantine the file, which moves the file to a quarantine folder for you to review and take appropriate action. You can then choose to allow the file to be uploaded or block the file from being uploaded. This option is available only when DLP is included in a policy. Also the action can be taken only for the upload activity.
Note: This quarantine folder is configurable on Box, Dropbox, Egnyte, Google Drive, Microsoft 365 OneDrive & SharePoint running on Classic API Data Protection. This is not available on SaaS apps running on the Next Generation API Data Protection platform. It is important to note that Classic API Data Protection will reach end-of-life on June 1, 2027. To learn more, see Classic API Data Protection: End of Life Announcement and Migration Guide. - Encryption: You can encrypt files in the named instances of cloud apps that are sanctioned if it matches certain policy criteria. Encryption is available only when an app instance of a cloud app is chosen. To learn how to create an app instance, refer to App Instance Profile. The encryption action can be applied to an upload activity. If any other activity is chosen, like download, encryption will not show under the list of actions.
- Alert: Inspects the session and performs deep analytics but no action is taken. It will generate an alert under the Alert tab. The alert action allows the traffic.
- (Optional) If you select Block as the action, you can also choose to suppress alerts with the Don’t Generate Alerts option. When an alert is suppressed, application or page events are still generated.

Note
Netskope appliance versions 128.0.0 and older don’t support the Don’t Generate Alerts option. If this option is selected while using an older version of Netskope appliances, alerts will not be suppressed. In addition, using this option with firewall policies is not supported.
- Click Add Profile to add a DLP Profile or Threat Protection Profile to the policy for additional content inspection.
A DLP profile detects violations like PCI (which identifies credit card information). You can configure DLP profiles and rules in Policies > DLP.

A threat protection profile detects malware files and malicious sites. You can configure threat protection profiles in Settings > Threat Protection.
- (Optional) If you’re configuring a Threat Protection policy and chose a Block action, you can see the Block till benign verdict by dynamic threat analysis option. Select to block users from uploading or downloading a file until Netskope dynamic threat analysis provides a benign verdict. The analysis can take up to 10 minutes. To learn more: Creating a Threat Protection Policy for Patient Zero.

- (Optional) You may see the Set action for each profile checkbox. This option is visible based on your initial template selection. This is an optional feature to help you consolidate policies. If you have multiple DLP profiles in one policy, you can set an action for each profile.

- (Optional) The Continue policy evaluation after match checkbox is available if you selected Alert as the action for one or more DLP profiles. When this option is enabled, the Add Traffic Action option is unavailable. Note that this Alert and Continue functionality is also supported for Email DLP.
This feature allows the Netskope cloud to continue evaluating your policies after a policy match and detect additional DLP violations, instead of ending the evaluation after a match. If your policy includes multiple DLP profiles, this only applies to the profiles with the Alert action configured. When a match occurs for a profile with an action other than Alert, Netskope stops processing your policies.

Note
When the Continue policy evaluation after match option is enabled and multiple policy matches occur, the generated DLP incident lists all matched policies and DLP profiles. The generated alert for the transaction uses the last matched policy as the Alert Name and lists all matched policies in the Policy Name field. The Action is the last matched policy’s configured action. If all matched policies’ actions are Alert (and Continue policy evaluation after match), then the Action is listed as None.
- (Optional) The Add Traffic Action option allows you to consolidate a DLP policy and an access control (Cloud App Access, Web Access, or Private App Segment Access) policy that have the same traffic criteria. When the traffic criteria matches but the DLP profile does not, the traffic action will be taken.

Policy Name
- Enter a policy name.
Important
When creating policy names, only use alphanumeric characters and symbols such as underscores (
_), dashes (-), and square brackets ([]). You cannot use the greater than (>) and less than (<) symbols in policy names. - Select a Group for the policy.
- (Optional) Click Policy Description to enter a description.
- Configure the Email Notification:
Note
When multiple events (i.e., policy matches) occur within one minute, only one email notification is sent. The email notification will contain information for all the events that occurred in that minute.
- Select the notification frequency.
- Select who will receive the email notifications. You can choose to send notifications to users or admins. The Imported Custom Attribute option allows you to send notifications based on user information synced from the Active Directory. Note that the imported custom attribute must contain the email address value, and not a directory pointer or another user’s directory ID. The Selected Users option allows you to add the email addresses for specific users you want to notify.
- (Optional) Enter an email address that will appear as the sender in the email notification.
- Once finished, click Done to save your email notification setting and exit the window.

Status
- Click to Enable the policy.
- (Optional) Click Policy Schedule to enable a time-based policy schedule. To learn more: Time Based Policies. If you do not see this option, contact Support to enable it in your account.
If a policy schedule is configured, you will see a clock  icon beside the policy name in the list of policies on the Real-time Protection page. If a time range has expired, you will see a grayed out
  clock icon and policy name. The policy is still enabled but it requires your attention. In both cases, you can hover over the clock icon for details.
- Click Save in the upper right corner to save your new policy.